ASRock Mini Mini Q190D RAID Installation Guide - Page 9
Conigure Marvell RAID BIOS
 |
View all ASRock Mini Mini Q190D manuals
Add to My Manuals
Save this manual to your list of manuals |
Page 9 highlights
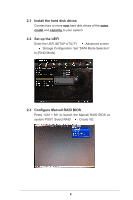
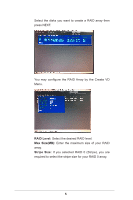
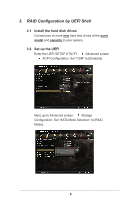
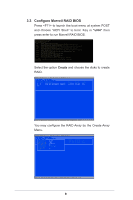
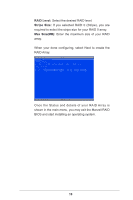
3.3 Conigure Marvell RAID BIOS Press to launch the boot menu at system POST and choose "UEFI Shell" to boot. Key in "ui64" then press enter to run Marvell RAID BIOS. EFI Shell version 2.31 [4.653] Current running mode 1.1.2 Device mapping table fs0 :CDRom - Alias cd10b65535a1 blk0 PciRoot(0x0)/Pci(0x11,0x0)/Sata(0x1,0x0)/CDROM(0x1,0x86e,0x1aafd8) fs1 :Removable HardDisk - Alias hd14c0b blk0 PciRoot(0x0)/Pci(0x13,0x2)/USB(0x2,0x0)/HD(1,MBR,0xea58cbf6,0x3f,0x3baf81) blk0 :CDRom - Alias cd10b65535a1 fs0 PciRoot(0x0)/Pci(0x11,0x0)/Sata(0x1,0x0)/CDROM(0x1,0x86e,0x1aafd8) blk1 :Removable HardDisk - Alias hd14c0b fs1 PciRoot(0x0)/Pci(0x13,0x2)/USB(0x2,0x0)/HD(1,MBR,0xea58cbf6,0x3f,0x3baf81) blk2 :CDRom - Alias (null) PciRoot(0x0)/Pci(0x11,0x0)/Sata(0x1,0x0)/CDROM(0x0,0x86c,0x8) blk3 :BlockDevice - Alias (null) PciRoot(0x0)/Pci(0x11,0x0)/Sata(0x1,0x0) blk4 :Removable BlockDevice - Alias (null) PciRoot(0x0)/Pci(0x13,0x2)/USB(0x2,0x0) blk5 :Removable BlockDevice - Alias (null) PciRoot(0x0)/Pci(0x15,0x3)/Pci(0x0,0x0)/Scsi(0x0,0x0) Press ESC in 4 seconds to skip startup.nsh, any other key to continue. Shell> ui64_ Select the option Create and choose the disks to create RAID. ENTER/SPACE:Select, ESC:Back/Exit, F7:Wipe Disk [Create] [Delete] Select free disks to create ID Port Disk Name 0 0 SATA:WDC WD7500BPVT-80HXZT3 1 0 SATA:WDC WD7500BPVT-80HXZT3 Next Size 750.0GB 750.0GB Speed 3.0Gbps 3.0Gbps Status Free Free Marvell EFI RAID Configuration (c) 2010 Marvell Technology. Ltd. You may conigure the RAID Array by the Create Array Menu. ENTER/SPACE:Select, ESC:Back/Exit, F7:Wipe Disk [Create] [Delete] Select free disks to create Create Array * RAID Level : RAID0 * Stripe Size : 64KB Max Size(MB) : 1500144 Quick Init : No Cache Mode : Write Back Array Name : Disks ID :01 Next Speed 3 750.0GB 3 750.0GB Status 3.0Gbps 3.0Gbps Free Free Marvell EFI RAID Configuration (c) 2010 Marvell Technology. Ltd. 9
-
 1
1 -
2
-
3
-
 4
4 -
 5
5 -
 6
6 -
 7
7 -
 8
8 -
 9
9 -
 10
10
 |
 |
