ASRock P4i45G User Manual - Page 18
BIOS Setup - main
 |
View all ASRock P4i45G manuals
Add to My Manuals
Save this manual to your list of manuals |
Page 18 highlights
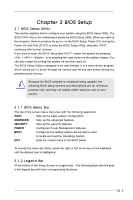
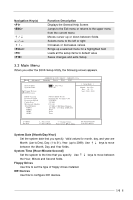
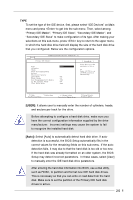
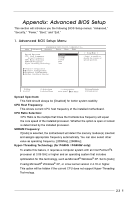
Chapter 3 BIOS Setup 3.1 BIOS Setup Utility This section explains how to configure your system using the BIOS Setup Utility. The BIOS FWH chip on the motherboard stores the BIOS Setup Utility. When you start up the computer, there is a chance for you to run the BIOS Setup. Press during the Power-On-Self-Test (POST) to enter the BIOS Setup Utility, otherwise, POST continues with its test routines. If you wish to enter the BIOS Setup after POST, restart the system by pressing + + , or by pressing the reset button on the system chassis. You can also restart by turning the system off and then back on. The BIOS Setup Utility is designed to be user-friendly. It is a menu-driven program, which allows you to scroll through its various sub-menus and select among the predetermined choices. Because the BIOS software is constantly being updated, the following BIOS setup screens and descriptions are for reference purpose only, and may not exactly match what you see on your screen. 3.1.1 BIOS Menu Bar The top of the screen has a menu bar with the following selections: MAIN Sets up the basic system configuration ADVANCED Sets up the advanced features SECURITY Sets up the security features POWER Configures Power Management features BOOT Configures the default system device that is used to locate and load the Operating System EXIT Exits the current menu or the BIOS Setup To access the menu bar items, press the right or left arrow key on the keyboard until the desired item is highlighted. 3.1.2 Legend Bar At the bottom of the Setup Screen is a legend bar. The following table lists the keys in the legend bar with their corresponding functions. 18
-
 1
1 -
2
-
3
-
4
-
5
-
6
-
7
-
8
-
9
-
10
-
11
-
12
-
 13
13 -
 14
14 -
 15
15 -
 16
16 -
 17
17 -
 18
18 -
 19
19 -
 20
20 -
 21
21 -
 22
22 -
 23
23 -
24
-
25
-
26
-
27
-
28
-
29
 |
 |