| Section |
Page |
| Aastra DT690/DT692 |
1 |
| Cordless Phone for MX-ONE™ |
1 |
| USER GUIDE |
1 |
| Copyright |
2 |
| 1 Introduction |
3 |
| 1.1 About this User Guide |
3 |
| 1.2 Preparing for Use |
3 |
| 1.3 IPEI and IPDI Codes |
3 |
| 1. Dial *#06# when the phone is in idle mode. |
4 |
| 2. Press Back to return to idle mode. |
4 |
| 1.4 Software Version |
4 |
| 1. Dial *#34# when the phone is in idle mode. |
4 |
| 2. Select Software and press Select. |
4 |
| 3. Press Back until you return to idle mode. |
4 |
| 1.5 Accessibility and Voice Quality |
5 |
| 1.5.1 Operating area |
5 |
| 1.5.2 Out of Range |
5 |
| 1.5.3 Standby Time |
5 |
| 2 Safety Instructions |
6 |
| 2.1 Precautions |
6 |
| 2.1.1 Frequency Range |
8 |
| 2.2 Regulatory Compliance Statements (EU and EFTA only) |
8 |
| 2.3 Regulatory Compliance Statements (USA and Canada only) |
8 |
| 2.3.1 FCC Compliance Statements |
9 |
| 2.3.2 Exposure to Radio Frequency Signals |
9 |
| 2.3.3 Information to User |
10 |
| 2.3.4 IC Requirements for Canada |
10 |
| 2.4 Bluetooth Qualified Design ID |
11 |
| 2.5 Environmental Requirements |
12 |
| 2.5.1 Cordless Telephone |
12 |
| 2.5.2 Battery |
13 |
| 2.5.3 Disposal of Telephone and Batteries |
14 |
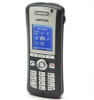
| 3 DT690 and DT692 Description |
15 |
| Figure 1: Overview of the DT690/DT692 cordless phone |
15 |
| 3.1 Functions and Accessories |
16 |
| Table 1 Functions |
16 |
| * This is a system dependent feature. |
17 |
| ** This feature requires configuration in WinPDM or CPDM3. |
17 |
| Table 2 Accessories |
17 |
| 3.1.1 Accessories |
18 |
| Case |
18 |
| Antenna |
18 |
| Loudspeaker |
18 |
| Microphone |
18 |
| Clips |
18 |
| Battery |
18 |
| 3.2 Display Information |
18 |
| Figure 2: Example of a display in idle mode |
18 |
| 3.2.1 Soft keys |
19 |
| Figure 3: Soft keys “Call” and “List” |
19 |
| 3.2.2 System Connection Messages |
21 |
| 3.2.3 Display Icons |
22 |
| 3.2.4 Menu Tabs |
24 |
| 3.3 Menu Structure |
25 |
| Figure 4: The main menu with the Messaging icon selected |
25 |
| 3.3.1 Calls Menu |
26 |
| Figure 5: Calls Menu |
26 |
| 3.3.2 Contacts Menu |
27 |
| Figure 6: Contacts Menu |
27 |
| 3.3.3 Profile Menu |
27 |
| Figure 7: Profile Menu |
27 |
| 3.3.4 Messaging Menu |
28 |
| Figure 8: Messaging Menu |
28 |
| 3.3.5 My Favourites Menu |
29 |
| Figure 9: My favourites Menu |
29 |
| 3.3.6 Short cuts Menu |
29 |
| Figure 10: Short cuts Menu |
29 |
| 3.3.7 Connection Menu |
30 |
| Figure 11: Connection Menu |
30 |
| 3.3.8 Settings Menu |
31 |
| Figure 12: Settings Menu |
31 |
| 3.3.9 In Call Menu |
32 |
| Figure 13: In call Menu |
32 |
| 3.3.10 Customizing the Menu Structure |
33 |
| 3.3.11 Additional In Call Functions |
33 |
| 3.4 Tones |
34 |
| 3.5 Indicators |
35 |
| 3.5.1 Phone Indicator |
35 |
| Table 3 Cordless Phone Indicator |
35 |
| 3.5.2 Desk PDM Charger Indicator |
35 |
| Table 4 Desk PDM Charger Indicator |
35 |
| 4 Switching On and Off |
37 |
| 4.1 Switching On |
37 |
| 1. Press and hold . |
37 |
| 2. Press Yes to confirm. |
37 |
| 4.2 Switching Off |
37 |
| 1. In idle mode, press and hold . |
37 |
| 2. Press Yes to confirm. |
37 |
| 5 Free Seating |
38 |
| 5.1 Logging On |
38 |
| 1. Press *11*. |
38 |
| 2. Dial the authorization code * extension number # and press . |
38 |
| 3. Press to finish the procedure. |
38 |
| 5.2 Logging Off |
38 |
| 1. Press #11# and then . |
38 |
| 2. Press to finish the procedure. |
38 |
| 6 Incoming Calls |
39 |
| 6.1 Answering Calls |
39 |
| 6.1.1 Call Pick-up |
40 |
| 1. Call the ringing extension and press . |
40 |
| 2. When you hear a busy tone, press 8. |
40 |
| 6.1.2 Mute Ring Signal |
40 |
| 1. Press to suppress the ringing. |
40 |
| 2. Press to answer the call. |
40 |
| 6.1.3 Silent Ringing |
40 |
| 6.2 Rejecting a Call |
40 |
| 6.3 Ending a Call |
40 |
| 6.4 Parallel Ringing |
41 |
| 6.4.1 Disabling Parallel Ringing Temporarily |
41 |
| 1. Press *21* |
41 |
| 2. Dial the extension number, press # and press . |
41 |
| 3. Press to finish the procedure. |
41 |
| 6.4.2 Restoring Parallel Ringing |
41 |
| 1. Press #21#. |
41 |
| 2. Press . |
41 |
| 3. Press to finish the procedure. |
41 |
| 7 Outgoing Calls |
43 |
| 7.1 Calling |
43 |
| 1. Dial the number and press or Call. |
43 |
| 2. If needed, press Clear to erase and edit the number. |
43 |
| 7.1.1 Dialing Using a Pre-programmed Hot Key, Soft Key or Multifunctional button |
44 |
| Press the pre-programmed hot key, soft key or multifunctional button. |
44 |
| 7.1.2 Dialing a Number From the Call List |
44 |
| 1. Press . |
44 |
| 2. Step with the navigation keys in the call list and select a number to dial. If you wish to edit the number before calling, do the following: |
44 |
| a) Press More. |
44 |
| b) Select Edit number, press Select, and make the desired changes. |
44 |
| 3. Press or Call. |
44 |
| 7.1.3 Dialing From Contacts |
44 |
| 1. Press Menu, select , and press Select. |
44 |
| 2. Select Call contact, and press Select. |
45 |
| 3. Select a contact from the list, or search a name or number by enter characters in the Search field, and press or Call. |
45 |
| 7.1.4 Dialing a Number from a Text Message |
45 |
| 7.1.5 Loudspeaking (Handsfree) |
45 |
| 1. Press . |
45 |
| 2. You are connected to the call via the loudspeaker and microphone. |
45 |
| 7.2 Number Presentation Restriction |
45 |
| 1. Press *42# and press . |
45 |
| 2. Dial the number. |
45 |
| 7.3 Last External Number Re-dial |
46 |
| 7.4 When You Receive a Busy Tone |
46 |
| 7.4.1 Callback |
46 |
| 7.4.1.1 Ordering Callback for an Extension |
46 |
| 1. Press More. |
46 |
| 2. Select Callback, and press Select. |
46 |
| 3. Press and wait until the phone alerts. |
46 |
| 4. Press to answer when you are called back. |
47 |
| 7.4.1.2 Ordering Callback for an External Number |
47 |
| 1. Press 6#. |
47 |
| 2. Press to finish the procedure. |
47 |
| 3. Press . |
47 |
| 7.4.1.3 Canceling a Single callback |
47 |
| 1. Press #37*. |
47 |
| 2. Dial the extension number and press #. |
47 |
| 3. Press . |
47 |
| 4. Press to finish the procedure. |
47 |
| 7.4.1.4 Canceling All Callbacks |
48 |
| 1. Press #37#. |
48 |
| 2. Press . |
48 |
| 3. Press to finish the procedure. |
48 |
| 7.4.2 Ordering Call Waiting |
48 |
| 1. Press More, select Call Waiting and press Select. |
48 |
| 2. Keep the phone off hook but close the menu. |
48 |
| 3. When the called extension or external line becomes free, it will be called automatically. |
48 |
| 7.4.3 Intrusion |
48 |
| 7.4.3.1 Ordering Intrusion On a Busy Extension |
49 |
| 1. Press 4 when you hear a busy tone. |
49 |
| 7.5 Bypass |
49 |
| 1. Press *60*. |
49 |
| 2. Dial the extension number and press # and . |
49 |
| 7.6 Speed Dialing |
49 |
| 1. Dial the common speed dialing number. |
49 |
| 2. Press to make the call. |
49 |
| 7.7 Voice Dialing |
50 |
| 7.8 Authorization Codes |
50 |
| 7.8.1 Common Authorization Code |
50 |
| 7.8.1.1 Opening the Extension For a Single Call |
50 |
| 1. Press *72*. |
50 |
| 2. Enter the authorization code, press # and . |
50 |
| 3. Dial the digit(s) to get an external line. |
50 |
| 4. Dial the external number. |
50 |
| 7.8.1.2 Opening the Extension For Several Calls |
50 |
| 1. Press #73*. |
50 |
| 2. Enter the authorization code, press # and . |
51 |
| 3. Press to finish the procedure. |
51 |
| 7.8.1.3 Locking the Extension |
51 |
| 1. Press *73*. |
51 |
| 2. Enter the authorization code, press # and . |
51 |
| 3. Press to finish the procedure. |
51 |
| 7.8.2 Individual Authorization Code |
51 |
| 7.8.2.1 Locking the Phone |
51 |
| 1. Press *76*. |
51 |
| 2. Enter the authorization code, press # and . |
51 |
| 3. Press to finish the procedure. |
51 |
| 7.8.2.2 Making Calls While the Phone Is Locked |
51 |
| 1. Press *75*. |
51 |
| 2. Enter the authorization code, press # and . |
51 |
| 3. Dial the digits to get an external line and the external number. |
52 |
| 7.8.2.3 Opening the Phone |
52 |
| 1. Press #76*. |
52 |
| 2. Enter the authorization code, press # and . |
52 |
| 3. Press to finish the procedure. |
52 |
| 7.8.2.4 Assigning Own the Individual Authorization Code to Other Phone |
52 |
| 1. Press *75*. |
52 |
| 2. Enter the authorization code and press *. |
52 |
| 3. Dial your own extension number, press # and . |
52 |
| 4. Dial the digits to get an external line and the external number. |
52 |
| 7.8.2.5 Changing the Individual Authorization Code |
52 |
| 1. Press *74*. |
52 |
| 2. Enter the old authorization code and press *. |
52 |
| 3. Enter the new authorization code, press # and . |
52 |
| 4. Press to finish the procedure. |
52 |
| 8 Call List |
53 |
| 8.1 Opening the Call List |
53 |
| 1. Press Menu, select , and press Select |
53 |
| 2. Select Call list, and press Select. |
53 |
| 3. Scroll the list to select a number to call or edit. |
53 |
| 4. Select More or Call. |
53 |
| 5. Press Back to leave the call list. |
53 |
| 8.2 Saving a Number in the Call List |
54 |
| 1. Press Menu, select , and press Select. |
54 |
| 2. Select Call list, and press Select. |
54 |
| 3. Scroll the list to select a number to edit. |
54 |
| 4. Select More and Edit number. |
54 |
| 5. Press Save number, specify the type of number, and press Select. |
54 |
| 6. Press Add, enter the desired name and press OK. |
54 |
| 7. Make any other necessary settings and press Save and then press Back twice to leave the call list. |
54 |
| 8.3 Deleting a Number From the Call List |
54 |
| 1. Press Menu, select , and press Select. |
54 |
| 2. Select Call list, and press Select. |
54 |
| 3. Scroll the list to select a number and press More. |
54 |
| 4. Select Delete, and press Select to remove the selected number. |
54 |
| 5. Press Yes to confirm. |
54 |
| 9 Contacts |
55 |
| Local phonebook |
55 |
| Company phonebook |
55 |
| Central phonebook (optional) |
55 |
| 9.1 Dialing a Contact from the Local or Company Phonebook |
55 |
| 1. Press Menu, select , and press Select. |
55 |
| 2. Select Call contact, and press Select. |
55 |
| 3. Select a contact from the list, or search a name or number by entering characters in the Search field, and press Call. |
55 |
| 9.2 Dialing a Contact from the Central Phonebook (Optional) |
56 |
| 9.2.1 Searching by Name |
56 |
| 1. Press Menu, select , and press Select. |
56 |
| 2. Select Central Phonebook, and press Select. |
56 |
| 3. Select Search by name, and press Select. |
56 |
| 4. Enter the first or last name and press Search. |
56 |
| 5. Press or Call. |
56 |
| 9.2.2 Searching by Number |
56 |
| 1. Press Menu, select , and press Select. |
56 |
| 2. Select Central Phonebook, and press Select. |
56 |
| 3. Select Search by number, and press Select. |
56 |
| 4. Enter the first digit in the number and press Search. |
56 |
| 5. Select the number to call from the result list and press or Call to make the call. |
56 |
| 9.2.2.1 Adding a Contact from the Central Phonebook Search |
56 |
| 1. Press More. |
56 |
| 2. Select Add to cont. and press Select. |
56 |
| 3. Press Save. |
56 |
| 9.2.3 Viewing Last Search Result |
57 |
| 1. Press Menu, select , and press Select. |
57 |
| 2. Select Central Phonebook, and press Select. |
57 |
| 3. Select Last Result, and press Select. |
57 |
| 9.3 Adding a Name and a Number |
57 |
| 1. Press Menu, select , and press Select. |
57 |
| 2. Select Add contact and press Select. |
57 |
| 3. Select New or From call list and press Select. |
57 |
| a) Press Add, enter the name, and press OK. |
57 |
| b) Select Name, Work number, Mobile number, or Other number, and press Add. It is possible to a tone “T” or a pause “P” by pressing 5 times or 7 times respectively. |
57 |
| c) Enter the number and press OK. |
57 |
| d) Press Save. |
57 |
| a) Navigate to the desired number in the call list and press Add. |
57 |
| b) Select Work number, Mobile number or Other number, and press Select. |
57 |
| c) Select Name and press Add. |
57 |
| d) Enter the name of the contact and press OK to save the entry. |
57 |
| e) Press Save. |
57 |
| 9.4 Changing a Name and a Number |
58 |
| 1. Press Menu, select , and press Select. |
58 |
| 2. Select Edit contact and press Select. |
58 |
| 3. Select the contact to change, and press Edit. |
58 |
| 4. Select what to edit for this contact (Name, Work number, Mobile number or Other number) and press Edit again. |
58 |
| 5. Make the changes, and press OK. |
58 |
| 6. Press Save to save the changes. |
58 |
| 9.5 Deleting a Name and a Number |
58 |
| 1. Press Menu, select , and press Select. |
58 |
| 2. Select Delete contact and press Select. |
58 |
| 3. Press Delete to delete the entry and confirm deletion by pressing Yes. |
58 |
| 9.6 Writing Text and Numbers |
59 |
| 1. Press 7777 for S. |
59 |
| 2. Press 6 for m. |
59 |
| 3. Press 444 for i. |
59 |
| 4. Press 8 for t. |
59 |
| 5. Press 44 for h. |
59 |
| 6. Press OK when the name is complete. |
59 |
| 9.6.1 Number Input Mode |
59 |
| 9.6.2 Text Input Mode |
59 |
| 9.6.3 Special Characters |
60 |
| Figure 14: Available characters |
60 |
| 10 Shortcuts |
61 |
| 10.1 Soft Keys |
61 |
| 1. Press Menu, select , and press Select. |
61 |
| 2. Select Soft keys and press Select. |
61 |
| 3. Select Left, Middle, or Right, and press Select. |
61 |
| 4. Select Name and press Select. |
61 |
| 5. Select Function and press Select. |
61 |
| 6. Select a function from the list, and press Select. |
61 |
| 7. Press Back to confirm, or enter any required information, such as a phone number, and press OK to confirm. |
61 |
| 8. Select Value (if available for the selected function), press Select, enter a value and press OK. |
61 |
| 9. Select Control question, and press Select. |
61 |
| 10. Select Off or On, and press Select and then Back. |
61 |
| 11. Press Save. |
61 |
| 10.2 Hot Keys |
62 |
| 1. Press Menu, select , and press Select. |
62 |
| 2. Select Hot keys and press Select. |
62 |
| 3. Select a number (0 or 2-9) in the list and press Select. |
62 |
| 4. Select Function and press Select. |
62 |
| 5. Select a function from the list, and press Select. |
62 |
| 6. Press Back to confirm, or enter any required information, such as a phone number, and press OK to confirm. |
62 |
| 7. Select Value (only available for some functions), press Select enter a value and press OK. |
62 |
| 8. Select Control question, and press Select. |
62 |
| 9. Select Off or On, and press Select and then Back. |
62 |
| 10. Press Save to save the setting. |
62 |
| 10.3 Navigation Keys |
62 |
| 1. Press Menu, select , and press Select. |
62 |
| 2. Select Navigation keys and press Select. |
62 |
| 3. Select Up, Down, Left, or Right, and press Select. |
62 |
| 4. Select Function and press Select. |
63 |
| 5. Select a function from the list, and press Select. |
63 |
| 6. Press Back to confirm, or enter any required information, such as a phone number, and press OK to confirm. |
63 |
| 7. Select Value (if available for the selected function), press Select enter a value and press OK. |
63 |
| 8. Select Control question and press Select. |
63 |
| 9. Select Off or On, and press Select and then Back. |
63 |
| 10. Press Save. |
63 |
| 10.4 Multifunction Button |
63 |
| 1. Press Menu, select , and press Select. |
63 |
| 2. Select Multifunction button, and press Select. |
63 |
| 3. Select Long press or Multi press, and press Select. |
63 |
| 4. Select Function and press Select. |
63 |
| 5. Select a function from the list, and press Select. |
63 |
| 6. Press Back to confirm, or enter any required information, such as a phone number, and press OK to confirm. |
63 |
| 7. Select Value (if available for the selected function), press Select enter a value and press OK. |
64 |
| 8. Select Control question, and press Select. |
64 |
| 9. Select Off or On, and press Select and then Back. |
64 |
| 10. Press Save. |
64 |
| 11 Favorites |
65 |
| 11.1 Adding a Favorite |
65 |
| 1. Press Menu, select , and press Select. |
65 |
| 2. Select Edit favourites, and press Select. |
65 |
| 3. Select one of the menu options and press Change. |
65 |
| 4. Press Back to save the setting. |
65 |
| 5. Press Back twice to return to the idle menu. |
65 |
| 11.2 Deleting a Favorite |
65 |
| 1. Press Menu, select , and press Select. |
65 |
| 2. Select Edit favourites, and press Select. |
65 |
| 3. Deselect the menu option you wish to delete, and press Change. |
65 |
| 4. Press Back to save the setting. |
65 |
| 5. Press Back twice to return to the idle menu. |
65 |
| 12 During Calls |
66 |
| 12.1 Volume Control |
66 |
| 12.2 Loudspeaking (Handsfree) |
66 |
| 12.3 Muting the Microphone |
66 |
| 1. Press More, select Microphone off, and press Select. |
66 |
| 1. Press More, select Microphone on, and press Select. |
67 |
| 12.4 Opening Contacts During Call |
67 |
| 1. Press More. |
67 |
| 2. Select Contacts, and press Select. |
67 |
| 3. Select Call contact to search a contact in the local or company phonebook. Or select Central Phonebook to search a contact in the central phonebook. |
67 |
| 4. Press Select. |
67 |
| 5. Select or search a contact. |
67 |
| 12.5 Open messaging during a call |
67 |
| 1. Press the soft key More during the call. |
67 |
| 2. Select Messaging. |
67 |
| 12.6 Inquiry |
68 |
| 1. Press More during the call. |
68 |
| 2. Select New call and press Select. |
68 |
| 3. Dial the third party's phone number and press . |
68 |
| 4. When the third party answers, it is possible to switch between the calls (refer back), transfer the call, create a conference, and end one of the calls. |
68 |
| 12.6.1 Ending Inquiry Call |
68 |
| 1. Press More during the call. |
68 |
| 2. Select End call and press Select. |
68 |
| 12.6.2 Refer Back |
68 |
| 1. Press More, select Switch and press Select. |
68 |
| 12.7 Transfer |
69 |
| 1. Press More, select New call and press Select. |
69 |
| 2. Dial the third party and press . |
69 |
| 3. Press More, select Transfer, and press Select. |
69 |
| 12.8 Emergency call |
69 |
| 12.9 Blind Transfer |
69 |
| 1. Press More, select Transf. to new and press Select. |
69 |
| 2. Dial the third party, and press . |
70 |
| 12.10 Call Parking (On Hold) |
70 |
| 1. Press R. |
70 |
| 12.10.1 Resuming a Call |
70 |
| 1. Press within 30 seconds. |
70 |
| 12.10.2 Resuming a Call on Another Extension |
70 |
| 1. Call the extension where the call was put on hold and press . |
70 |
| 2. Press 8. |
70 |
| 12.11 Answering a Call Waiting Call |
70 |
| 12.11.1 Putting the Ongoing Call On Hold |
71 |
| 1. Press R. |
71 |
| 2. Press to finish the call. |
71 |
| 12.11.2 Terminating the Ongoing Call |
71 |
| 1. Press to finish the ongoing call. |
71 |
| 2. Press to answer the new call. |
71 |
| 12.12 Conference |
71 |
| 1. Press More, select New Call, and press Select. |
71 |
| 2. Dial the number, and press . |
72 |
| 3. Press More, select Conference and press Select. |
72 |
| 4. Repeat the procedure to add more conference members. |
72 |
| 12.13 Dialing During a Connected Call |
72 |
| 1. Press 9. |
72 |
| 2. Dial the required digits. |
72 |
| 1. Press More, select DTMF and press Select. |
72 |
| 2. Dial the required digits. |
72 |
| 13 Call Forwarding |
73 |
| 13.1 Diversion from Call Services Menu |
73 |
| 13.1.1 Ordering Diversion of Incoming Calls |
73 |
| 1. Press Menu, select and press Select. |
73 |
| 2. Step to Call services, and press Select. |
73 |
| 3. Select Divert calls and press Select. |
73 |
| 4. Select Internal, External, No reply or When busy, and press Select. |
73 |
| 5. Select Activate and press Select. |
73 |
| 6. Dial the number (maximum 24 digits) to divert your calls to and press OK. You can also press to select a number from the call list. |
73 |
| 7. Press to finish the procedure. |
73 |
| 13.1.2 Canceling Diversion |
74 |
| 1. Press Menu, select and press Select. |
74 |
| 2. Step to Call services, and press Select. |
74 |
| 3. Select Divert calls and press Select. |
74 |
| 4. Select Internal, External, No reply or When busy, and press Select. |
74 |
| 5. Select Deactivate. |
74 |
| 6. Press to finish the procedure. |
74 |
| 13.2 Internal Follow-me |
74 |
| 13.2.1 Ordering Internal Follow-me |
74 |
| 1. Press *21*. |
74 |
| 2. Dial the answering position number and press # and . |
74 |
| 3. Press to finish the procedure. |
74 |
| 13.2.2 Cancelling Internal Follow-me |
74 |
| 1. Press #21#. |
74 |
| 2. Press . |
75 |
| 3. Press to finish the procedure. |
75 |
| 13.2.3 Remote Programming of Follow-me |
75 |
| 1. Press *21* extension number to divert * internal number of follow-me position # |
75 |
| 2. Press and wait for the call timer to start in the display. |
75 |
| 3. Press . |
75 |
| 1. Press #21* diverted extension number # |
75 |
| 2. Press and wait for the call timer to start in the display. |
75 |
| 3. Press . |
75 |
| 13.3 External Follow-me |
75 |
| 13.3.1 Ordering External Follow-me |
75 |
| 1. Press *22#. |
75 |
| 2. Dial the digit or digits to get a line, and enter the external number. |
76 |
| 3. Press # and . |
76 |
| 4. Press to finish the procedure. |
76 |
| 13.3.2 Cancelling External Follow-me |
76 |
| 1. Press #22#. |
76 |
| 2. Press . |
76 |
| 3. Press to finish the procedure. |
76 |
| 13.3.3 Remote Programming of External Follow-Me |
76 |
| 1. Press *22* extension number to divert # |
76 |
| 2. Press route access code and the external number # |
76 |
| 3. Press and wait for the call timer to start in the display. |
76 |
| 4. Press . |
76 |
| 1. Press #22* diverted extension number # |
76 |
| 2. Press and wait for the call timer to start in the display. |
76 |
| 3. Press . |
76 |
| 13.4 Personal Number |
77 |
| 13.4.1 Activating or Changing Personal Number From Your Office Phone |
77 |
| 1. Press *10*. |
77 |
| 2. Enter the search profile digit (1-5). |
77 |
| 3. Press # and . |
77 |
| 4. Press to finish the procedure. |
77 |
| 13.4.2 Cancelling Personal Number From Your Office Phone |
78 |
| 1. Press #10#. |
78 |
| 2. Press . |
78 |
| 3. Press to finish the procedure. |
78 |
| 13.4.3 Activating or Changing Personal Number From an External Phone |
78 |
| 1. Call the DISA function at your office. |
78 |
| 2. Press *75*. |
78 |
| 3. Enter the authorization code and press *. |
78 |
| 4. Dial your own extension number and press #. |
78 |
| 5. Press *10*. |
78 |
| 6. Dial your own extension number and press *. |
78 |
| 7. Enter the search profile number, (1-5). |
78 |
| 8. Press # and . |
78 |
| 13.4.4 Cancelling From External Phone |
79 |
| 1. Call the DISA function at your office. |
79 |
| 2. Press *75*. |
79 |
| 3. Enter the authorization code and press *. |
79 |
| 4. Dial your own extension number and press #. |
79 |
| 5. Press #10*. |
79 |
| 6. Dial your own extension number and press #. |
79 |
| 7. Press . |
79 |
| 13.4.5 Creating and Using Search Profiles |
79 |
| Table 5 Profile 1 - In office |
80 |
| Table 6 Profile 2 - At home |
80 |
| 13.5 Settings Form For Search Profiles |
81 |
| Table 7 Profile 1 - ______________ |
81 |
| Table 8 Profile 2- ______________ |
81 |
| Table 9 Profile 3- ______________ |
81 |
| Table 10 Profile 4 - ______________ |
82 |
| Table 11 Profile 5 - ______________ |
82 |
| 13.6 Remote Programming of Diversion |
82 |
| 13.6.1 Remote Programming of Direct Diversion |
82 |
| 1. Press *21* extension number to divert * # |
83 |
| 2. Press and wait for the call timer to start in the display. |
83 |
| 3. Press . |
83 |
| 1. Press #21* diverted extension number # |
83 |
| 2. Press and wait for the call timer to start in the display. |
83 |
| 3. Press . |
83 |
| 13.6.2 Remote Programming of Diversion on No Answer |
83 |
| 1. Press *211* extension number to divert # |
83 |
| 2. Press and wait for the call timer to start in the display. |
83 |
| 3. Press . |
83 |
| 1. Press #211* diverted extension number # |
83 |
| 2. Press and wait for the call timer to start in the display. |
83 |
| 3. Press . |
83 |
| 13.6.3 Remote Programming of Diversion on Busy |
83 |
| 1. Press *212* extension number to divert # |
84 |
| 2. Press and wait for the call timer to start in the display. |
84 |
| 3. Press . |
84 |
| 1. Press #212* diverted extension number # |
84 |
| 2. Press and wait for the call timer to start in the display. |
84 |
| 3. Press . |
84 |
| 14 Absence Information (Optional) |
85 |
| 14.1 Ordering Absence Information For Your Extension |
85 |
| 1. Press Menu, select , and press Select. |
85 |
| 2. Select Call services, and press Select. |
85 |
| 3. Select Absence and press Select. |
85 |
| 4. Select an absence reason, and press Select. |
85 |
| 5. Depending on the selected option, enter date (MMDD) or time (HHMM), and press OK. |
85 |
| 6. When the call timer starts in the display, press to finish the procedure. |
85 |
| 1. Press *23*. |
85 |
| 2. Enter the absence code (0-9) and, if requested, enter time or date of return preceded by *. |
86 |
| 3. Press # followed by and . |
86 |
| 14.2 Cancelling Absence Information For Your Extension |
86 |
| 1. Press Menu, select , and press Select. |
86 |
| 2. Select Call services, and press Select. |
86 |
| 3. Select Absence and press Select. |
86 |
| 4. Select Deactivate and press Select. |
86 |
| 5. Press to finish the procedure. |
86 |
| 1. Press #23#. |
86 |
| 2. Press and . |
86 |
| 14.3 Ordering Absence Information For Another Extension |
86 |
| 1. Press *230*. |
86 |
| 2. Dial the extension number and press *. |
86 |
| 3. Enter the absence code (0-9). |
86 |
| 4. Press * and enter the date or time for when the other person will return. |
87 |
| 5. Press # and . |
87 |
| 6. Press to finish the procedure. |
87 |
| 14.4 Cancelling Absence Information For Another Extension |
87 |
| 1. Press #230*. |
87 |
| 2. Dial the extension number and press # and . |
87 |
| 3. Press to finish the procedure. |
87 |
| 15 Messages |
88 |
| 15.1 Text Messages (SMS) |
88 |
| 15.1.1 Receiving a Message |
88 |
| 1. Press Yes to open the mail inbox (or press No if you want to open the message later. The message will be stored in the inbox in both cases.) The text message appears in the display. |
88 |
| 2. When you have read the message, several options are available. |
88 |
| 1. Press Menu, select , and press Select. |
89 |
| 2. Select Inbox, and press Select. |
89 |
| 3. Select which message to view and press View. |
89 |
| 4. Press Close to close the message. |
89 |
| 15.1.1.1 Replying to a Message |
89 |
| 1. Press Menu, select , and press Select. |
89 |
| 2. Select Inbox, and press Select. |
89 |
| 3. Select which message to reply to and press View. |
89 |
| 4. Select Reply. |
89 |
| 5. Write the message and press Send. |
89 |
| 15.1.1.2 Deleting a Message |
89 |
| 1. Press Menu, select , and press Select. |
89 |
| 2. Select Inbox, and press Select. |
89 |
| 3. Select which message to delete and press More. |
89 |
| 4. Select Delete or Delete all, and press Select. |
89 |
| 5. Press Yes to confirm. |
90 |
| 15.1.1.3 Calling the Sender of a Message |
90 |
| 1. Press Menu, select , and press Select. |
90 |
| 2. Select Inbox, and press Select. |
90 |
| 3. Select which message to view, and press View. |
90 |
| 4. Select More, then Call sender, and press Select. |
90 |
| 15.1.1.4 Calling a Phone Number Included In a Message |
90 |
| 1. Press Menu select , and press Select. |
90 |
| 2. Select Inbox, and press Select. |
90 |
| 3. Select a message, and press View. |
90 |
| 4. Select More, then Call no. in text, and press Select. |
90 |
| 5. Press Call. |
90 |
| 15.1.1.5 Saving a Number Included In a Message |
90 |
| 1. Press Menu, select , and press Select. |
90 |
| 2. Select Inbox, and press Select. |
90 |
| 3. Select a message, and press View. |
90 |
| 4. Select More, then Save number, and press Select. |
90 |
| 5. Select Work number, Mobile number or Other number, and press Select. |
90 |
| 6. Select Name, and press Add. |
90 |
| 7. Enter a name and press OK. |
90 |
| 8. Press Back. |
91 |
| 15.1.2 Writing and Sending a Message |
91 |
| 1. Press Menu, select , and press Select. |
91 |
| 2. Select Write new message, and press Select. |
91 |
| 3. Write the message and press Send. |
91 |
| 4. Dial a number, or press the middle soft key, to enter the contact list. |
91 |
| 5. Press Send to send the message. |
91 |
| 15.1.2.1 Opening a Sent Message |
91 |
| 1. Press Menu, select , and press Select. |
91 |
| 2. Select Sent, and press Select. |
91 |
| 3. Select a message, and press View. |
91 |
| 15.1.3 Forwarding a Message |
91 |
| 1. Press Menu, select , and press Select. |
91 |
| 2. Select Inbox to forward a received message and press Select. |
92 |
| 3. Select a message, and press View. |
92 |
| 4. Press More and select Forward, and press Select. |
92 |
| 5. Edit the message (optional), and press Send. |
92 |
| 6. Dial the number, or press the soft key to select a number from the contact list, and press Send to forward the message. |
92 |
| 15.2 Manual Message Waiting (MMW) |
92 |
| 15.2.1 Answering a Manual Message Waiting |
92 |
| 1. Press Yes to open the mailbox (or No to check the message later). |
92 |
| 2. Press Call. |
92 |
| 15.2.2 Ordering an MMW Indication |
92 |
| 1. Press *31*. |
92 |
| 2. Dial the extension number and press # and . |
93 |
| 3. Press to finish the procedure. |
93 |
| 15.2.3 Cancelling an MMW Indication |
93 |
| 1. Press #31*. |
93 |
| 2. Dial the extension number and press # and . |
93 |
| 3. Press to finish the procedure. |
93 |
| 15.3 Voice Mail (Optional) |
93 |
| 15.3.1 Activating Voice Mail |
94 |
| 15.3.2 Listening To Voice Mail |
94 |
| 15.3.2.1 Listening To New Voice Mail Directly |
94 |
| 1. Press Yes to open the mail inbox (or press No to open the message later). |
94 |
| 2. Press Call. |
94 |
| 15.3.2.2 Listen to New Voice Mail Later |
94 |
| 1. Press and hold 1, when in idle mode. |
94 |
| 2. Listen to the voice mail and follow the recorded instructions. |
94 |
| 1. Press Menu, select , and press Select. |
95 |
| 2. Select Inbox, and press Select. |
95 |
| 3. Select the voice mail message, and press View. |
95 |
| 4. Press Call. |
95 |
| 16 Group Features |
96 |
| 16.1 Group Call Pickup |
96 |
| 1. Press *8#. |
96 |
| 2. Press to answer. |
96 |
| 16.2 Common Bell Group |
96 |
| 1. Press *8#. |
96 |
| 2. Press to answer. |
96 |
| 16.3 Group Hunting |
96 |
| 16.3.1 Answering a Group Call |
97 |
| 16.3.2 Leaving the Group Temporarily |
97 |
| 1. Press *21*. |
97 |
| 2. Dial your own extension number and press # and . |
97 |
| 3. Press to finish the procedure. |
97 |
| 16.3.3 Reentering the Group |
97 |
| 1. Press #21#. |
97 |
| 2. Press . |
97 |
| 3. Press to finish the procedure. |
97 |
| 16.4 Group Do Not Disturb |
97 |
| 16.4.1 To order group do not disturb |
97 |
| 1. Lift the handset (dial tone) |
97 |
| 2. Press *25*group number# (special dial tone). |
97 |
| 3. Replace the handset. |
98 |
| 16.4.2 To cancel group do not disturb |
98 |
| 1. Lift the handset (dial tone) |
98 |
| 2. Press #25*group number#. |
98 |
| 3. Replace the handset. |
98 |
| 16.4.3 To bypass group do not disturb |
98 |
| 1. Lift the handset (dial tone) |
98 |
| 2. Press *60*extension number#. |
98 |
| 3. Replace the handset. |
98 |
| 17 Alarm Operation |
99 |
| 17.1 Push Button Alarm |
99 |
| 17.1.1 Test Alarm |
99 |
| 17.1.2 Personal Alarm |
99 |
| 17.1.3 Alarm with Location Information |
100 |
| 18 Other Useful Features |
101 |
| 18.1 Account Code |
101 |
| 1. Press *61*. |
101 |
| 2. Dial the account code and press # and . |
101 |
| 3. Dial the digit or digits to get an external line and the external number. |
101 |
| 18.1.1 Ongoing External Call |
101 |
| 1. Press R to put the ongoing call on hold. |
101 |
| 2. Press *61*. |
101 |
| 3. Enter the account code and press #. |
101 |
| 4. Press R. |
101 |
| 5. Press to resume the call that was put on hold. |
101 |
| 18.2 Call Statistics |
102 |
| 1. Press Menu, select , and press Select. |
102 |
| 2. Select Call time and press Select. |
102 |
| 18.3 General Deactivation |
102 |
| 18.3.1 Ordering General Deactivation |
102 |
| 1. Press #001#. |
102 |
| 2. Press . |
102 |
| 3. Press to finish the procedure. |
102 |
| 18.4 Night Service |
102 |
| Common Night Service |
103 |
| Individual Night Service |
103 |
| Universal Night Service |
103 |
| 18.5 Emergency Mode |
103 |
| 18.6 Malicious Call Tracing |
103 |
| 18.6.1 Ordering Call Tracing |
103 |
| 1. Press R. |
103 |
| 2. Press *39#. |
103 |
| 18.7 Direct Inward System Access (DISA) |
104 |
| 18.7.1 Calling With an Common Authorization Code |
104 |
| 1. Call the DISA function at your office. |
104 |
| 2. Press *72*. |
104 |
| 3. Dial the authorization code and press #. |
104 |
| 4. Dial the external number. |
104 |
| 18.7.2 Calling With an Individual Authorization Code |
104 |
| 1. Call the DISA function at your office. |
104 |
| 2. Press *75*. |
104 |
| 3. Dial the authorization code and press *. |
104 |
| 4. Dial your own extension number and press #. |
104 |
| 5. Dial the external number. |
104 |
| 18.8 Do Not Disturb (DND) |
105 |
| 18.8.1 To order do not disturb |
105 |
| 1. Lift the handset (dial tone) |
105 |
| 2. Press *27#. |
105 |
| 3. Replace the handset. |
105 |
| 18.8.2 To cancel do not disturb |
105 |
| 1. Lift the handset (special dial tone) |
105 |
| 2. Press #27# (dial tone). |
105 |
| 3. Replace the handset. |
105 |
| 19 Settings |
106 |
| 19.1 Sound and Alerts |
106 |
| 19.1.1 Adjusting Ringer Volume |
106 |
| 1. Press Menu, select , and press Select. |
106 |
| 2. Select Sound & Alerts, and press Select. |
106 |
| 3. Select Volume, and press Select. |
106 |
| 4. Step with to increase the volume and to decrease it. |
106 |
| 5. Press OK to save the settings. |
106 |
| 19.1.2 Different Ring Signals for Different Call Types |
106 |
| 1. Press Menu, select , and press Select. |
106 |
| 2. Select Sound & Alerts, and press Select. |
106 |
| 3. Select Ring Signals, and press Select. |
106 |
| 4. Select Internal call, External call or Callback, and press Select. |
106 |
| 5. Select a ring signal, press Select, and press Back to save the setting. |
106 |
| 19.1.3 Switching Vibrator On and Off |
107 |
| 1. Press Menu, select , and press Select. |
107 |
| 2. Select Sound & Alerts, and press Select. |
107 |
| 3. Select Vibrating alert, and press Select. |
107 |
| 4. Choose between On, On when silent (the vibrator is on when the phone is muted), or Off, and press Select. |
107 |
| 5. Press Back to save the setting. |
107 |
| 19.1.4 Set Message Alert |
107 |
| 1. Press Menu, select , and press Select. |
107 |
| 2. Select Sounds & Alerts, and press Select. |
107 |
| 3. Select Message alert, and press Select. |
107 |
| 4. Choose between the 8 different message alerts. |
107 |
| 5. Press Back to save the settings. |
107 |
| 19.1.5 Setting the Key Sound |
107 |
| 1. Press Menu, select , and press Select. |
107 |
| 2. Select Sounds & Alerts, and press Select. |
107 |
| 3. Select Key sound, and press Select. |
107 |
| 4. Choose between Click, Tone or Silent. |
107 |
| 5. Press Select. |
107 |
| 6. Press Back to save the setting. |
107 |
| 19.2 Display |
108 |
| 19.2.1 Brightness |
108 |
| 1. Press Menu, select , and press Select. |
108 |
| 2. Select Display and press Select. |
108 |
| 3. Select Brightness, and press Select. |
108 |
| 4. Select Normal or Power save, and press Select. |
108 |
| 5. Press Back to save the setting. |
108 |
| 19.2.2 Screen Saver |
108 |
| 1. Press Menu, select , and press Select. |
108 |
| 2. Select Display, and press Select. |
108 |
| 3. Select Screen saver, and press Select. |
108 |
| 4. Select Information, Black or Black also in call, and press Select. |
108 |
| 5. Press Back to save the setting. |
108 |
| 19.2.3 Contrast |
109 |
| 1. Press Menu, select , and press Select. |
109 |
| 2. Select Display, and press Select. |
109 |
| 3. Select Contrast, and press Select. |
109 |
| 4. Press the left or right navigation key to increase or decrease the contrast. |
109 |
| 5. Press OK to save the setting. |
109 |
| 19.3 Time and Date |
109 |
| 19.3.1 Setting Time Format |
109 |
| 1. Press Menu, select , and press Select. |
109 |
| 2. Select Time & Date, and press Select. |
109 |
| 3. Select Time format, and press Select. |
109 |
| 4. Press Select to save the settings. |
109 |
| 19.3.2 Setting Date Format |
109 |
| 1. Press Menu, select , and press Select. |
109 |
| 2. Select Time & Date, and press Select. |
109 |
| 3. Select Date format, and press Select. |
109 |
| 4. Press Select to save the setting. |
110 |
| 19.4 Phone Locks |
110 |
| 19.4.1 Setting Automatic Key Lock |
110 |
| 19.4.2 Activating Automatic Key Lock |
111 |
| 1. Press Menu, select , and press Select. |
111 |
| 2. Select Locks and press Select. |
111 |
| 3. Select Automatic key lock and press Select. |
111 |
| 4. Select On or On except calls, and press Select. |
111 |
| 5. Press Back to redisplay the Locks menu. |
111 |
| 1. Press Menu, select , and press Select. |
111 |
| 2. Select Locks and press Select. |
111 |
| 3. Select Automatic key lock and press Select. |
111 |
| 4. Select On for activation of automatic key lock. |
111 |
| 19.4.3 Activating Manual Key Lock |
111 |
| 1. Press . |
111 |
| 2. Press Lock. |
111 |
| 19.4.3.1 Unlocking the Key Lock Manually |
112 |
| 1. Press . |
112 |
| 2. Press Yes. |
112 |
| 19.4.4 Setting the Phone Lock |
112 |
| 1. Press Menu, select , and press Select. |
112 |
| 2. Select Locks and press Select. |
112 |
| 3. Select Phone lock and press Select. |
112 |
| 4. Select Auto phone lock and press Select. |
112 |
| 5. Select On, On in charger or Off, and press Select. |
112 |
| 6. Enter the PIN code, and press OK. |
112 |
| 19.4.5 Deactivating Phone Lock |
112 |
| 1. Press Menu, select , and press Select. |
112 |
| 2. Select Locks and press Select. |
112 |
| 3. Select Phone lock and press Select. |
112 |
| 4. Select Auto phone lock and press Select. |
113 |
| 5. Select Off, and press Select. |
113 |
| 6. Enter the PIN code, press OK. |
113 |
| 19.4.6 Changing PIN Code |
113 |
| 1. Press Menu, select , and press Select. |
113 |
| 2. Select Locks and press Select. |
113 |
| 3. Select Phone lock and press Select. |
113 |
| 4. Select Change PIN code and press Select. |
113 |
| 5. Enter the old PIN code (default is 0000) and press OK. |
113 |
| 6. Enter the new PIN code. |
113 |
| 7. Enter the new PIN code again to confirm and press Save. |
113 |
| 19.5 Changing the Owner ID |
113 |
| 1. Press Menu, select , and press Select. |
113 |
| 2. Select Owner ID, and press Select. |
113 |
| 3. Enter a name and press Save to save the setting. |
113 |
| 19.6 Changing Answering Methods |
113 |
| 19.6.1 Normal Answering |
114 |
| 1. Press Menu, select , and press Select. |
114 |
| 2. Select Answering, and press Select. |
114 |
| 3. Select Answering key, and press Select. |
114 |
| 4. Select Any key and press Select. |
114 |
| 5. Press Back to save the setting. |
114 |
| 19.6.2 Automatic Answer (Headset Mode) |
114 |
| 1. Press Menu, select , and press Select. |
114 |
| 2. Select Answering, and press Select. |
114 |
| 3. Select Answer behaviour, and press Select. |
114 |
| 4. Select Automatically and press Change to activate the automatic mode. |
114 |
| 5. Press Back to save the setting. |
114 |
| 19.6.3 Loudspeaking (Handsfree Mode) |
114 |
| 1. Press Menu, select , and press Select. |
114 |
| 2. Select Answering, and press Select. |
114 |
| 3. Select Answer behaviour, and press Select. |
114 |
| 4. Select Loudspeaking and press Change to activate. |
114 |
| 5. Press Back to save the setting. |
114 |
| 19.7 Changing Menu Language |
115 |
| 1. Press Menu, select , and press Select. |
115 |
| 2. Select * Language, and press Select. |
115 |
| 3. Select one of the languages from the list, and press Select. |
115 |
| 19.8 Changing Text Size for Messages |
115 |
| 1. Press Menu, select , and press Select. |
115 |
| 2. Select Messages, and press Select. |
115 |
| 3. Select Text size, and press Select. |
115 |
| 4. Select between Normal and Large, and press Select. |
115 |
| 5. Press Back to save the setting. |
115 |
| 20 Procedure Call |
116 |
| 1. Press Menu, or the confirmation button. |
116 |
| 2. Select Services, |
116 |
| 3. Select Add new. |
116 |
| 4. In the name field enter Call no. |
116 |
| 5. Select the function Phone call |
116 |
| 6. Press Save |
116 |
| 21 Connection |
117 |
| 21.1 Bluetooth |
117 |
| 21.1.1 Enabling Bluetooth |
117 |
| 1. Press Menu, select , and press Select. |
117 |
| 2. Select Bluetooth, and press Select. |
117 |
| 3. Select Enable, and press Select. |
117 |
| 21.1.2 Disabling Bluetooth |
117 |
| 1. Press Menu, select , and press Select. |
117 |
| 2. Select Bluetooth, and press Select. |
117 |
| 3. Select Disable, and press Select. |
117 |
| 21.1.3 Connecting a Bluetooth Headset |
117 |
| 1. Press Menu, select , and press Select. |
117 |
| 2. Select Bluetooth, and press Select. |
117 |
| 3. Select Headset and press Select. |
117 |
| 4. Select Add new, and press Select. |
118 |
| 5. Press OK. |
118 |
| 6. If a headset is found, press Pair. |
118 |
| 7. Enter the PIN code. |
118 |
| 8. Press OK. |
118 |
| 21.2 System |
118 |
| 21.2.1 Selecting a System |
118 |
| 1. Press Menu, select , and press Select. |
118 |
| 2. Select System, and press Select. |
118 |
| 3. Select Change system and press Select. |
118 |
| 4. Select Automatically (or a specific system from the list), and press Select. |
118 |
| 21.2.1.1 System Priority |
118 |
| 1. Press Menu, select , and press Select. |
119 |
| 2. Select System, and press Select. |
119 |
| 3. Select Priority, and press Select. |
119 |
| 4. Change the priority if needed by selecting Up or Down. |
119 |
| 5. Press Back to save. |
119 |
| 21.2.2 Subscribing To a New System |
119 |
| 1. Press Menu, select , and press Select. |
119 |
| 2. Select Systems, and press Select. |
119 |
| 3. Select Subscribe, and press Select. |
119 |
| 4. Enter the system name and press Next. |
119 |
| 5. Enter the PARK code (max.31 digits.) the park code. |
119 |
| 6. Enter the AC code (minimum 4-8 digits) and press Next. |
119 |
| 7. Select Yes, if the new system is to be protected, or No if the new system is not to be protected. |
119 |
| 8. Press OK. |
119 |
| 21.2.3 Unsubscribing From a System |
119 |
| 1. Press Menu, select , and press Select. |
119 |
| 2. Navigate to System, and press Select. |
119 |
| 3. Select Unsubscribe, and press Select. |
119 |
| 4. Select system to unsubscribe, and press Select. |
120 |
| 21.2.4 Renaming a System |
120 |
| 1. Press Menu, select , and press Select. |
120 |
| 2. Select System, and press Select. |
120 |
| 3. Select Rename System, and press Select. |
120 |
| 4. Select a system from the list, and press Edit. |
120 |
| 5. Enter the new name. |
120 |
| 6. Press Save to save the changes. |
120 |
| 7. Press Back to exit the menu. |
120 |
| 21.3 In Charger |
120 |
| 21.3.1 Redirecting Calls and Messages While Charging |
120 |
| 1. Press Menu, select , and press Select. |
120 |
| 2. Select In charger, and press Select. |
120 |
| 3. Select Redirect, and press Select. |
121 |
| 4. Press Back to save the setting. |
121 |
| 21.3.2 Switching Off the Phone While Charging |
121 |
| 1. Press Menu, select , and press Select. |
121 |
| 2. Select In charger, and press Select. |
121 |
| 3. Select Switch off, and press Select. |
121 |
| 4. Press Back to save the setting |
121 |
| 21.3.3 Muting the Phone While Charging |
121 |
| 1. Press Menu, select , press Select. |
121 |
| 2. Select In charger, and press Select. |
121 |
| 3. Select Sound off, and press Select. |
121 |
| 4. Press Back to save the setting. |
121 |
| 21.3.4 Deactivating the Charging Mode |
121 |
| 1. Press Menu, select , press Select. |
121 |
| 2. Select In charger, and press Select. |
121 |
| 3. Select No action, and press Select. |
121 |
| 4. Press Back to save the setting. |
121 |
| 21.3.5 Clear list in Charger |
122 |
| 21.4 Headset Profiles |
122 |
| 1. Press Menu, select , and press Select. |
122 |
| 2. Select Headset and press Select |
122 |
| 3. Select Mic on boom, Mic on cable or Hearing protection, and press Select. |
122 |
| 22 Profiles |
123 |
| 22.1 Adding a New Profile |
123 |
| 1. Press Menu, select , and press Select. |
123 |
| 2. Select Add new and press Select. |
123 |
| 3. Enter the name of the profile and select Save. |
123 |
| 4. Press More and then select the Add setting. |
123 |
| 5. Select the setting you want to add to the profile. Repeat steps 4-5 if you want to add additional settings. |
123 |
| 6. Mark the wanted setting and press Edit to make the change. |
123 |
| 7. |
123 |
| 1. Select Add new. |
123 |
| 2. Enter the name of the profile. |
123 |
| 3. Press Save. and then select Import from. |
123 |
| 4. Select the profile which settings to be used for the new profile. |
123 |
| 5. If needed press More and then select corresponding option to add/ import additional settings or remove settings. |
123 |
| 22.2 Activate Profile |
124 |
| 1. Select the wanted profile in the list. |
124 |
| 22.3 Deleting a Profile |
124 |
| 1. Press Menu, select , and press Select. |
124 |
| 2. Select a profile from the list and press More. |
124 |
| 3. Select Delete and press Select. |
124 |
| 4. Press Yes to confirm. |
124 |
| 22.4 Editing profile |
124 |
| 1. Press Menu, select , and press Select. |
124 |
| 2. Select a profile from the list and press More. |
124 |
| 3. Select Edit from menu. |
124 |
| 4. Select what to edit and press Edit. |
124 |
| 5. Following options can be performed: |
124 |
| 6. If needed, mark the added settings and press Edit to make the changes. |
124 |
| 23 Installation |
125 |
| 23.1 Battery |
125 |
| 23.1.1 Charging the Battery |
125 |
| 23.1.2 Charging Spare Batteries |
125 |
| 23.1.3 Replacing the Battery |
126 |
| Figure 15: Unlock the lid and remove the battery |
126 |
| 23.2 Accessories |
126 |
| 23.2.1 Headset |
126 |
| 23.2.2 Belt Clip |
126 |
| 23.2.2.1 Attaching a Standard Clip (Hinge Type) |
127 |
| Figure 16: Screw the clip into position |
127 |
| 23.2.2.2 Attaching a Security Clip (Swivel Type) |
127 |
| Figure 17: Screw the clip into position |
127 |
| 23.2.3 Leather Casing |
127 |
| 23.2.4 Security String |
128 |
| 23.3 Chargers |
128 |
| 23.3.1 Desk Charger |
128 |
| Figure 18: Desk Charger |
128 |
| 23.3.2 Desk PDM Charger |
128 |
| Figure 19: Desk PDM Charger |
128 |
| Figure 20: Network and USB Connectors |
129 |
| 23.3.3 Rack PDM Charger |
129 |
| 23.3.4 Battery Pack Rack Charger |
129 |
| 23.4 Bluetooth Headset |
130 |
| 23.4.1 Using a Bluetooth Headset |
130 |
| 23.4.1.1 Activating a Bluetooth Headset |
130 |
| 1. Press Menu, select , and press Select. |
131 |
| 2. Select Bluetooth, and press Select. |
131 |
| 3. Select Headset, and press Select. |
131 |
| 4. Step with the navigation keys to the headset to be connected, Select. |
131 |
| 23.4.1.2 Removing a Bluetooth Headset |
131 |
| 1. Press Menu, select , and press Select. |
131 |
| 2. Go to Bluetooth, and press Select. |
131 |
| 3. Select Headset, and press Select. |
131 |
| 4. Use the navigation key to select headset, and press More. |
131 |
| 5. Select Delete and press Yes. |
131 |
| 23.4.1.3 Changing the Name of the Bluetooth Headset |
131 |
| 1. Press Menu, select , and press Select. |
131 |
| 2. Go to Bluetooth, and press Select. |
131 |
| 3. Select Headset, and press Select. |
131 |
| 4. Use the navigation key to select headset, and press More. |
131 |
| 5. Select Edit name, and press Select. |
131 |
| 23.4.2 Calling With Bluetooth |
131 |
| 1. Dial the number and press Call. |
131 |
| 2. the following message is displayed, follow the steps below: Audio i headset. Transfer to phone? |
132 |
| 23.4.3 Answering With Bluetooth |
132 |
| 23.4.4 Ending a Call With Bluetooth |
132 |
| 23.4.5 Transferring a Call With Bluetooth |
132 |
| 1. Press More during a call. |
132 |
| 2. Select Audio transfer and press Select. |
132 |
| 23.4.6 Switching from Bluetooth To a Headset With Cord |
132 |
| 23.4.7 Operation Notice |
132 |
| 23.5 WinPDM and CPDM3 |
133 |
| Figure 21: Desk PDM Charger connected to a PC through a USB Connector |
133 |
| 24 Troubleshooting |
134 |
| Table 12 Operational problems |
134 |
| 25 Glossary |
138 |
| 26 Telephony Function Codes |
140 |
 1
1 117
117 118
118 119
119 120
120 121
121 122
122 123
123 124
124 125
125 126
126 127
127