Acer BE320QK User Manual - Page 26
Troubleshooting, HDMI/DP, Mode Optional
 |
View all Acer BE320QK manuals
Add to My Manuals
Save this manual to your list of manuals |
Page 26 highlights
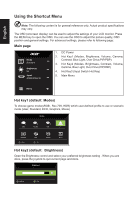
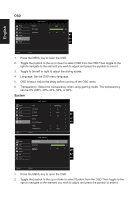
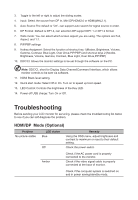
3. Toggle to the left or right to adjust the sliding scales. 4. Input: Select the source from DP In, Mini DP,HDMI2.0 or HDMI(MHL2.1). 5. Auto Source:The default is "On", can support auto search for signal source in order. 6. DP Format :Default is DP1.2, can selection DP support DP1.1 or DP1.2 format. 7. Wide mode: You can select which screen aspect you are using. The options are Full, Aspect, and 1:1. 8. PIP/PBP settings 9. Hotkey Assigment: Select the function of shortcut key 1(Modes, Brightness, Volume, Gamma, Contrast, Blue Light, Over Drive,PIP/PBP) and shortcut keys 2 (Modes, Brightness, Volume, Gamma, Contrast, Blue Light, Over Drive,PIP/PBP) 10. DDC/CI: Allows the monitor settings to be set through the software on the PC. Note: DDC/CI, short for Display Data Channel/Command Interface, which allows monitor controls to be sent via software. 11. HDMI Black level setting. 12. Quick start mode: Select Off or On. Turn on to speed up boot speed. 13. LED Control: Controls the brightness of the Key LED. 14. Power-off USB charge: Turn On or Off. Troubleshooting Before sending your LCD monitor for servicing, please check the troubleshooting list below to see if you can self-diagnose the problem. HDMI/DP Mode (Optional) Problem No picture visible LED status Blue Off Remedy Using the OSD menu, adjust brightness and contrast to maximum or reset to their default setting. Check the power switch. Amber Check if the AC power cord is properly connected to the monitor. Check if the video signal cable is properly connected at the back of monitor. Check if the computer system is switched on and in power saving/standby mode.
-
 1
1 -
2
-
3
-
4
-
5
-
6
-
7
-
8
-
9
-
10
-
11
-
12
-
13
-
14
-
15
-
16
-
17
-
18
-
19
-
20
-
 21
21 -
 22
22 -
 23
23 -
 24
24 -
 25
25 -
 26
26
 |
 |