Acer ConceptD 500 User Manual - Page 15
Installing a memory module
 |
View all Acer ConceptD 500 manuals
Add to My Manuals
Save this manual to your list of manuals |
Page 15 highlights
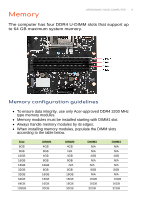
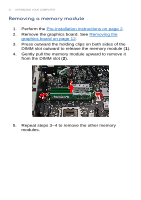
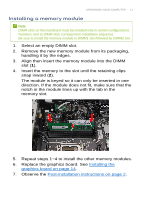
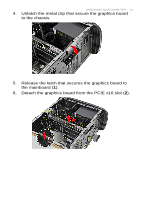
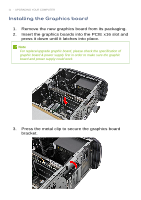
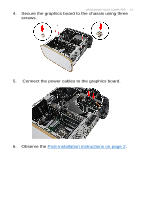
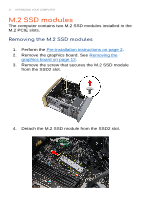
UPGRADING YOUR COMPUTER - 11 Installing a memory module Note DIMM slots on the mainboard must be installed only in certain configurations. Numbers next to DIMM slots correspond to installation sequence. Be sure to install the memory module in DIMM1 slot followed by DIMM2 slot. 1. Select an empty DIMM slot. 2. Remove the new memory module from its packaging, handling it by the edges. 3. Align then insert the memory module into the DIMM slot (1). 4. Insert the memory to the slot until the retaining clips snap inward (2). The module is keyed so it can only be inserted in one direction. If the module does not fit, make sure that the notch in the module lines up with the tab in the memory slot. 5. Repeat steps 1~4 to install the other memory modules. 6. Replace the graphics board. See Installing the graphics board on page 14. 7. Observe the Post-installation instructions on page 2.
-
 1
1 -
2
-
3
-
4
-
5
-
6
-
7
-
8
-
9
-
 10
10 -
 11
11 -
 12
12 -
 13
13 -
 14
14 -
 15
15 -
 16
16 -
 17
17 -
 18
18 -
 19
19 -
 20
20 -
21
-
22
-
23
-
24
-
25
-
26
-
27
-
28
-
29
-
30
-
31
 |
 |
