Acer H277HK User Manual - Page 25
Setting Menu
 |
View all Acer H277HK manuals
Add to My Manuals
Save this manual to your list of manuals |
Page 25 highlights
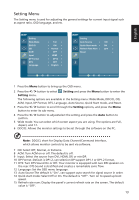
English Setting Menu The Setting menu is used for adjusting the general settings for current input signal such as aspect ratio, OSD language, and etc. Setting Wide Mode DDC/CI OD ACM Input DP Format DTS Language Full ON Normal OFF HDMI DP12 OFF English Setting Auto Source Quick Start mode Refresh Rate Num Reset ON ON OFF 1 Press the Menu button to bring up the OSD menu. 2 Press the < / > button to select Setting and press the Menu button to enter the Setting menu. The following options are available in the Setting menu: Wide Mode, DDC/CI, OD, ACM, Input, DP Format, DTS, Language, Auto Source, Quick Start mode, and Reset. 3 Press the < / > button to scroll through the Setting options, and press the Menu button to enter its sub-menu. 4 Press the < / > button to adjust/select the setting and press the Auto button to confirm. 5 Wide mode: You can select which screen aspect you are using. The options are Full, Aspect, and 1:1. 6 DDC/CI: Allows the monitor settings to be set through the software on the PC. Note: DDC/CI, short for Display Data Channel/Command Interface, which allows monitor controls to be sent via software. 7 OD: Select Off, Normal, or Extreme. 8 ACM: Turn ACM on or off. The default is off. 9 Input: Select the source from DVI, HDMI, DP, or miniDP. 10 DP Format :Default is DP1.2, can selection DP support DP1.1 or DP1.2 format. 11 DTS: Turn DTS Sound On or Off. Your monitor is equipped with two 3W speakers on the rear. DTS Sound is stratified and creates a remarkable sonic flow. 12 Language: Set the OSD menu language. 13 Auto Source:The default is "On", can support auto search for signal source in order. 14 Quick start mode: Select Off or On. The default is "Off". Turn on to speed up boot speed. 15 Refresh rate num: Display the panel's current refresh rate on the screen. The default value is "Off". 13
-
 1
1 -
2
-
3
-
4
-
5
-
6
-
7
-
8
-
9
-
10
-
11
-
12
-
13
-
14
-
15
-
16
-
17
-
18
-
19
-
 20
20 -
 21
21 -
 22
22 -
 23
23 -
 24
24 -
 25
25 -
 26
26 -
 27
27
 |
 |
