Acer K2 Lifecycle Extension Guide - Page 12
Picture 2
 |
View all Acer K2 manuals
Add to My Manuals
Save this manual to your list of manuals |
Page 12 highlights
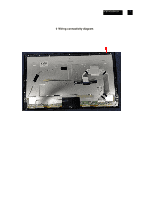
ACER-K242HYLH 12 4.2 Assembly Procedures Preparation before assemble: 1.Clean the room for work 2.Identify the area for material 3.Prepare the implement, equipment, materials as bellow: 1) working table 2) Screw-driver 3) Knife 4) glove 5) cleaning cloth 6) ESD protection S1 , PICTURE 1 Insert connect lines,put themoduleon the worktable.Install the main board to the bracket . PICTURE 2 P/BD I/F BD USB BD S2 PICTURE 1 Take the Panel on the sponge cushion. PICTURE 2
-
 1
1 -
2
-
3
-
4
-
5
-
6
-
 7
7 -
 8
8 -
 9
9 -
 10
10 -
 11
11 -
 12
12 -
 13
13 -
 14
14 -
 15
15 -
 16
16 -
 17
17 -
18
-
19
-
20
-
21
-
22
 |
 |

4.2 Assembly Procedures
Preparation before assemble:
1.Clean the room for work
2.Identify the area for material
3.Prepare the implement, equipment, materials as bellow
:
1) working table
2) Screw-driver
3) Knife
4)
glove
5) cleaning cloth
6)
ESD protection
S1
,
-
Insert connect lines,put themoduleon the worktable.Install the main board to the bracket
.
Take the Panel on the sponge cushion.
USB BD
I/F BD
P/BD
S2
PICTURE 1
PICTURE 2
PICTURE 1
PICTURE 2
12
ACER-K242HYLH