Acer K2 Lifecycle Extension Guide - Page 9
K242hylh
 |
View all Acer K2 manuals
Add to My Manuals
Save this manual to your list of manuals |
Page 9 highlights
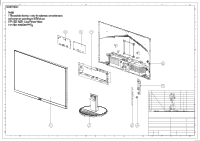
ACER-K242HYLH 9 4. Assembly and Disassembly SOP K242HYLH 4.1 Disassembly Procedures Preparation before disassemble 1.Clean the room for disassemble 2.Identify the area for monitor 3.Check the position that the monitors be placed and the quantity of the monitor ;prepare the area for material flow; according to the actual condition plan the disassemble layout 4.Prepare the implement, equipment, materials as bellow: 1) working table 2) Screw-driver 3) knife 4) glove 5) cleaning cloth 6) ESD protection S1 Prepare the worktable and remove the screws of the backcover S2 Disassemble the backcover and disassemble the key connector. PICTURE 1 PICTURE 2 CTRL BD
-
 1
1 -
2
-
3
-
 4
4 -
 5
5 -
 6
6 -
 7
7 -
 8
8 -
 9
9 -
 10
10 -
 11
11 -
 12
12 -
 13
13 -
 14
14 -
15
-
16
-
17
-
18
-
19
-
20
-
21
-
22
 |
 |

4.1 Disassembly Procedures
Preparation before disassemble
1.Clean the room for
disassemble
2.Identify the area for monitor
3.Check the position that the monitors be placed and the quantity of the monitor ;prepare the area for material flow;
according to the actual condition plan the
disassemble
layout
4.Prepare the implement, equipment, materials as bellow:
1) working table
2) Screw-driver
3) knife
4) glove
5) cleaning cloth
6) ESD protection
PICTURE 1
PICTURE 2
CTRL BD
Prepare the worktable and remove the screws of the backcover
Disassemble
the backcover and disassemble the key connector.
S2
S1
9
ACER-K242HYLH
4. Assembly and Disassembly SOP
K242HYLH