Acer P1555 User Manual - Page 44
Connecting the computer to the projector, Executing the Acer Splash Downloader tool on the computer
 |
View all Acer P1555 manuals
Add to My Manuals
Save this manual to your list of manuals |
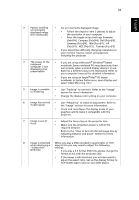
Page 44 highlights
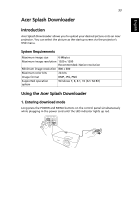
English 34 2. Connecting the computer to the projector Use an USB cable to connect the computer and the projector. 3. Executing the Acer Splash Downloader tool on the computer If the projector is not properly connecting to the computer, below message will be displayed. If the projector successfully connects the computer, below message will be displayed. Press "Logo Replace" to proceed. 4. Loading the image First, select the native resolution for the projector by adjusting "PJ Native Resolution" and decide if you want the image to be displayed full screen or in its original aspect ratio. Press "LoadImage" and choose an image from your computer.
-
 1
1 -
2
-
3
-
4
-
5
-
6
-
7
-
8
-
9
-
10
-
11
-
12
-
13
-
14
-
15
-
16
-
17
-
18
-
19
-
20
-
21
-
22
-
23
-
24
-
25
-
26
-
27
-
28
-
29
-
30
-
31
-
32
-
33
-
34
-
35
-
36
-
37
-
38
-
 39
39 -
 40
40 -
 41
41 -
 42
42 -
 43
43 -
 44
44 -
 45
45 -
 46
46 -
 47
47 -
 48
48 -
 49
49 -
50
-
51
-
52
-
53
-
54
-
55
-
56
-
57
-
58
-
59
-
60
-
61
-
62
-
63
-
64
-
65
-
66
 |
 |

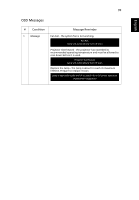
34
English
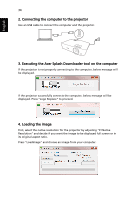
2. Connecting the computer to the projector
Use an USB cable to connect the computer and the projector.
3. Executing the Acer Splash Downloader tool on the computer
If the projector is not properly connecting to the computer, below message will
be displayed.
If the projector successfully connects the computer, below message will be
displayed. Press "Logo Replace" to proceed.
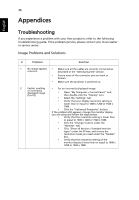
4. Loading the image
First, select the native resolution for the projector by adjusting "PJ Native
Resolution" and decide if you want the image to be displayed full screen or in
its original aspect ratio.
Press "LoadImage" and choose an image from your computer.