Acer P5230 User Manual - Page 32
User Controls, Installation menu
 |
View all Acer P5230 manuals
Add to My Manuals
Save this manual to your list of manuals |
Page 32 highlights
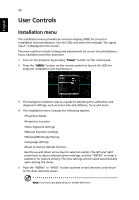
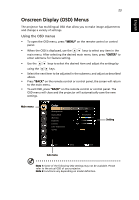
English 22 User Controls Installation menu The installation menu provides an onscreen display (OSD) for projector installation and maintenance. Use the OSD only when the message "No signal input" is displayed on the screen. The menu options include settings and adjustments for screen size and distance, focus, keystone correction and more . 1 Turn on the projector by pressing "Power" button on the control pad. 2 Press the "MENU" button on the remote control to launch the OSD for projector installation and maintenance. Installation Projection Mode Projection Location Auto Keystone V. Keystone H. Keystone LAN IP/Mask WiFi IP/Mask MAC Address Wake on LAN (Standby) Language WirelessHD Dongle Pairing Reset Exit Select Off Off English Enter 3 The background pattern acts as a guide to adjusting the calibration and alignment settings, such as screen size and distance, focus and more. 4 The Installation menu includes the following options: •Projection Mode •Projection Location •Auto Keystone settings •Manual Keystone settings •WirelessHD Dongle Pairing •Language settings •Reset to factory default function Use the up and down arrow keys to select an option, the left and right arrow keys to adjust selected option settings, and the "ENTER" to enter a submenu for feature setting. The new settings will be saved automatically upon exiting the menu. 5 Push the "MENU" or "BACK" button anytime to exit the menu and return to the Acer welcome screen. Note: Functions vary depending on model definition.
-
 1
1 -
2
-
3
-
4
-
5
-
6
-
7
-
8
-
9
-
10
-
11
-
12
-
13
-
14
-
15
-
16
-
17
-
18
-
19
-
20
-
21
-
22
-
23
-
24
-
25
-
26
-
 27
27 -
 28
28 -
 29
29 -
 30
30 -
 31
31 -
 32
32 -
 33
33 -
 34
34 -
 35
35 -
 36
36 -
 37
37 -
38
-
39
-
40
-
41
-
42
-
43
-
44
-
45
-
46
-
47
-
48
-
49
-
50
-
51
-
52
-
53
-
54
-
55
-
56
-
57
-
58
-
59
-
60
-
61
-
62
-
63
-
64
-
65
-
66
-
67
-
68
 |
 |