Acer S1283e User Manual (Multmedia) - Page 32
Setting
 |
View all Acer S1283e manuals
Add to My Manuals
Save this manual to your list of manuals |
Page 32 highlights
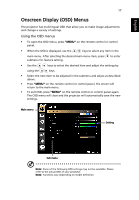
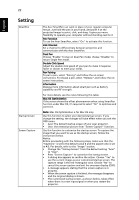
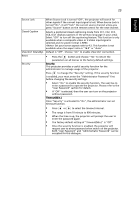
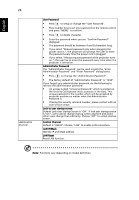
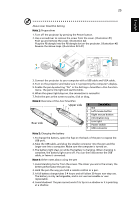
English 22 Setting SmartPen Startup Screen Screen Capture The Acer SmartPen can work in place of your regular computer mouse. Just hold the pen in your hand, and point it at the projected image to point, click, and drag. It gives you more flexibility to operate your computer without standing next to it. Pen Function To use the Acer SmartPen, select "On" to activate this function. Link Channel Set a channel to differentiate between projectors and communicate with the Acer SmartPen. Dual Pen Choose "Enable" to stay on Dual Pen mode; choose "Disable" to return Single Pen mode. Double Click Speed Adjust the double click speed of your pen to make it response faster or slower to meet your needs. Pen Pairing To pair a pen, select "Pairing" and follow the on-screen instructions. To release a pen, select "Release" and follow the onscreen instructions. Information Displays more information about smart pen such as battery capability and RF strength. For more details, see the notes following this table. Mac OS Optimization If the screen shows the offset phenomenon when using SmartPen function under Mac OS, it's required to select "On" to optimize and correct it. Note: Mac OS Optimization is for Mac OS only. Use this function to select your desired startup screen. If you change the setting, the changes will take effect when you exit the OSD menu. • Acer: The default startup screen of your Acer projector. • User: Use memorize picture from "Screen Capture" function. Use this function to customize the startup screen. To capture the image that you want to use as the startup screen, follow the instructions below. Notice: Before proceeding with the following steps, make sure that the "Keystone" is set to the default value 0 and the aspect ratio is set to 4:3. For details, refer to the "Image" section. • Change the "Startup Screen" from the default setting "Acer" to "User". • Press "Screen Capture" to customize the startup screen. • A dialog box appears to confirm the action. Choose "Yes" to use the current image as your customized startup screen. The capture range is the red rectangular area. Choose "No" to cancel the screen capture and exit the onscreen display (OSD). • A message appears, stating that the screen capture is in progress. • When the screen capture is finished, the message disappears and the original display is shown. • The customized startup screen, as shown below, takes effect when there is a new input signal or when you restart the projector.
-
 1
1 -
2
-
3
-
4
-
5
-
6
-
7
-
8
-
9
-
10
-
11
-
12
-
13
-
14
-
15
-
16
-
17
-
18
-
19
-
20
-
21
-
22
-
23
-
24
-
25
-
26
-
 27
27 -
 28
28 -
 29
29 -
 30
30 -
 31
31 -
 32
32 -
 33
33 -
 34
34 -
 35
35 -
 36
36 -
 37
37 -
38
-
39
-
40
-
41
-
42
-
43
-
44
-
45
-
46
-
47
-
48
-
49
-
50
-
51
-
52
-
53
-
54
-
55
-
56
-
57
-
58
-
59
-
60
-
61
-
62
-
63
-
64
-
65
-
66
 |
 |
