Acer S1283e User Manual (Multmedia) - Page 50
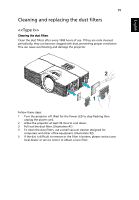
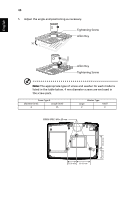
<<Type II>>, To install the 3D dust filter and lens shield, please reverse previous steps.
 |
View all Acer S1283e manuals
Add to My Manuals
Save this manual to your list of manuals |
Page 50 highlights
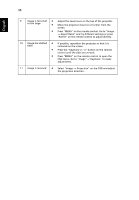
English Lens shield 40 Replacing the dust shield pack 3 5 3D dust filter 2 1 4 Follow these steps: Replacing the 3D dust filter 1 Turn the projector off. Wait for the Power LED to stop flashing then unplug the power cord. 2 Allow the projector at least 30 mins to cool down. 3 Use a screwdriver to remove the screw from the 3D dust filter. (Illustration #1) 4 Remove the 3D dust filter. (Illustration #2) Replacing the Lens shield 1 Open the top cover from the lens shield. (Illustration #3) 2 Use a screwdriver to remove the screws from the lens shield. (Illustration #4) 3 Remove the lens shield. (Illustration #5) To install the 3D dust filter and lens shield, please reverse previous steps. To reset 3D dust filter after installing. Note: Considering the performance of 3D dust filter, it is not recommended to clean the electrostatic filters. Please contact your local dealer or serviced center to purchase and replace new electrostatic filters inside 3D dust filter.
-
 1
1 -
2
-
3
-
4
-
5
-
6
-
7
-
8
-
9
-
10
-
11
-
12
-
13
-
14
-
15
-
16
-
17
-
18
-
19
-
20
-
21
-
22
-
23
-
24
-
25
-
26
-
27
-
28
-
29
-
30
-
31
-
32
-
33
-
34
-
35
-
36
-
37
-
38
-
39
-
40
-
41
-
42
-
43
-
44
-
 45
45 -
 46
46 -
 47
47 -
 48
48 -
 49
49 -
 50
50 -
 51
51 -
 52
52 -
 53
53 -
 54
54 -
 55
55 -
56
-
57
-
58
-
59
-
60
-
61
-
62
-
63
-
64
-
65
-
66
 |
 |
