Acer UL6500 User Manual - Page 9
Remote control, For entering the Keystone Correction
 |
View all Acer UL6500 manuals
Add to My Manuals
Save this manual to your list of manuals |
Page 9 highlights
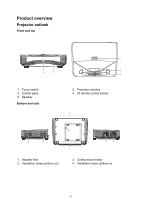
Remote control 1 2 RESYNC RATIO 10 3 SOURCE MENU 11 12 4 ENTER 13 5 MODE KEYSTONE BACK 14 6 7 ZOOM VOL 15 8 ECO FREEZE HIDE 16 9 FUNCTION 3D 17 18 1. ON button For turning the power on. 3. SOURCE buttons For switching Input mode. 5. MODE button For selecting the appropriate picture. 7. ZOOM buttons For enlarging/reducing part of the image. 9. FUNCTION button For operating and executing a function assigned to "FUNCTION Button". 11. MENU button For displaying adjustment and setting screens. 13. ENTER button For setting items selected or adjusted on the menu. 15. VOL +/- (Volume) buttons For adjusting the speaker sound level. 17. 3D button For displaying the 3D mode menu screen. 2. STANDBY button For putting the projector into the Standby mode. 4. Adjustment buttons ( / / / ) For selecting and adjusting menu items. 6. KEYSTONE button For entering the Keystone Correction mode. 8. ECO button For lowering the noise of the cooling fan. 10. RATIO button For switching the picture size (NORMAL, 16:9, etc.). 12. RESYNC button For automatically adjusting images when connected to a computer. 14. BACK button For returning to the previous menu screen during menu operation. 16. HIDE button For temporarily displaying a black screen and turning off the sound. 18. FREEZE button For freezing images. 8
-
 1
1 -
2
-
3
-
 4
4 -
 5
5 -
 6
6 -
 7
7 -
 8
8 -
 9
9 -
 10
10 -
 11
11 -
 12
12 -
 13
13 -
 14
14 -
15
-
16
-
17
-
18
-
19
-
20
-
21
-
22
-
23
-
24
-
25
-
26
-
27
-
28
-
29
-
30
-
31
-
32
-
33
-
34
-
35
-
36
-
37
-
38
-
39
-
40
-
41
-
42
-
43
-
44
-
45
-
46
-
47
-
48
-
49
-
50
-
51
-
52
-
53
-
54
 |
 |
