Acer Veriton 7200 Veriton 7200 - Page 60
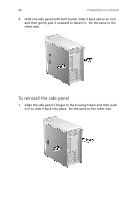
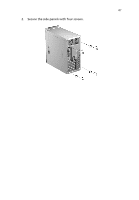
Reinstall the side panel see Secure it with four screws.
 |
View all Acer Veriton 7200 manuals
Add to My Manuals
Save this manual to your list of manuals |
Page 60 highlights
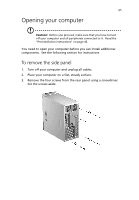
50 4 Upgrading your computer 4. (a) Insert the new hard disk into the frame. (b) Connect the power and hard disk cables to the new hard disk. 5. Secure it with four screws. Note: Make sure that the other ends of the disk cables are securely connected to their corresponding connectors on the mainboard. 6. Reinstall the side panel (see page 46).
-
 1
1 -
2
-
3
-
4
-
5
-
6
-
7
-
8
-
9
-
10
-
11
-
12
-
13
-
14
-
15
-
16
-
17
-
18
-
19
-
20
-
21
-
22
-
23
-
24
-
25
-
26
-
27
-
28
-
29
-
30
-
31
-
32
-
33
-
34
-
35
-
36
-
37
-
38
-
39
-
40
-
41
-
42
-
43
-
44
-
45
-
46
-
47
-
48
-
49
-
50
-
51
-
52
-
53
-
54
-
 55
55 -
 56
56 -
 57
57 -
 58
58 -
 59
59 -
 60
60 -
 61
61 -
 62
62 -
 63
63 -
 64
64 -
 65
65 -
66
-
67
-
68
-
69
-
70
-
71
-
72
-
73
-
74
-
75
-
76
-
77
-
78
-
79
-
80
-
81
-
82
-
83
-
84
-
85
-
86
-
87
-
88
 |
 |

4 Upgrading your computer
50
4.
(a) Insert the new hard disk into the frame.
(b) Connect the power and hard disk cables to the new hard disk.
5.
Secure it with four screws.
Note:
Make sure that the other ends of the disk cables are
securely connected to their corresponding connectors on the
mainboard.
6.
Reinstall the side panel (see page 46).