Adaptec 2126700 Installation Guide - Page 10
Connecting One ATA Disk Drive on a Cable, into the connector
 |
UPC - 760884145838
View all Adaptec 2126700 manuals
Add to My Manuals
Save this manual to your list of manuals |
Page 10 highlights
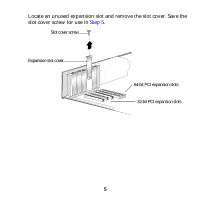
Connecting One ATA Disk Drive on a Cable When you connect only one ATA disk drive to a cable, that disk drive must be set as a master drive. (See Setting Jumpers on ATA Disk Drives on page 7 for more information.) To connect one ATA drive to the ASH-1233 adapter: 1 Connect the IDE cable to an IDE connector on the ASH-1233 adapter (as shown below), being careful to match pin 1 of the cable to pin 1 of the connector. The cables and connectors are keyed. If the cable does not slide easily into the connector, do not force it. Instead, reverse the cable. Note: The stripe along the edge of the cable indicates Pin #1. If the cable does not slide easily into the connector, reverse the cable. 9
-
 1
1 -
2
-
3
-
4
-
 5
5 -
 6
6 -
 7
7 -
 8
8 -
 9
9 -
 10
10 -
 11
11 -
 12
12 -
 13
13 -
 14
14 -
 15
15 -
16
-
17
 |
 |

9
Connecting One ATA Disk Drive on a Cable
When you connect only one ATA disk drive to a cable, that disk drive
must be set as a
master
drive. (See
Setting Jumpers on ATA Disk Drives
on
page 7
for more information.)
To connect one ATA drive to the ASH-1233 adapter:
1
Connect the IDE cable to an IDE connector on the ASH-1233 adapter
(as shown below), being careful to match pin 1 of the cable to pin 1 of
the connector.
The cables and connectors are keyed. If the cable does not slide easily
into the connector,
do not
force it. Instead, reverse the cable.
Note:
The stripe along the edge of the cable indicates Pin #1. If
the cable does not slide easily into the connector, reverse the
cable.