Adobe 38039336 Tutorial - Page 3
Insert, Keyframe, Insert > Timeline > Keyframe
 |
UPC - 883919066486
View all Adobe 38039336 manuals
Add to My Manuals
Save this manual to your list of manuals |
Page 3 highlights
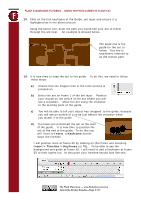
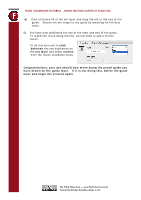
FLASH CLASSROOM TUTORIAL - USING MOTION GUIDES IN FLASH CS3 10. Click on the first keyframe of the Guide: ant layer and ensure it is highlighted as in the above picture. Using the pencil tool, draw the path you would like your ant to follow through the ant nest. An example is showed below. The black line is the guide for the ant to follow. This line is sometimes referred to as the motion path. 10. It is now time to snap the ant to the guide. To do this, we need to follow these steps: a) Ensure that the magnet icon in the tools options is pressed on. b) Select the ant on frame 1 of the ant layer. Position your mouse on the centre of the ant where you will see a crosshair. Move the ant using the crosshair to the starting point of the guide. c) You will be able to tell your object has 'snapped' to the guide, because you will see an outline of a circle just behind the crosshair when you attach it to the guide. d) You have just positioned the ant at the start of the guide. It is now time to position the ant at the end of the guide. To do this you will need to Insert a Keyframe further down the timeline. I will position mine at frame 50 by clicking on this frame and selecting Insert > Timeline > Keyframe (or F6). To be able to see the background and guide at frame 50, I will need to add a keyframe at frame 50 to their layers too. At this point your timeline should look like this. The Flash Classroom - www.flashclassroom.com Tutorial by Kristine Kopelke-Page 3 of 4
-
 1
1 -
 2
2 -
 3
3 -
 4
4
 |
 |
