Airlink AMPS240W User Manual - Page 28
E-mail Account, E-mail Notification, E-mail Printing
 |
View all Airlink AMPS240W manuals
Add to My Manuals
Save this manual to your list of manuals |
Page 28 highlights
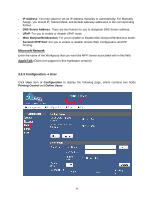
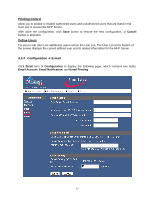
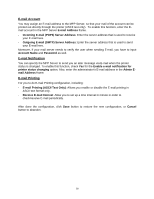
E-mail Account You may assign an E-mail address to the MFP Server, so that your mail of the account can be printed out directly through the printer (ASCII text only). To enable this function, enter the Email account in the MFP Server E-mail Address frame. - Incoming E-mail (POP3) Server Address: Enter the server address that is used to receive your E-mail here. - Outgoing E-mail (SMTP) Server Address: Enter the server address that is used to send your E-mail here. Moreover, if your mail server needs to verify the user when sending E-mail, you have to input Account Name and Password as well. E-mail Notification You can specify the MFP Server to send you an alter message via E-mail when the printer status is changed. To enable this function, check Yes for the Enable e-mail notification for printer status changing option. Also, enter the administrator's E-mail address in the Admin Email Address frame. E-mail Printing For you to do E-mail Printing configuration, including: - E-mail Printing (ASCII Text Only): Allows you enable or disable the E-mail printing in ASCII text format only. - Receive E-mail Interval: Allow you to set up a time interval in minute in order to check/receive E-mail periodically. After done the configuration, click Save button to restore the new configuration, or Cancel button to abandon. 28
-
 1
1 -
2
-
3
-
4
-
5
-
6
-
7
-
8
-
9
-
10
-
11
-
12
-
13
-
14
-
15
-
16
-
17
-
18
-
19
-
20
-
21
-
22
-
 23
23 -
 24
24 -
 25
25 -
 26
26 -
 27
27 -
 28
28 -
 29
29 -
 30
30 -
 31
31 -
 32
32 -
 33
33 -
34
-
35
-
36
 |
 |
