Akai APC20 Quick Start Guide - Page 4
Top Panel Overview, Clip Launch / Session Overview, Amber, Green, Shift, Scene Launch, Clip Stop - ableton controller
 |
View all Akai APC20 manuals
Add to My Manuals
Save this manual to your list of manuals |
Page 4 highlights
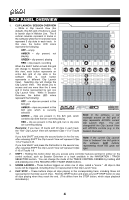
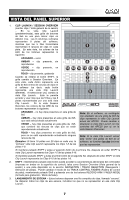
TOP PANEL OVERVIEW 1. CLIP LAUNCH / SESSION OVERVIEW - While in Clip Launch View (the default), this 8x5 grid of buttons is used to launch clips in Ableton Live. The 8 vertical columns represent 8 tracks in the software while the 5 horizontal rows represent 5 clip slots in each track. In this view, the button LED colors represent the following: 1 3 OFF - empty AMBER - clip present, not playing GREEN - clip present, playing RED - clip present, recording When the SHIFT button is held, this grid will change to Session Overview. In this view, each button represents an entire 8x5 grid of clip slots in the software (that is, each button represents a different Clip Launch View). Selecting one will change the Clip Launch View. This allows you to access and use more than the 5 rows and 8 tracks represented by just one Clip Launch View. While in Session Overview, the button LED colors represent the following: 4 2 10 10 10 11 12 12 12 12 13 6 7 9 8 5 OFF - no clips are present in this 8x5 grid AMBER - clips are present in this 8x5 grid, which is currently selected GREEN - clips are present in this 8x5 grid, which contains clip slots that are currently playing RED - clip are present in this 8x5 grid, but no clip slots are currently playing Examples: If you have 16 tracks with 20 clips in each track, the "first" Clip Launch View will represent Clips 1-5 of Tracks 1-8. Note: In the software, a red rectangle around an 8x5 grid of clips represents APC20's current Clip Launch View. You can change/shift the Clip Launch View with APC20's controls (e.g. in the Session Overview). If you hold SHIFT and press the second button in the first row, after releasing SHIFT the Clip Launch View will represent Clips 1-5 of Tracks 9-16. If you hold SHIFT and press the first button in the second row, after releasing SHIFT the Clip Launch View will represent Clips 6-10 of Tracks 1-8. Note: If the current Clip Launch View is "between" two 8x5 grids in the software, both buttons representing those two grids will light. 2. SHIFT - Holding this button down lets you access extra controller features (printed in amber on the control surface), such as Session Overview or a track available in the NAVIGATION / TRACK SELECTION section. You can change the mode of the TRACK CONTROL FADERS by holding shift and pressing one of the RECORD ARM / FADER MODE buttons. 3. SCENE LAUNCH - These buttons triggers an entire row of clips, called a "scene." All clips in that scene will be triggered, including those not represented in that Clip Launch View. 4. CLIP STOP - These buttons stops all clips playing in the corresponding track, including those not represented in that Clip Launch View. Hold the SHIFT button and press any CLIP STOP button to stop all clips playing when they reach the end. (This differs from the STOP button, which stops playback immediately.) 4
-
 1
1 -
 2
2 -
 3
3 -
 4
4 -
 5
5 -
 6
6 -
 7
7 -
 8
8 -
 9
9 -
 10
10 -
11
-
12
-
13
-
14
-
15
-
16
-
17
-
18
-
19
-
20
 |
 |
