Akai MPK88 Operation Manual - Page 6
Rear Panel Overview, Hookup Diagram - usb midi
 |
View all Akai MPK88 manuals
Add to My Manuals
Save this manual to your list of manuals |
Page 6 highlights
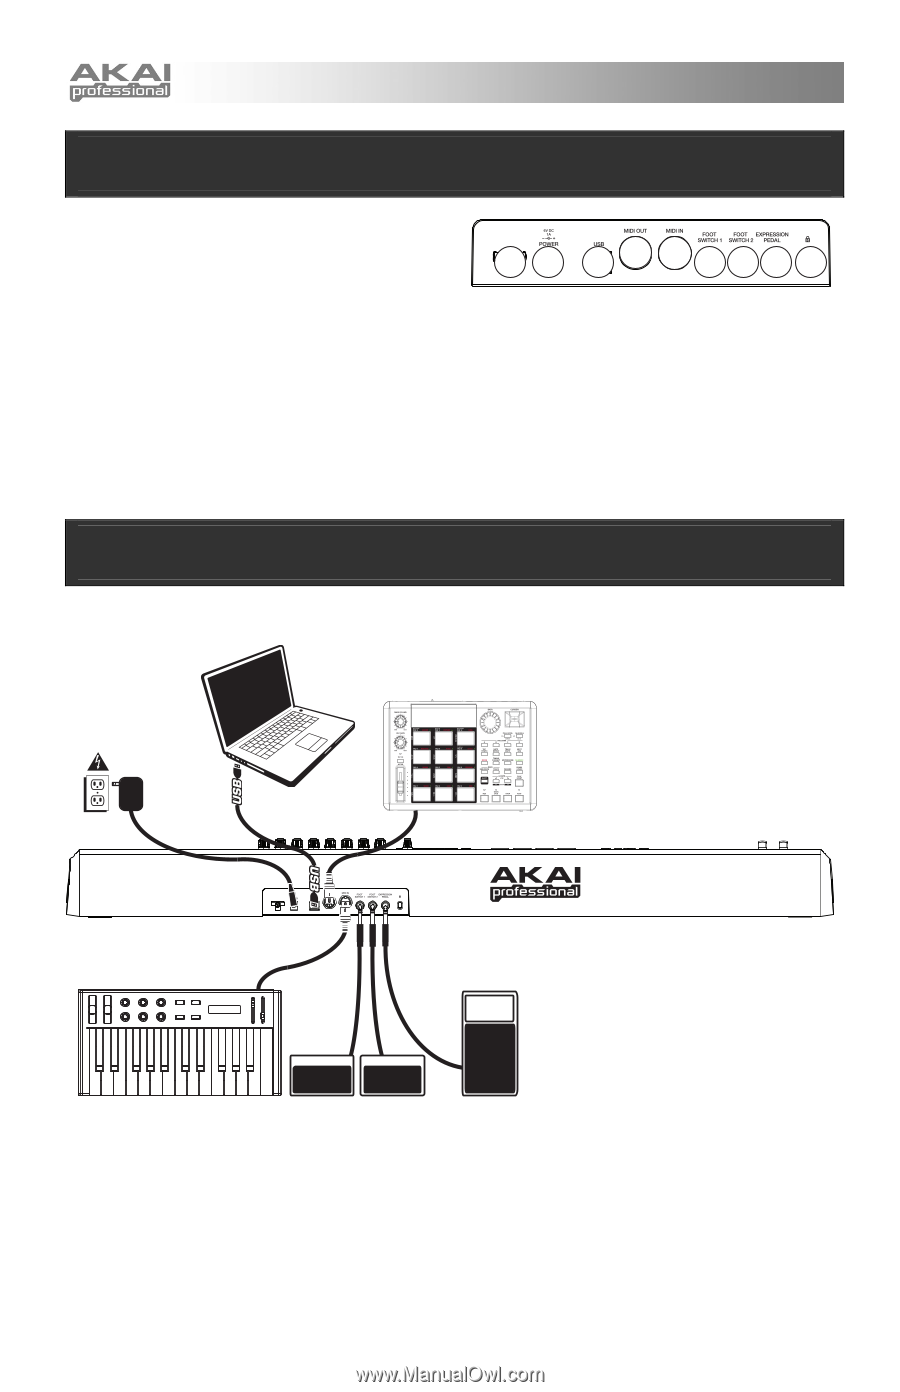
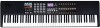
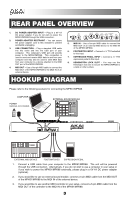
REAR PANEL OVERVIEW 1. DC POWER ADAPTER INPUT - Plug in a 6V-1A DC power adapter if you do not wish to power the MPK61/MPK88 through the USB connection. 2. POWER ADAPTER RESTRAINT - You can secure the power adapter cord to this restraint to prevent accidental unplugging. 3. USB CONNECTION - Plug a standard USB cable into this outlet and into the USB port of your computer. The computer's USB port will provide power to the MPK61/MPK88. This connection is used to send and receive MIDI data to and from your computer and may also be used to send MIDI data from your computer to a device attached to the MIDI OUT port of the MPK61/MPK88. 4. MIDI OUT - Use a five-pin MIDI cable to connect the MIDI OUT of the MPK61/MPK88 to the MIDI IN of an external device. 2 1 3 4 5667 8 5. MIDI IN - Use a five-pin MIDI cable to connect the MIDI OUT of an external MIDI device to the MIDI IN of the MPK61/MPK88. 6. FOOTSWITCH INPUT - Connect a ¼" TS footswitch to this input. 7. EXPRESSION PEDAL INPUT - Connect a ¼" TRS expression pedal to this input. 8. KENSINGTON LOCK SLOT - You may use this Kensington lock slot to secure the MPK61/MPK88 to a table or other surface. HOOKUP DIAGRAM Please refer to the following scenario for connecting the MPK61/MPK88. COMPUTER POWER (optional, not included) EXTERNAL SOUND MODULE EXTERNAL MIDI DEVICE FOOTSWITCHES EXPRESSION PEDAL 1. Connect a USB cable from your computer to the MPK61/MPK88. The unit will be powered through the USB connection. Alternatively, if you do not wish to use a computer in your setup or if you wish to power the MPK61/MPK88 externally, please plug in a 6V-1A DC power adapter (optional). 2. If you would like to use an external sound module, connect a 5-pin MIDI cable from the MIDI OUT of the MPK61/MPK88 to the MIDI IN of the external device. 3. If you would like to use another MIDI controller in your setup, connect a 5-pin MIDI cable from the MIDI OUT of the controller to the MIDI IN of the MPK61/MPK88. 3
-
 1
1 -
 2
2 -
 3
3 -
 4
4 -
 5
5 -
 6
6 -
 7
7 -
 8
8 -
 9
9 -
 10
10 -
 11
11 -
 12
12 -
13
-
14
-
15
-
16
-
17
-
18
-
19
-
20
-
21
-
22
-
23
-
24
-
25
-
26
-
27
-
28
-
29
-
30
-
31
-
32
-
33
-
34
-
35
-
36
-
37
-
38
-
39
-
40
-
41
-
42
-
43
-
44
 |
 |