Alesis DM Dock User Guide - Page 4
Setup, Top Panel, Rear Panel - manual
 |
View all Alesis DM Dock manuals
Add to My Manuals
Save this manual to your list of manuals |
Page 4 highlights
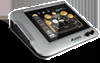
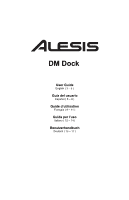
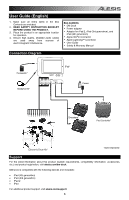
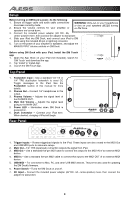
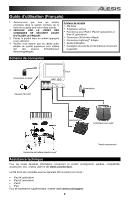
Setup Before turning on DM Dock's power, do the following: 1. Ensure all trigger cable and audio cable connections have been correctly made. 2. Ensure the volume controls for your amplifier or speakers are turned down. WARNING: Only put on your headphones or turn on your speakers AFTER turning on DM Dock. 3. Connect the included power adapter (6V DC, 3A, center-positive) here, then connect the adapter to wall power. 4. Slide your iPad into DM Dock, and connect your iPad to DM Dock using the included 30-pin or lightning connector. 5. Turn on the power of your amplifier or speakers, and adjust the MAIN OUTPUT volume controls on DM Dock. Before using DM Dock with your iPad, install the DM Touch app: 1. Open the App Store on your iPad (not included), search for 'DM Touch' and download the app. 2. Tap 'Install' or 'Install App'. 3. Launch the DM Touch app. Top Panel 1. Footswitch Input - Use a standard 1/4" TS or 1/4" TRS dual-button footswitch to send CC Toggle messages to the iPad. See the Footswitch section of this manual for more details. 1 2. Phones Out - Connect 1/4" headphones to this output. 3. Phones Volume - Adjusts the signal level of the PHONES OUT. 2 4. Main Out Volume - Adjusts the signal level going to the MAIN OUT. 5. Power LED - Illuminates when DM Dock is powered on. 6. Dock Connector - Connect your iPad here. When docked, charging of iPad will begin. Rear Panel 6 34 5 1 2 345 6 7 1. Trigger Inputs - Routes trigger/pad signals to the iPad. These inputs are also routed to the MIDI Out and USB MIDI ports for alternate setups. 2. Main Out - 1/4" TRS (balanced) connection outputs the signal from iPad. 3. MIDI Out - Use a standard five-pin MIDI cable to connect this output to the MIDI IN of an external MIDI device. 4. MIDI In - Use a standard five-pin MIDI cable to connect this input to the MIDI OUT of an external MIDI device. 5. USB MIDI - For connection to Mac, PC, and other USB MIDI devices. This port is also used for updating the DM Dock's firmware. 6. Power Switch - Turns the DM Dock on and off. 7. DC Input - Connect the included power adapter (6V DC, 3A, center-positive) here, then connect the adapter to wall power. 4
-
 1
1 -
 2
2 -
 3
3 -
 4
4 -
 5
5 -
 6
6 -
 7
7 -
 8
8 -
 9
9 -
 10
10 -
11
-
12
-
13
-
14
-
15
-
16
-
17
-
18
-
19
-
20
 |
 |