Alesis DM10 Studio Kit Quick Start Guide - Page 5
Selecting And Editing Kits, Value Up / Down - manual
 |
View all Alesis DM10 Studio Kit manuals
Add to My Manuals
Save this manual to your list of manuals |
Page 5 highlights
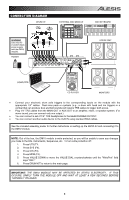
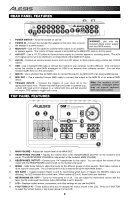
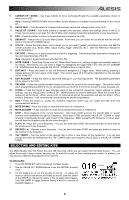
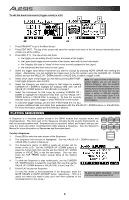
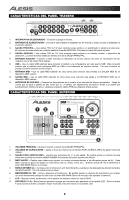
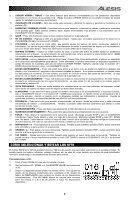
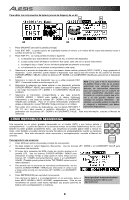
9. CURSOR UP / DOWN - Use these buttons to move (vertically) through the available parameters shown in menus in the LCD. Note: Pressing CURSOR DOWN from the Main Screen allows you to adjust overall parameters for the current Kit. 10. VALUE DIAL - Turn this wheel to increase and decrease values and settings shown in the LCD. 11. VALUE UP / DOWN - Use these buttons to increase and decrease values and settings shown in the LCD. These may be easier to use than the VALUE DIAL when making incremental adjustments to your parameters. 12. EXIT - Press this button to return to the previous menu shown in the LCD. 13. DRUM KIT - Returns the LCD to the Main Screen. From here, you can select the current Kit with the VALUE DIAL or VALUE UP / DOWN buttons. 14. UTILITY - Enters the Utility Menu, which allows you to set certain "global" parameters that affect the DM10's overall operation (e.g., tempo, MIDI, output routing, trigger sensitivity, etc.). (See the Reference Manual for more information.) 15. EXT TRIG - Allows you to adjust parameters related to triggering. Customizing these parameters changes the feel and responsiveness of the Kit. Note: Changes to these parameters will affect ALL Kits. 16. NOTE CHASE - Turns Note Chase on or off. When Note Chase is on, striking a trigger automatically selects it for editing. Alternatively, you can select a trigger by highlighting the trigger field in the LCD with the CURSOR UP / DOWN buttons then using the VALUE UP / DOWN buttons or VALUE DIAL. 17. EDIT INST - Press this button to edit the Instrument assigned to a trigger input. While editing, pressing it toggles between the two Layers of the trigger. The current Layer (A or B) will be highlighted on the top-right corner of the LCD. 18. EDIT ACCOMP - Press this button to adjust the settings for your Accompaniment. The adjustable parameters will be shown in the LCD. 19. PREVIEW - Press this velocity-sensitive button to preview the sound of the current trigger. This can be useful when programming the DM10 if it is not connected to your drum kit, if it is not convenient to strike the pads, etc. 20. STORE - Press this button to save changes made to the current Kit, Sequence, trigger settings, or global settings. Use the VALUE DIAL or VALUE UP / DOWN buttons to select a destination where the current Kit or Sequence will be stored. When saving a Kit, its Instruments and all its parameters will also be stored. When saving a Sequence, it will remember its corresponding Kit and Accompaniment. 21. SEQ - Press this button to access the module's Sequencer where you can create and edit drum and accompaniment patterns. 22. MUTE DRUMS - Press this button to mute the drum track of a Sequence. 23. MUTE ACCOMP - Press this button to mute the Accompaniment track of a Sequence. 24. STOP - Stops playback of the current Sequence. Hold down STOP and turn the VALUE DIAL to "scrub" forwards and backwards through the Sequence. Hold down STOP and press VALUE UP / DOWN to "step" forwards or backwards through each "event" in the Sequence. While navigating the Sequence in these ways, you will hear the Sequence play as you move through it. 25. PLAY / - Plays the current Sequence. You can also hold down STOP and press this button to move back to the previous bar in the Sequence. 26. RECORD / - Records a new Sequence. You can also hold down STOP and press this button to move to the next bar in the Sequence. 27. TAP TEMPO - Tap this button at the desired rate to enter a new tempo for the Sequence. You can also change the tempo by holding down the TAP TEMPO button and using the VALUE DIAL or VALUE UP / DOWN buttons. SELECTING AND EDITING KITS The DM10 Module has 100 Preset Kits and 100 User Kits, which you can select from the Main Screen. You can adjust the sounds, tuning, volume, panning, etc. for each Kit as well as their individual pad sounds. In addition, you may choose a different Accompaniment for each Kit. To select a Kit: 1. Press the DRUM KIT button to bring up the Main Screen. 2. Use the VALUE UP / DOWN buttons or the VALUE DIAL to select a Kit. 3. Hit the triggers to try out the sounds of the Kit. To adjust the levels of various instruments that make up the Kit, slide the faders of the MIXER to change the levels of the corresponding triggers. (Use MIX BANK to toggle between Banks A and B to access all available triggers.) 3
-
 1
1 -
 2
2 -
 3
3 -
 4
4 -
 5
5 -
 6
6 -
 7
7 -
 8
8 -
 9
9 -
 10
10 -
 11
11 -
12
-
13
-
14
-
15
-
16
-
17
-
18
-
19
-
20
-
21
-
22
-
23
-
24
 |
 |