Alesis M1Active 520 USB Quick Start Guide - Page 3
About Latency & Third-party Asio Drivers, Front Panel Overview - speakers
 |
View all Alesis M1Active 520 USB manuals
Add to My Manuals
Save this manual to your list of manuals |
Page 3 highlights
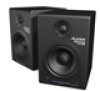
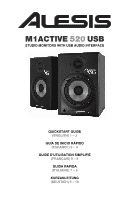
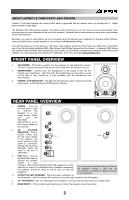
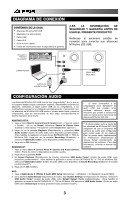
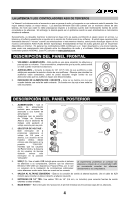
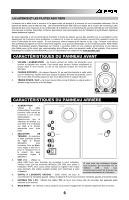
ABOUT LATENCY & THIRD-PARTY ASIO DRIVERS "Latency" is the delay between the moment when audio is generated and the moment when you actually hear it. Higher latency means a longer delay. The M1Active 520 USB speakers feature zero latency direct monitoring so you don't have to worry about latency when monitoring input sources connected to the rear of the speakers. However, latency may become an issue when using software synths and instruments. Generally, you want to keep latency as low as possible while still allowing your equipment to operate without glitches. Latency and buffering is usually adjusted in your software's Preferences settings. If you still experience too much latency or "lag" when using software synths and instruments, you might want to download one of the free and widely available ASIO (Audio Stream Input/Output) drivers from the Internet. In general, ASIO drivers may perform better and with lower latency since they create a more efficient communication between audio devices and software. You may download and install the free ASIO4ALL driver (PC) by visiting www.asio4all.com. FRONT PANEL OVERVIEW 1. VOL/POWER - This knob is used to turn the speakers on and adjust their volume. To turn on, simply turn up the knob; you will feel a click when the speakers turn on. 2. HEADPHONES - Connect your 1/4" headphones to this output to hear the mix through your headphones. Note that while the headphones are connected, you will not be able to hear sound out of your speakers until the headphones are disconnected. 3. POWER / CLIP INDICATOR - This light will illuminate blue when it detects incoming audio signal. It will illuminate red if that signal is clipping. 2 31 REAR PANEL OVERVIEW 1. POWER - Use the included power cable to connect the speakers to a live 6 power source. Make sure your AC VOLTAGE SELECTOR is set to the correct voltage for your country. 5 2. AC VOLTAGE SELECTOR - This 2- position switch sets the AC input voltage 4 4 for the speaker. US users should set this switch to "100-120V" 3 whereas UK and most European users will 2 need to set this to "220-240V." 1 3. USB (1.1) - Use the supplied USB cable to connect the speaker system to your computer. Note that the M1Active 520 USB speakers are Plugand-Play so there is no additional driver installation necessary; the speakers should be ready to use as soon as they are plugged in. If you experience problems when connecting the speakers through a USB hub, we recommend connecting the speakers directly to your computer. 4. OUTPUT TO LEFT SPEAKER - This is the audio connection to the left speaker. Use the included XLR cable to connect the right speaker to the left speaker. 5. 1/4" TRS INPUTS - Use 1/4" TRS cables (not included) to connect external sound sources to these inputs. 6. BASS BOOST - This 2-position switch allows you to boost the speakers' bass frequencies. 2
-
 1
1 -
 2
2 -
 3
3 -
 4
4 -
 5
5 -
 6
6 -
 7
7 -
 8
8 -
 9
9 -
10
-
11
-
12
 |
 |