Alesis Q25 Quick Start Guide - Page 4
Top Panel Overview, Selecting & Editing Midi Commands - 25 key keyboard midi controller
 |
View all Alesis Q25 manuals
Add to My Manuals
Save this manual to your list of manuals |
Page 4 highlights
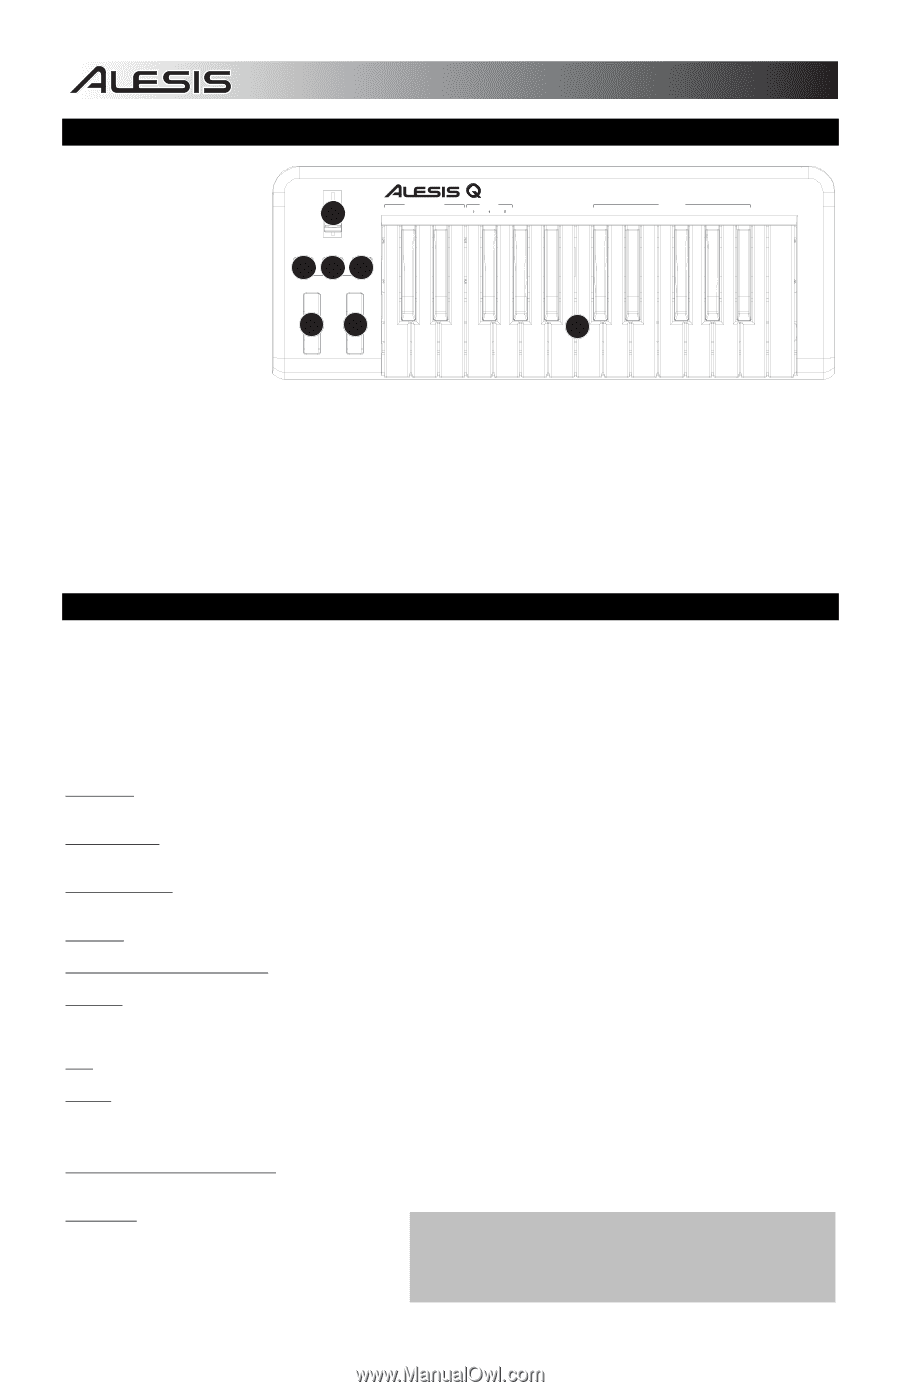
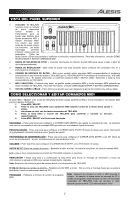
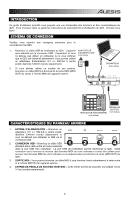
TOP PANEL OVERVIEW 1. KEYBOARD - The KEYBOARD functions as a normal electronic piano keyboard during 4 VELOCIT Y ASSIGNMENT DATA ENTRY AFTER REVERB TOUCH DEPTH VOLUME CC NOTE 25 USB/MIDI KEYBOARD CONTROLLER TRANSPOSE NUMERIC KEYPAD MIDI CC CC RESET CHANNEL DATA NO. PROGRAM 1 2 3 4 5 6 7 8 9 0 CANCEL ENTER performance but can also be used to adjust MIDI settings and send MIDI messages. The labels above the keys DATA ENTRY DOWN 6 MIDI / SELECT 5 OCTAVE UP 6 PITCH MODULATION indicate their functions. The numbered keys 23 1 allow you to enter values for settings. Press the Cancel or Enter key to cancel or confirm your selection, respectively. See SELECTING & EDITING MIDI COMMANDS for more information. 2. PITCH BEND WHEEL - Transmits MIDI Pitch Bend information to raise or lower the pitch of a note temporarily. 3. MODULATION WHEEL - This wheel can be used to transmit continuous controller data (CC #1 or Modulation Depth). 4. DATA ENTRY SLIDER - This slider lets you send MIDI messages for the currently selected parameter from the KEYBOARD (e.g., REVERB DEPTH, VOLUME, etc.). You can select a parameter by pressing MIDI / SELECT then the corresponding key on the KEYBOARD. 5. MIDI / SELECT - Pressing this button allows you to adjust MIDI settings and send MIDI messages by pressing labeled keys on the KEYBOARD. See SELECTING & EDITING MIDI COMMANDS for more information. 6. OCTAVE UP / DOWN - These buttons can be used to shift the keyboard's range up and down. SELECTING & EDITING MIDI COMMANDS The MIDI / SELECT button and the keys on the KEYBOARD allow you to adjust MIDI parameters and send precise MIDI messages and information quickly and easily: 1. Press MIDI / SELECT. 2. Press the key on the KEYBOARD whose MIDI setting (printed above the key) you want to adjust or send. 3. Enter a value with the numbered keys on the KEYBOARD. 4. Press the Enter or Cancel key on the KEYBOARD to confirm or cancel your choice, respectively. 5. Press MIDI / SELECT if the button is still lit. VELOCITY - Press this key to set the DATA ENTRY SLIDER to adjust the note velocity. Increasing this value increases the MIDI velocity value generated by a light key press. AFTERTOUCH - Press this key to set the DATA ENTRY SLIDER to send Aftertouch information (also sometimes referred to as Channel Pressure). REVERB DEPTH - Press this key to set the DATA ENTRY SLIDER to CC #91 (Reverb Send Level). The default value for this setting is 64. VOLUME - Press this key to set the DATA ENTRY SLIDER to CC #7 (Channel Volume). CC DATA (Control Change Data) - Sets the value to be sent. Pressing the Enter key will send a MIDI message. OCTAVE - Lowers or raises the octave range of the KEYBOARD with the "OCTAVE -" and "OCTAVE +" buttons, respectively. You can transpose the keyboard up to two octaves in either direction. Press STANDARD to return the KEYBOARD to its original octave range b / # - Lowers or raises (respectively) the pitch of the entire KEYBOARD a semitone. RESET - Press this key followed by the Enter key to send a reset message to all controllers and return the Q25 to its original settings. Note: This button does not reset the current octave range or transposition of the KEYBOARD. CC NO. (Control Change Number) - Sets the MIDI CC# to be sent. (A message will not be sent until the Enter key is pressed when selecting CC Data.) PROGRAM - Sets the MIDI Program Change number. Note: After you enter a CC#, the number will be remembered by the Q25. However, if you want to send a CC or Program Change message, you must enter the value using the numbered keys on the KEYBOARD each time (even if the desired value is shown in the LCD) before pressing Enter. 4
-
 1
1 -
 2
2 -
 3
3 -
 4
4 -
 5
5 -
 6
6 -
 7
7 -
 8
8 -
 9
9 -
 10
10 -
11
-
12
-
13
-
14
-
15
-
16
-
17
-
18
-
19
-
20
 |
 |