Alesis VI25 User Manual - Page 5
Rear Panel - user guide
 |
View all Alesis VI25 manuals
Add to My Manuals
Save this manual to your list of manuals |
Page 5 highlights
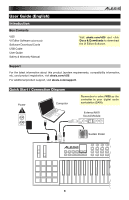
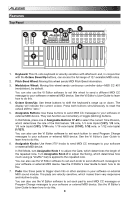
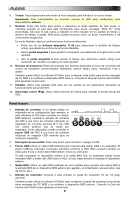
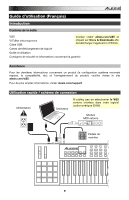
8. Tempo: Tap this button at the desired rate to enter a new tempo. Important: This feature does not work when the VI25 is set to External sync. 9. Roll: Press this button to activate or deactivate Roll Mode. In this mode, pressing and holding a pad (that is set to send Note On messages) causes the pad to retrigger at a rate based on the current Tempo and Time Division settings. This button can function as a toggle (latching) or momentary button. In Roll Mode, some controls have different functions: • Press one of Assignable Buttons 17-24 to select the current Time Division, which determines the rate of the Roll feature. • Turn Assignable Knob 1 to adjust the Gate, which determines the length of the repeated note. • Turn Assignable Knob 2 to adjust the Swing, which determines how much swing (a "shuffle" feel) is applied to the repeated note. 10. Transport Buttons: These six buttons are dedicated buttons for sending conventional transport control commands: Rewind, Fast-Forward, Stop, Play, Loop, and Record. You can also use the VI Editor software to set each button to send MIDI CC messages to your software or external MIDI device. See the VI Editor's User Guide to learn how to do this. 11. Display: Use this LCD screen to view parameter values relevant to VI25's current operation. 12. Preset Down/Up (): Use these arrow buttons to change the preset of VI25. Rear Panel 1. Power Input: If you do not want to use a computer in your setup (i.e., if you are using VI25 to control an external MIDI module), connect VI25's power input to a power outlet using an optional power adapter (9 V DC, 500 mA, center-positive, sold separately). Alternatively, you can connect VI25's USB Port to a power outlet using a standard USB charger (sold separately). 54321 2. Power Switch: Press this button to power the VI25 on or off. 3. USB Port: Use a standard USB cable to connect this USB port to your computer. The computer's USB port provides ample power to VI25. This connection is also used to send and receive MIDI data to and from your computer. If an external device is connected to the MIDI Out, your computer can send MIDI messages via USB to the VI25, which will then send the message to the external device. 4. MIDI Out: Use a standard five-pin MIDI cable to connect this MIDI Out to the MIDI In of an external MIDI device (e.g., a synthesizer, sequencer, drum machine, etc.). 5. Sustain Input: Connect an optional 1/4" TS sustain pedal to this input. You can also use the VI Editor software to set the sustain pedal to send other MIDI CC messages to your software or external MIDI device. See the VI Editor's User Guide to learn how to do this. 5
-
 1
1 -
 2
2 -
 3
3 -
 4
4 -
 5
5 -
 6
6 -
 7
7 -
 8
8 -
 9
9 -
 10
10 -
 11
11 -
12
-
13
-
14
-
15
-
16
-
17
-
18
-
19
-
20
 |
 |