Alpine DPR-RDS1 Owner's Manual (english/french) - Page 2
Intruction d'installation
 |
UPC - 793276401755
View all Alpine DPR-RDS1 manuals
Add to My Manuals
Save this manual to your list of manuals |
Page 2 highlights
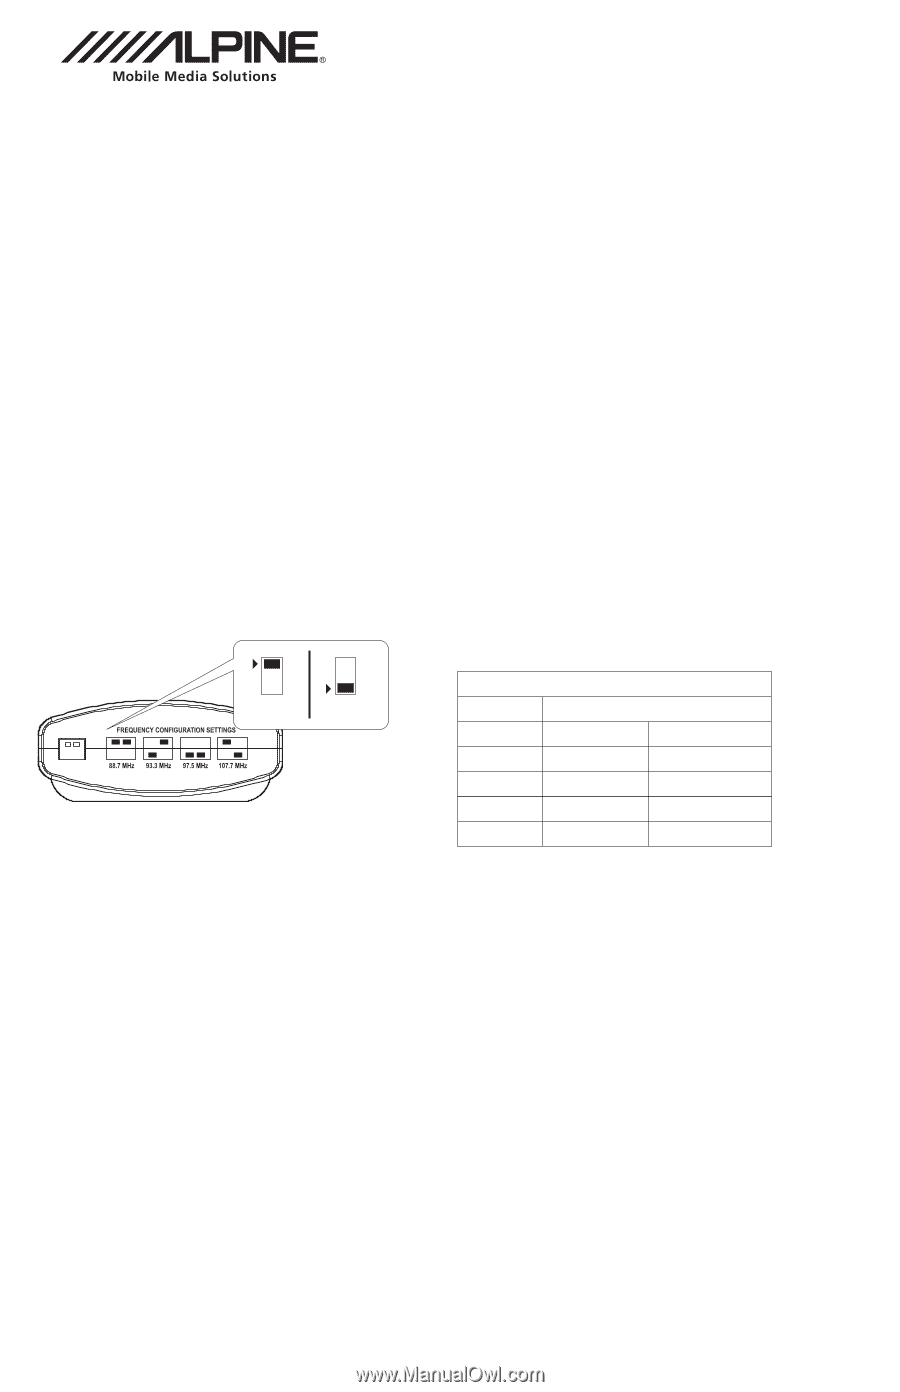
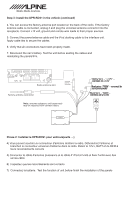
Step 1: Set the DPR-RDS1's FM transmission frequency The frequency selector switch is located on the interface unit and is used to set the optimal transmitting frequency. Incorrect dip switch settings may cause the interface not to work properly or not to operate at all. Disconnect the vehicle harness from module and cycle ignition off for 5 seconds after changing the switches! After making changes to the frequency selector be sure to tune to the correct FM frequency on which the iPod will be heard. Step 2: Install the DPR-RDS1 in the vehicle 1. Pull vehicle into the service bay. 2. Make sure that the radio code is available before disconnecting the battery. Disconnect both battery terminals. These cables must be disconnected during installation for proper initialization of the module when its connected. 3. Pull out the radio by removing surrounding trims and screws to access the factory antenna connector. Most trims can be removed by carefully pulling on the piece or using trim removal tools. trim is usually held in place by snap-in clips. Consult your dealership if additional information is needed on removing the radio. Interface Unit ON/OFF Switch Positions OFF 1 ON 2 "frequency selector" NOTE: Try to select a transmitting frequency that is not occupied by a local FM radio station. Frequency configuration settings Dip switch configuration FM (MHz) Dip switch 1 Dip switch 2 88.7 OFF OFF 93.3 ON OFF 97.5 ON ON 107.7 OFF ON Intruction d'installation Phase 1: Ajustez le choix de fréquence Les commutateurs sont situés sur l'unité et sont utilisés pour placer la meilleure fréquence pour l'émission. Les arrangements incorrects peuvent faire ne pas fonctionner correctement ou ne pas fonctionner l'unité du tout. Déconnectez le câble d'alimentation pendant 5 secondes après changement les positions de commutateur. Après avoir apporté des modifications, accordez à la radiofréquence sur votre radio pour entendre l'iPod Phase 2: Installez le DPR-RDS1 pour véhicule 1) S'arrêter le véhicule en le aire de réparation 2) Notez le code radio avant de commencer. Déconnectez les bornes de batterie pour s'assurer l'unité initialise correctement. 3) Enlevez les panneaux de véhicule pour accéder au connecteur de radio et d'antenne. Enlevez les panneaux en tirant doucement et à l'aide des outils appropriés pour ne pas les endommager. Consultez votre agence si les informations supplémentaires ou l'aide sont nécessaire.
-
 1
1 -
 2
2 -
 3
3 -
 4
4
 |
 |