Alpine PSU-300CVC Owners Manual - Page 5
Factory Equipment Removal Process continued, Installation
 |
View all Alpine PSU-300CVC manuals
Add to My Manuals
Save this manual to your list of manuals |
Page 5 highlights
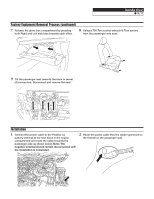
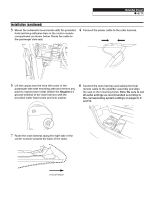
Honda Civic ˜ 5/11 Factory Equipment Removal Process (continued) 7 Release the glove box compartment by pressing both Right and Left side tabs towards each other. 8 Using a T50 Torx socket extract (4) Torx screws from the passenger side seat. 9 Tilt the passenger seat towards the back to reveal (4) connectors. Disconnect and remove the seat. Installation 1 Connect the power cable to the Positive (+) battery terminal at the fuse block in the engine compartment and route the cable towards the passenger side as shown below. Note: The negative terminal should remain disconnected unit the installation is completed. 2 Route the power cable thru the rubber grommet on the firewall on the passenger side.
-
 1
1 -
 2
2 -
 3
3 -
 4
4 -
 5
5 -
 6
6 -
 7
7 -
 8
8 -
 9
9 -
 10
10 -
 11
11
 |
 |

Honda Civic
±
5/11
Factory Equipment Removal Process (continued)
7
Release the glove box compartment by pressing
both Right and Left side tabs towards each other.
9
Tilt the passenger seat towards the back to reveal
(4) connectors. Disconnect and remove the seat.
8
Using a T50 Torx socket extract (4) Torx screws
from the passenger side seat.
Installation
1
Connect the power cable to the Positive (+)
battery terminal at the fuse block in the engine
compartment and route the cable towards the
passenger side as shown below.
Note: The
negative terminal should remain disconnected unit
the installation is completed.
2
Route the power cable thru the rubber grommet on
the firewall on the passenger side.