Alpine PSU-300CVC Owners Manual - Page 6
Installation continued
 |
View all Alpine PSU-300CVC manuals
Add to My Manuals
Save this manual to your list of manuals |
Page 6 highlights
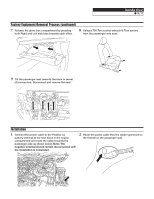
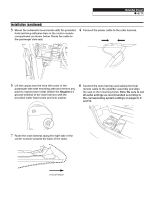
Honda Civic ˜ 6/11 Installation (continued) 3 Mount the subwoofer level remote with the provided hook and loop adhesive tape in the center console compartment as shown below. Route the cable to the passenger side seat. 4 Connect the power cable to the main harness. 5 Lift the carpet near the front left screw of the passenger side seat mounting area and remove any paint to expose bare metal. Attach the Negative (-) ground terminal of the main harness with the provided wafer head screw and lock washer. 6 Connect the main harness and subwoofer level remote cable to the amplifier assembly and align the seat to the mounting holes. Note: Be sure to set all audio settings as recommended according to the corresponding system settings on pages 8, 9 and 10. 7 Route the main harness along the right side of the center console towards the back of the radio. Front of Vehicle
-
 1
1 -
 2
2 -
 3
3 -
 4
4 -
 5
5 -
 6
6 -
 7
7 -
 8
8 -
 9
9 -
 10
10 -
 11
11
 |
 |
