Alpine iDA-X100M Owners Manual - Page 9
Radio - remote
 |
UPC - 793276711540
View all Alpine iDA-X100M manuals
Add to My Manuals
Save this manual to your list of manuals |
Page 9 highlights
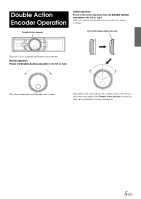
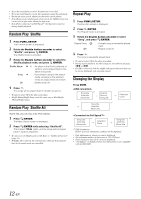
4 Rotate the Double Action encoder to select year, month, day, hour or minutes to be set. 5 Press /ENTER. The year setting mode is activated, and the year blinks. (When "year" is set) 6 Rotate the Double Action encoder to set year, and then press /ENTER. The setting for year is complete. (When "year" is set) 7 Repeat steps 4 to 6 above to set month, day, hour and minutes. 8 Press and hold for at least 2 seconds to return to normal mode. • Pressing during the procedure will return to the previous mode. Displaying the Calendar/Time Press VIEW. The calendar/time is displayed. Pressing VIEW again will return to normal mode. Radio SOURCE Double Action encoder BAND TUNE/A.ME /ENTER PRESET VIEW This unit cannot receive HD Radio™ signals (digital terrestrial radio). In order to activate the digital radio functions described below, an optional HD Radio Tuner module must be connected through the Ai-NET bus. How to View the Display 1 4 2 5 3 • Selecting any tuner or iPod function while in the clock priority mode will interrupt the time display momentarily. The function selected 6 will be displayed for about 5 seconds before the time returns to the 1 Mode display display. 2 Preset number • If an HD Radio Tuner is connected, text information can be displayed. Refer to "Changing the Display (HD Radio mode only)" (page 9). • If an XM receiver is connected, the Auxiliary Data Field can be displayed. Refer to "Setting the Auxiliary Data Field Display" 3 Volume 4 Tuning mode 5 Frequency 6 Calendar/Time (page 28). • If an iPod is connected via USB, the album cover screen can be displayed. Refer to "Changing the Display" (page 12). Controllable With Remote Control Point the optional remote control transmitter at the remote control sensor. Remote control sensor 7-EN
-
 1
1 -
2
-
3
-
 4
4 -
 5
5 -
 6
6 -
 7
7 -
 8
8 -
 9
9 -
 10
10 -
 11
11 -
 12
12 -
 13
13 -
 14
14 -
15
-
16
-
17
-
18
-
19
-
20
-
21
-
22
-
23
-
24
-
25
-
26
-
27
-
28
-
29
-
30
-
31
-
32
-
33
-
34
-
35
-
36
-
37
-
38
-
39
-
40
-
41
-
42
-
43
-
44
-
45
-
46
-
47
-
48
-
49
-
50
-
51
-
52
-
53
-
54
-
55
-
56
-
57
-
58
-
59
-
60
-
61
-
62
-
63
-
64
-
65
-
66
-
67
-
68
-
69
-
70
-
71
-
72
-
73
-
74
-
75
-
76
-
77
-
78
-
79
-
80
-
81
-
82
-
83
-
84
-
85
-
86
-
87
-
88
-
89
-
90
-
91
-
92
-
93
-
94
-
95
-
96
-
97
-
98
-
99
-
100
-
101
-
102
-
103
-
104
-
105
-
106
-
107
-
108
-
109
-
110
-
111
-
112
-
113
-
114
-
115
-
116
-
117
-
118
-
119
-
120
-
121
-
122
-
123
-
124
-
125
-
126
-
127
-
128
-
129
-
130
-
131
-
132
-
133
-
134
-
135
-
136
-
137
-
138
-
139
-
140
-
141
-
142
-
143
 |
 |
