Alpine iDA-X305S Om Ida-x305s English - Page 10
Radio - remote
 |
UPC - 793276711687
View all Alpine iDA-X305S manuals
Add to My Manuals
Save this manual to your list of manuals |
Page 10 highlights
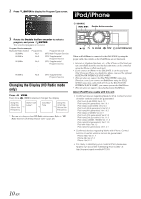
4 Rotate the Double Action encoder to select year, month, day, hour or minutes to be set. 5 Press /ENTER. The year setting mode is activated, and the year blinks. (When "year" is set) 6 Rotate the Double Action encoder to set year, and then press /ENTER. The setting for year is complete. (When "year" is set) 7 Repeat steps 4 to 6 above to set month, day, hour and minutes. 8 Press and hold for at least 2 seconds to return to normal mode. • Pressing during the procedure will return to the previous mode. Displaying the Calendar/Time Press VIEW. The calendar/time is displayed. Pressing return to normal mode. VIEW again will Radio SOURCE VIEW Double Action encoder BAND TUNE/A.ME /ENTER (PRESET) This unit cannot receive HD Radio™ signals (digital terrestrial radio). In order to activate the digital radio functions described below, an optional HD Radio Tuner module must be connected through the Ai-NET bus. iTunes Tagging lets you tag songs you hear on HD Radio stations with your new iDA-X305S and then preview, buy, and download them later from your iTunes Tagged playlist the next time you sync your iPod. If the unit is connected to a Tagging compatible device, you can use the iTunes Tagging function. For details, refer to the Owner's Manual of the Tagging compatible device. How to View the Display • Selecting any tuner or iPod/iPhone function while in the clock 1 priority mode will interrupt the time display momentarily. The 4 function selected will be displayed for about 5 seconds before the time returns to the display. 2 5 • If an HD Radio Tuner is connected, text information can be displayed. Refer to "Changing the Display (HD Radio mode only)" (page 10). • If an XM receiver is connected, the Auxiliary Data Field can be 3 displayed. Refer to "Setting the Auxiliary Data Field Display" 6 (page 31). • If an iPod/iPhone is connected, the album cover screen can be displayed. Refer to "Changing the Display" (page 13). • In Auxiliary/Auxiliary+ mode, Calendar/Time is not displayed. 1 Mode display 2 Preset number 3 Volume 4 Tuning mode 5 Frequency Controllable With Remote Control 6 Calendar/Time Point the optional remote control transmitter at the remote control sensor. 8-EN Remote control sensor
-
 1
1 -
2
-
3
-
4
-
 5
5 -
 6
6 -
 7
7 -
 8
8 -
 9
9 -
 10
10 -
 11
11 -
 12
12 -
 13
13 -
 14
14 -
 15
15 -
16
-
17
-
18
-
19
-
20
-
21
-
22
-
23
-
24
-
25
-
26
-
27
-
28
-
29
-
30
-
31
-
32
-
33
-
34
-
35
-
36
-
37
-
38
-
39
-
40
-
41
-
42
-
43
-
44
-
45
-
46
-
47
-
48
-
49
-
50
 |
 |
