Ariens Max Zoom 48 Owners Manual - Page 22
MOWER BLADES, Purging the Hydraulic System, Remove, Replace
 |
View all Ariens Max Zoom 48 manuals
Add to My Manuals
Save this manual to your list of manuals |
Page 22 highlights
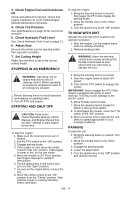
7. Fill with 20W-50 engine oil with an SL API classification until oil appears at the bottom of the drain plug (about 2 quarts per transaxle). Install the drain plug and tighten it to 180 lbf-in (20.3 N•m). 8. Repeat steps 1 - 7 for the other transaxle. 9. Follow the instructions in To Add Hydraulic Fluid: on page 21. 2 1 5. Start the engine and slowly move the steering levers in forward and reverse five or six times. 6. Stop the engine, check the oil level and add oil as needed. 7. Repeat steps 2 - 6 until the transaxles operate smoothly in forward and reverse at normal speeds without excessive noise. MOWER BLADES Remove 3 4 1. Drain Plug 2. Oil Filter 3. Filter Guard 4. Mounting Hardware Figure 8 Purging the Hydraulic System CAUTION: Use sturdy gloves or padding to protect hands when working with mower blades. 1. Turn the engine off. Remove the ignition key. Remove the ignition wire from the spark plugs. 2. Remove the bolts, cup washer, and blades from the spindle shafts. Replace 1. Put the blades, cup washers, and the bolts back on the spindle shafts. 2. Tighten the bolts to a torque of 115 - 160 lbf-ft (156 - 217 N•m). 3. Replace the ignition wire on the spark plugs. WARNING: This adjustment requires operating the engine. Use extreme care to avoid contact with moving parts and hot surfaces. Be sure rear of unit is well supported and secure before starting engine. 1. With the unit up to and facing a wall, jack up the unit so that both drive wheels are off the ground. 2. Disengage the parking brake and put the transaxle bypass levers in the neutral position. See Moving the Unit with the Engine Off on page 18. 3. Start the engine and slowly move the steering levers in forward and reverse five or six times. 4. Stop the engine and put the transaxle bypass levers in the drive position. See Moving the Unit with the Engine Off on page 18. 1 2 3 1. Blade 2. Cup Washer 3. Bolt Figure 9 GB - 22
-
 1
1 -
2
-
3
-
4
-
5
-
6
-
7
-
8
-
9
-
10
-
11
-
12
-
13
-
14
-
15
-
16
-
 17
17 -
 18
18 -
 19
19 -
 20
20 -
 21
21 -
 22
22 -
 23
23 -
 24
24 -
 25
25 -
 26
26 -
 27
27 -
28
-
29
-
30
-
31
-
32
-
33
-
34
-
35
-
36
-
37
-
38
 |
 |
