Ariens Path-Pro 136 Owners Manual - Page 14
MAINTENANCE, Remote Discharge Chute Handle, Assembly, Item 4, Model 938033, Stop Engine
 |
View all Ariens Path-Pro 136 manuals
Add to My Manuals
Save this manual to your list of manuals |
Page 14 highlights
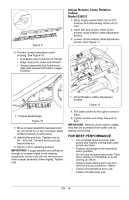
Remote Discharge Chute Handle Assembly (Item 4) Model 938033 IMPORTANT: Always throw snow in a safe direction, away from people and windows. Move remote discharge chute handle forward or backward to choose the direction to throw snow. If chute becomes frozen and does not turn correctly, take unit into warm area until controls are unfrozen. Stop Engine 1. Release auger control bar (Item 2). 2. Turn engine switch (Item 16) to OFF position. 3. If finished with unit, close fuel shut-off valve (Item 20). MAINTENANCE Replace Auger Paddles Replace auger paddles when paddles are worn down to wear indicator holes. See Figure 5. 1 1. Move engine switch (Item 16) to OFF position and remove key. Allow unit to cool. 2. Tip unit back onto engine guard. Do not tip further than engine guard allows or oil may leak out of engine. 3. Remove six hex bolts and nuts per paddle. Discard hardware, spacers and paddles. See Figure 6. NOTICE: Do not remove center plate. 2 3 1 1 1. Bolt and Nut Locations 2. Paddle 3. Center Plate Figure 6 1 1. Wear Indicator Hole Figure 5 IMPORTANT: Always replace auger paddles in pairs. Do not replace one paddle only. See MAINTENANCE SCHEDULE on page 17. 4. Position new paddles with wear indicator holes on the left side as you face the unit. 5. Install spacers into paddle holes and secure paddle with new hex bolts and nuts. 6. Tighten nuts to 50 - 90 in-lbf. Do not overtighten. 7. When both paddles are installed, rotate auger paddles by hand. Ensure that paddles do not rub on housing and are tightly attached. 8. Return unit to operating position. 9. Remove slack from auger cable. See Adjust Auger Cable on page 15. EN - 14
-
 1
1 -
2
-
3
-
4
-
5
-
6
-
7
-
8
-
 9
9 -
 10
10 -
 11
11 -
 12
12 -
 13
13 -
 14
14 -
 15
15 -
 16
16 -
 17
17 -
 18
18 -
 19
19 -
20
-
21
-
22
-
23
-
24
 |
 |
