Ariens Pro 21 Owners Manual - Page 10
CONTROLS AND FEATURES, Muffler and Muffler Guard
 |
View all Ariens Pro 21 manuals
Add to My Manuals
Save this manual to your list of manuals |
Page 10 highlights
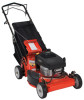
3. Check the level of the engine crankcase oil before each use. NOTE: The engine is shipped with oil in crankcase. Refer to Engine Manual for detailed instructions. 4. Set-up mower for bagging, side discharge or mulching. See MOWER SET-UP on page 13. NOTE: The mower ships with the rear wheels and the front wheels set for different cutting heights. This position is not suitable for cutting grass. Before mowing, make sure the wheels are set at the same cutting height in a range appropriate for your mowing conditions. 5. Set the proper cutting height. See CUTTING HEIGHT ADJUSTMENT on page 11. 6. Fill fuel tank. See FILLING THE FUEL TANK on page 12. 7. Connect spark plug wire. 8. Check the engine/blade control feature. Try starting the engine without the engine/blade control held against the handlebar. Engine must not start. If engine starts, stop engine and bring the unit to your dealer for adjustment or repair. CONTROLS AND FEATURES 1 2 13 12 11 10 15 14 1. Handlebars 2. Wheel Drive Control 3. Engine/Blade Control 4. Oil Fill/Dipstick 5. Fuel Tank and Cap 6. Air Filter 7. Primer Bulb 3 4 5 6 7 9 8 10 OM3155 Figure 6 8. Muffler and Muffler Guard 9. Mulch Cover 10. Cutting Height Levers 11. Grass Bag 12. Rear Door 13. Recoil Starter Handle 14. Side Discharge Chute 15. Mulch Plug GB - 10
-
 1
1 -
2
-
3
-
4
-
 5
5 -
 6
6 -
 7
7 -
 8
8 -
 9
9 -
 10
10 -
 11
11 -
 12
12 -
 13
13 -
 14
14 -
 15
15 -
16
-
17
-
18
-
19
-
20
-
21
-
22
-
23
-
24
-
25
-
26
-
27
-
28
-
29
-
30
-
31
-
32
 |
 |
