Asus AGP-V6600 Deluxe ASUS V6800/V6600 Series Graphic Card English Version Use - Page 37
Video Capture
 |
View all Asus AGP-V6600 Deluxe manuals
Add to My Manuals
Save this manual to your list of manuals |
Page 37 highlights
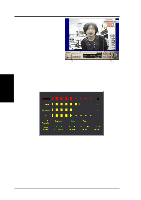
4. S/W Reference ASUS Live 4. Software Reference If desired, you may adjust the Brightness, Contrast, Saturation, and Hue of your display by using the video source setup screen. Use the Up or Down Buttons on the ASUS Main Panel or the UP and DOWN arrow keys on your keyboard to select the desired option and then the Left and Right Buttons or the LEFT and RIGHT arrow keys to make the desired adjustments. Click again the Show/Hide Video Source Options button on the ASUS Main Panel to exit from the video source option screen. Video Capture IMPORTANT: It is the intent of ASUS that this product be used in full compliance with the copyright laws of your respective and other countries and that prior permission be obtained from copyright owners whenever necessary. When you install the Windows 98 Driver of your ASUS graphics card (only models with the VIDEO-IN connector), the video capture driver will automatically be installed on your system. This video capture driver follows Microsoft Video for Windows standard and can open up to a capture window size of 704 x 480. It can be used with some applications that use video capture as an option, such as video conferencing, net meeting, or digital video authoring applications. IMPORTANT: You must enable the DMA transfer mode of your hard disk (EIDE HD) to get the maximum data transfer capability (704 x 480, 30 frames/second) during the video capture process. Otherwise, your system may become unstable. Enabling DMA Transfer Mode NOTE: The How to Get Maximum Capture Performance dialog box will tell you how to enable your hard disk's DMA transfer mode to get the best capture performance. Simply follow the on-screen instructions to enable DMA mode. Otherwise, do the following: 1. Click Start, point to Settings, and then click Control Panel. 2. Double-click the System icon. The System Properties dialog box appears. 3. Click the Device Manager tab and then click the plus sign next to Disk drives, and then double-click your hard disk. The hard disk's Properties box appears. 4. Click the Settings tab and then select the DMA check box under Options. ASUS V6600/V6800 Series User's Manual 37
-
 1
1 -
2
-
3
-
4
-
5
-
6
-
7
-
8
-
9
-
10
-
11
-
12
-
13
-
14
-
15
-
16
-
17
-
18
-
19
-
20
-
21
-
22
-
23
-
24
-
25
-
26
-
27
-
28
-
29
-
30
-
31
-
 32
32 -
 33
33 -
 34
34 -
 35
35 -
 36
36 -
 37
37 -
 38
38 -
 39
39 -
 40
40 -
 41
41 -
 42
42 -
43
-
44
-
45
-
46
-
47
-
48
-
49
-
50
-
51
-
52
-
53
-
54
-
55
-
56
-
57
-
58
-
59
-
60
-
61
-
62
-
63
-
64
-
65
-
66
-
67
-
68
-
69
-
70
-
71
-
72
-
73
-
74
-
75
-
76
 |
 |
