Asus Asteio D20 Quick Start Guide - Page 1
Asus Asteio D20 Manual
 |
View all Asus Asteio D20 manuals
Add to My Manuals
Save this manual to your list of manuals |
Page 1 highlights
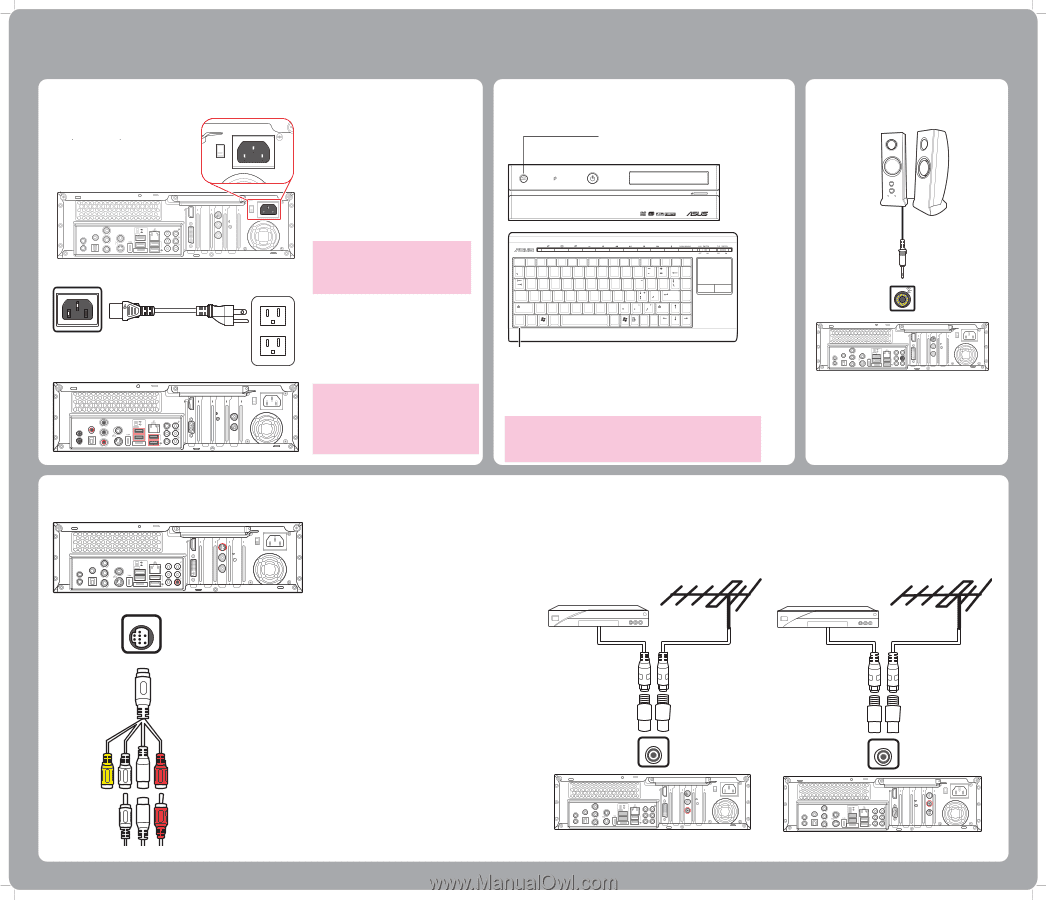
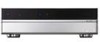
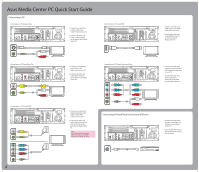
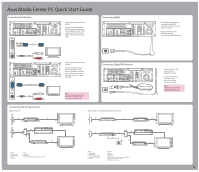
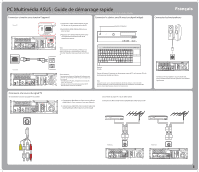
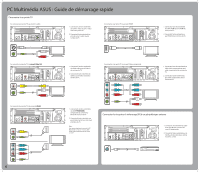
Asus Media Center PC Quick Start Guide This guide explains how to quickly get started using your Media Center PC. Please refer to the User's Manual for more detailed installation and safety instructions. Connecting and Turning On The Power Connecting Wireless Keyboard and Mouse E82405SP R Asteio D22 15 15 VIDEO-IN HDMI TV1 S/PDIF IR 1 IR 2 S/PDIF VIDEO OUT Y Pb s Pr 2.0 2.0 E-SATA CENTER REAR SIDE 2.0 TV2 1. Connect the power cable to the AC IN jack on the rear panel of the Media Center PC. 2. Plug the power cable into a power socket. 3. Press the Power button on the front panel to turn on the Media Center PC. Note: Ensure you use the correct voltage as recommended by the manufacturer before turning on your Media Center PC. Check the voltage label located on the left of the Power In jack. Connect button Digital HOME RECORDER DVD+R DL HIGH DEFINITION MULTIMEDIA INTERFACE Esc F1 ~! 1 Tab Q F2 F3 F4 F5 F6 F7 @ # $ %^ 2 3 4 5 6 WE R T Y F8 &7 7 F9 F10 F11 F12 *8 ( 9 ) * 8 9 0 Num Lock PrtSc Scroll Pause SysRq Lock Break Back Space Home U4 I 5 O6 P { } [ ] PgUp Caps A S D F G H J 1 K2 L 3 Lock " Enter PgDn Shift Z X C V B N M0 < > ? Shift End ID Fn Link Ctrl Alt Alt Ins Del Asteio D20 S/PDIF IR 1 IR 2 S/PDIF VIDEO OUT Y s Pb Pr 2.0 2.0 E-SATA CENTER REAR SIDE 2.0 HDMI 15 TV2 VIDEO-IN Connecting the TV Signal Source Connecting to TV Signal Source Using S-video 15 VIDEO-IN HDMI TV1 S/PDIF IR 1 IR 2 S/PDIF VIDEO OUT Y Pb s Pr 2.0 2.0 E-SATA CENTER REAR SIDE 2.0 TV2 Warning: • Openings in the computer case are provided for ventilation. Do not block or cover these openings. • Do not set up the system in an enclosed cabinet as it may cause overheat. • Make sure you provide adequate space around the system for ventilation. ID Link button Press the Connect button on the front panel of your Media Center PC and the ID Link button on your wireless keyboard to establish a link. Note: When the wireless keyboard is left idle for more than three minutes, it enters the power saving mode to reduce power consumption. Press any key (excluding the touch pad and the left/right click button) to return to normal mode. 1. Connect an S-video cable from a video source to the Video In adapter cable and connect it to the Video In port. 2. Connect a RCA cable from the Audio Out jacks on the video device to the Line In (red) jack. Connecting to TV Signal/Coaxial TV Connect a coaxial cable from a video device to the TV jack. VIDEO-IN English Connecting Speakers 15 VIDEO-IN HDMI TV1 S/PDIF IR 1 IR 2 S/PDIF VIDEO OUT Y Pb s Pr 2.0 2.0 E-SATA CENTER REAR SIDE 2.0 TV2 Connect the speakers to the Audio Out jack (green) as shown. Speakers may be sold separately. 15G06J0080K0 TV Asteio D22 15 VIDEO-IN HDMI TV1 S/PDIF IR 1 IR 2 S/PDIF VIDEO OUT Y Pb s Pr 2.0 2.0 E-SATA CENTER REAR SIDE 2.0 TV2 TV Asteio D20 S/PDIF IR 1 IR 2 S/PDIF VIDEO OUT Y Pb s Pr 2.0 2.0 E-SATA CENTER REAR SIDE 2.0 HDMI 15 TV1 TV2 VIDEO-IN 1
-
 1
1 -
 2
2 -
 3
3 -
 4
4 -
 5
5 -
 6
6 -
 7
7 -
8
-
9
-
10
-
11
-
12
-
13
-
14
-
15
-
16
-
17
-
18
-
19
-
20
-
21
-
22
-
23
-
24
 |
 |