Asus Asteio D20 Quick Start Guide - Page 4
Inserting Wireless Keyboard and Mouse Batteries
 |
View all Asus Asteio D20 manuals
Add to My Manuals
Save this manual to your list of manuals |
Page 4 highlights
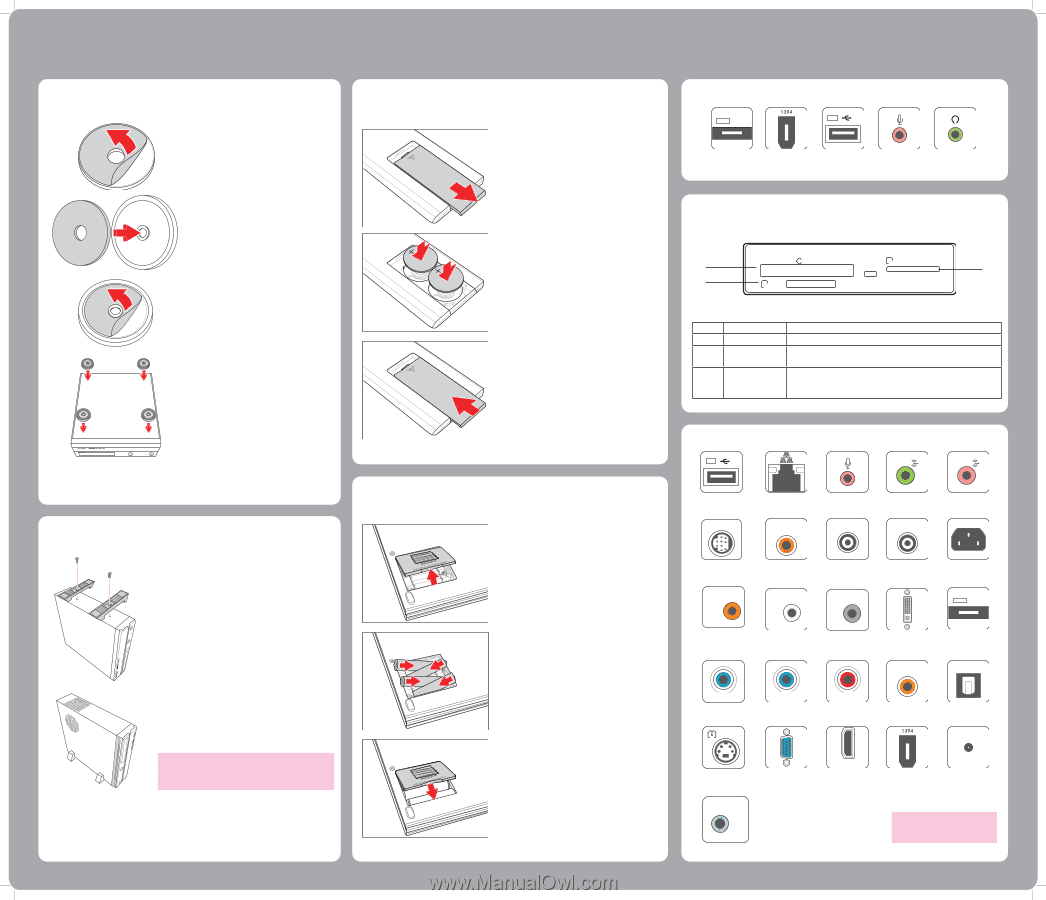
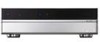
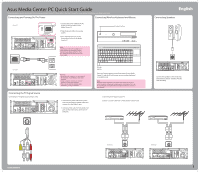
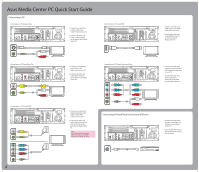
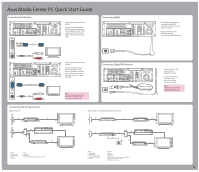
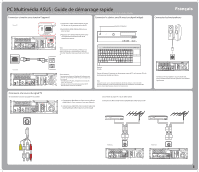
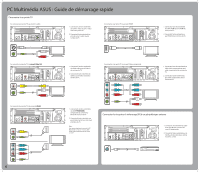
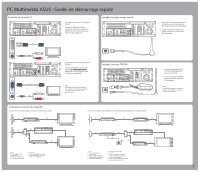
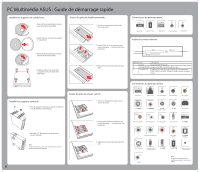
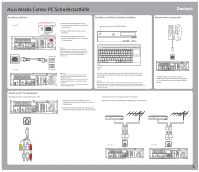
Asus Media Center PC Quick Start Guide Installing the Rubber Feet Inserting Remote Control Batteries 1. Peel off the backing paper from one side of a padded ring. 1. Open the battery compartment cover. 2. Attach the padded ring to the rubber feet. 3. Remove the backing from the other side of the padded ring. 4. Attach the rubber feet to the four corners on the base of your Media Center PC. 2. Insert two Li-Ion batteries paying attention to the polarity markings inside the battery compartment. 3. Close the battery compartment cover. RECORDER DVD+R DL Digital HOME Installing the PC Stand 1. Fix the pedestals to screw holes on the left of the Media Center PC as shown. Inserting Wireless Keyboard and Mouse Batteries 1. Open the battery compartment cover. RECORDER DVD+R DL Digital HOME 2. Turn the PC over to stand in upright position. Note: You can choose to set up your Media Center PC in upright or horizontal position according to your preference. 2. Insert four AAA batteries paying attention to the polarity markings inside the battery compartment. 3. Close the battery compartment cover. Digital HOME DVD+R DL RECORDER 4 Front Panel Connectors 2.0 E-SATA E-SATA Port IEEE 1394 Port USB 2.0 Port Microphone Jack Earphone Jack Inserting Memory Cards CF MMC. SD C W/R A B M S /PRO Item Name A CF slot B MS/MS PRO Slot C MMC/SD slot Description Supports MD, CF Type I/II Supports MS/MS-Pro, MS duo, MS pro duo Supports SD, mini SD (Micro SD through adapter), MMC, MMC4.x, RS MMC, RSMMC4.x (MMC mobile through adapter) Rear Panel Connectors 2.0 USB 2.0 Port VIDEO-IN Ethernet Socket Microphone Jack Audio Out Jack VIDEO OUT TV1 TV2 Audio In Jack Video In Port CENTER Video Out Port REAR TV1 Port (For D22 only) SIDE TV2 Port Power In Socket E-SATA Center Speaker Jack Rear Speaker Jack Side Speaker Jack Y Pb Pr Component Video ports DVI Connector S/PDIF S/PDIF Port (RCA) E-SATA Port S/PDIF S/PDIF Port (Optical) S-Video Out Port VGA Connector (For D20 only) IR 1 IR Port HDMI HDMI Port IEEE 1394 Port WIFI Antenna Connector Note: Connector location and type may vary by model.
-
 1
1 -
 2
2 -
 3
3 -
 4
4 -
 5
5 -
 6
6 -
 7
7 -
 8
8 -
 9
9 -
 10
10 -
11
-
12
-
13
-
14
-
15
-
16
-
17
-
18
-
19
-
20
-
21
-
22
-
23
-
24
 |
 |