Asus DSBF-DM User Manual - Page 51
Force BIOS recovery setting 3-pin RECOVERY1, Onboard SATA setting 3-pin SATA_EN1, SATA_EN2
 |
View all Asus DSBF-DM manuals
Add to My Manuals
Save this manual to your list of manuals |
Page 51 highlights
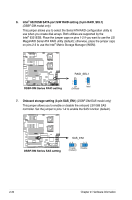
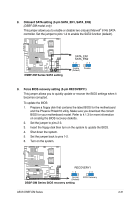
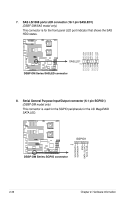
8. Onboard SATA setting (3-pin SATA_EN1, SATA_EN2) (DSBF-DM model only) This jumper allows you to enable or disable two onboard Marvell® 6145 SATA controller. Set the jumper to pins 1-2 to enable the SATA function (default). DSBF-DM Series SATA controller 1 SATA_EN1 ® SATA_EN2 12 23 SATA controller 2 DSBF-DM Series SATA setting Enable (Default) Disable 9. Force BIOS recovery setting (3-pin RECOVERY1) This jumper allows you to quickly update or recover the BIOS settings when it becomes corrupted. To update the BIOS: 1. Prepare a floppy disk that contains the latest BIOS for the motherboard and the Phoenix Phlash16 utility. Make sure you download the correct BIOS for your motherboard model. Refer to 4.1.3 for more information on creating the BIOS recovery diskette. 2. Set the jumper to pins 2-3. 3. Insert the floppy disk then turn on the system to update the BIOS. 4. Shut down the system. 5. Set the jumper back to pins 1-2. 6. Turn on the system. DSBF-DM Series ® RECOVERY1 12 23 Normal (Default) DSBF-DM Series BIOS recovery setting BIOS Recovery ASUS DSBF-DM Series 2-31
-
 1
1 -
2
-
3
-
4
-
5
-
6
-
7
-
8
-
9
-
10
-
11
-
12
-
13
-
14
-
15
-
16
-
17
-
18
-
19
-
20
-
21
-
22
-
23
-
24
-
25
-
26
-
27
-
28
-
29
-
30
-
31
-
32
-
33
-
34
-
35
-
36
-
37
-
38
-
39
-
40
-
41
-
42
-
43
-
44
-
45
-
 46
46 -
 47
47 -
 48
48 -
 49
49 -
 50
50 -
 51
51 -
 52
52 -
 53
53 -
 54
54 -
 55
55 -
 56
56 -
57
-
58
-
59
-
60
-
61
-
62
-
63
-
64
-
65
-
66
-
67
-
68
-
69
-
70
-
71
-
72
-
73
-
74
-
75
-
76
-
77
-
78
-
79
-
80
-
81
-
82
-
83
-
84
-
85
-
86
-
87
-
88
-
89
-
90
-
91
-
92
-
93
-
94
-
95
-
96
-
97
-
98
-
99
-
100
-
101
-
102
-
103
-
104
-
105
-
106
-
107
-
108
-
109
-
110
-
111
-
112
-
113
-
114
-
115
-
116
-
117
-
118
-
119
-
120
-
121
-
122
-
123
-
124
-
125
-
126
-
127
-
128
-
129
-
130
-
131
-
132
-
133
-
134
-
135
-
136
-
137
-
138
-
139
-
140
-
141
-
142
-
143
-
144
-
145
-
146
-
147
-
148
-
149
-
150
-
151
-
152
-
153
-
154
-
155
-
156
-
157
-
158
-
159
-
160
-
161
-
162
-
163
-
164
-
165
-
166
-
167
-
168
-
169
-
170
-
171
-
172
-
173
-
174
-
175
-
176
-
177
-
178
-
179
-
180
-
181
-
182
-
183
-
184
-
185
-
186
-
187
-
188
-
189
-
190
-
191
-
192
-
193
-
194
-
195
-
196
-
197
-
198
-
199
-
200
-
201
-
202
-
203
-
204
 |
 |
