Asus KFN5-D User Guide - Page 122
Entering the Silicon Image BIOS RAID, Configuration Utility
 |
UPC - 610839140275
View all Asus KFN5-D manuals
Add to My Manuals
Save this manual to your list of manuals |
Page 122 highlights
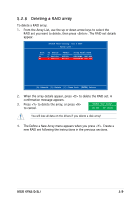
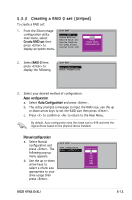
5.3.2 Entering the Silicon Image BIOS RAID Configuration Utility To enter the Silicon Image BIOS RAID configuration utility: 1. Boot up your computer. 2. During POST, press + or . The RAID BIOS setup screens shown in this section are for reference only, and may not exactly match the items on your screen. RAID Configuration Utility - Silicon Image Inc. Copyright (C) 2004 MAIN MENU Create RAID set Delete RAID set Rebuild Raid1 set Resolve Conflicts Low Level Format Logical Drive Info HELP Press "Enter" to create RAID set PHYSICAL DRIVE 0 XXXXXXXXXXX 1 XXXXXXXXXXX XXXXXXMB XXXXXXMB LOGICAL DRIVE STXXXXXXXXX STXXXXXXXXX XXXXXXMB XXXXXXMB ↑↓:Select Menu ESC:Previous Menu Enter:Select Ctrl-E:Exit The Main Menu on the upper left corner allows you to select an operation to be performed. The Main Menu options include the following: Create RAID set - creates a new legacy RAID set or allocates spare drives. Delete RAID set - deletes a RAID set or deallocates a spare drive. Rebuild RAID1 set - rebuilds a RAID 1 set (e.g., swapped drives). Resolve Conflicts - automatically restores disrupted drives on a RAID set. Low Level Format - creates a pattern of reference marks on a drive. Formatting the disks erases all data previously stored in the drive. Logical Drive Info - shows the current configuration of each RAID set. On the upper right corner of the screen is the Help message box. The message describes the function of each menu item. At the bottom of the screen is the legend box. The keys on the legend box allow you to navigate through the setup menu options. The following lists the keys found in the legend box and their corresponding functions. ↑, ↓ ESC Enter Ctrl-E : Select/Move to the next item : Previous Menu : Select : Exit 5-12 Chapter 5: RAID configuration
-
 1
1 -
2
-
3
-
4
-
5
-
6
-
7
-
8
-
9
-
10
-
11
-
12
-
13
-
14
-
15
-
16
-
17
-
18
-
19
-
20
-
21
-
22
-
23
-
24
-
25
-
26
-
27
-
28
-
29
-
30
-
31
-
32
-
33
-
34
-
35
-
36
-
37
-
38
-
39
-
40
-
41
-
42
-
43
-
44
-
45
-
46
-
47
-
48
-
49
-
50
-
51
-
52
-
53
-
54
-
55
-
56
-
57
-
58
-
59
-
60
-
61
-
62
-
63
-
64
-
65
-
66
-
67
-
68
-
69
-
70
-
71
-
72
-
73
-
74
-
75
-
76
-
77
-
78
-
79
-
80
-
81
-
82
-
83
-
84
-
85
-
86
-
87
-
88
-
89
-
90
-
91
-
92
-
93
-
94
-
95
-
96
-
97
-
98
-
99
-
100
-
101
-
102
-
103
-
104
-
105
-
106
-
107
-
108
-
109
-
110
-
111
-
112
-
113
-
114
-
115
-
116
-
 117
117 -
 118
118 -
 119
119 -
 120
120 -
 121
121 -
 122
122 -
 123
123 -
 124
124 -
 125
125 -
 126
126 -
 127
127 -
128
-
129
-
130
-
131
-
132
-
133
-
134
-
135
-
136
-
137
-
138
-
139
-
140
-
141
-
142
-
143
-
144
-
145
-
146
 |
 |
