Asus P5K WS Motherboard Installation Guide - Page 144
在功能主選單中,選擇 3. Reset Disks to Non-RAID 項目,接著按下 <Enter>
 |
UPC - 610839152223
View all Asus P5K WS manuals
Add to My Manuals
Save this manual to your list of manuals |
Page 144 highlights
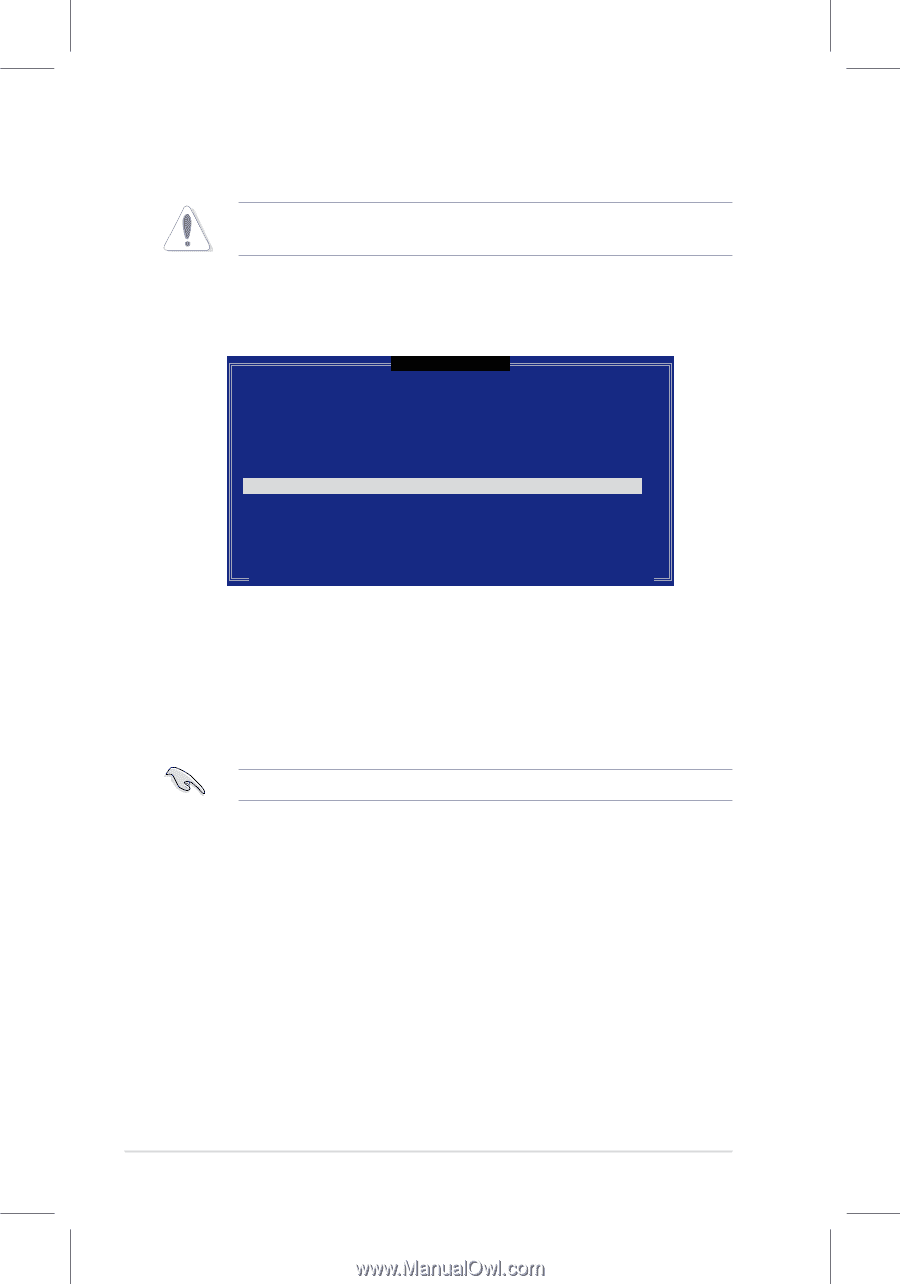
RAID RAID RAID 架構。 1 3. Reset Disks to Non-RAID Enter> [ RESET RAID DATA ] Resetting RAID data will remove internal RAID structures from the selected RAID disks. By removing these structures, the drive will revert back to a non-RAID disk. WARNING: Resetting a disk causes all data on the disk to be lost. Port Drive Model Serial # Size Status 0 XXXXXXXXXXXX XXXXXXXX XX.XGB Member Disk 1 XXXXXXXXXXXX XXXXXXXX XX.XGB Member Disk Select the disks that should be reset. [↑↓]-Previous/Next [SPACE]-Selects [ENTER]-Selection Complete 2 Space 3. 按下
-
 1
1 -
2
-
3
-
4
-
5
-
6
-
7
-
8
-
9
-
10
-
11
-
12
-
13
-
14
-
15
-
16
-
17
-
18
-
19
-
20
-
21
-
22
-
23
-
24
-
25
-
26
-
27
-
28
-
29
-
30
-
31
-
32
-
33
-
34
-
35
-
36
-
37
-
38
-
39
-
40
-
41
-
42
-
43
-
44
-
45
-
46
-
47
-
48
-
49
-
50
-
51
-
52
-
53
-
54
-
55
-
56
-
57
-
58
-
59
-
60
-
61
-
62
-
63
-
64
-
65
-
66
-
67
-
68
-
69
-
70
-
71
-
72
-
73
-
74
-
75
-
76
-
77
-
78
-
79
-
80
-
81
-
82
-
83
-
84
-
85
-
86
-
87
-
88
-
89
-
90
-
91
-
92
-
93
-
94
-
95
-
96
-
97
-
98
-
99
-
100
-
101
-
102
-
103
-
104
-
105
-
106
-
107
-
108
-
109
-
110
-
111
-
112
-
113
-
114
-
115
-
116
-
117
-
118
-
119
-
120
-
121
-
122
-
123
-
124
-
125
-
126
-
127
-
128
-
129
-
130
-
131
-
132
-
133
-
134
-
135
-
136
-
137
-
138
-
 139
139 -
 140
140 -
 141
141 -
 142
142 -
 143
143 -
 144
144 -
 145
145 -
 146
146 -
 147
147 -
 148
148 -
 149
149 -
150
-
151
-
152
 |
 |
´-²·
第五章:軟體支援
請依照下列步驟來重新設定非陣列硬碟︰
1.
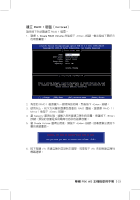
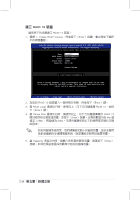
在功能主選單中,選擇 3. Reset Disks to Non-RAID 項目,接著按下 <Enter>
鍵,顯示的視窗畫面如下圖所示。
重新設定硬碟為非陣列硬碟
在您重新設定 RAID 硬碟為非陣列硬碟前必須注意,重新設定 RAID
硬碟會刪除硬碟內部的 RAID 架構。
2. 使用向上、向下方向鍵來選擇您所要設定為非陣列硬碟的硬碟機,接著
按下 <Space> 空白鍵確認。
3. 按下 <Enter> 鍵以重新設定非陣列硬碟,一個要求確認的對話框即會出
現。
3. 請按下 <Y> 鍵以確認重新設定,否則請按下 <N> 鍵以返回功能主選
單。
請按下 <Y> 鍵來刪除掉原儲存於硬碟中的所有資料。
[
RESET RAID DATA
]
Resetting RAID data will remove internal RAID structures
from the selected RAID disks. By removing these structures,
the drive will revert back to a non-RAID disk.
WARNING: Resetting a disk causes all data on the disk to be lost.
Port Drive Model
Serial #
Size Status
0 XXXXXXXXXXXX
XXXXXXXX
XX.XGB Member Disk
1 XXXXXXXXXXXX
XXXXXXXX
XX.XGB Member Disk
Select the disks that should be reset.
[
↑↓
]-Previous/Next
[SPACE]-Selects
[ENTER]-Selection Complete