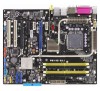
Asus P5N32-SLI-Deluxe P5N32-SLI Deluxe User's Manual for English Edition - Page 155
Silicon Image RAID configurations
 |
View all Asus P5N32-SLI-Deluxe manuals
Add to My Manuals
Save this manual to your list of manuals |
Page 155 highlights
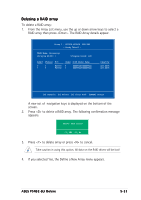
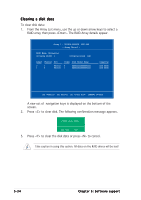
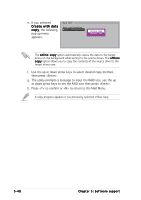
5.4.3 Silicon Image RAID configurations The Silicon Image RAID controller supports RAID 0 and RAID 1 configurations. Use the Silicon Image RAID utility to configure a disk array. Setting the BIOS RAID items After installing the hard disk drives, make sure to set the necessary RAID items in the BIOS before setting your RAID configuration. To set the BIOS RAID items: 1. Boot the system and press during the Power-On Self-Test (POST) to enter the BIOS Setup Utility. 2. From the A d v a n c e d > O n b o a r d D e v i c e s C o n f i g u r a t i o n menu item in the BIOS set the S i l i c o n I m a g e C o n t r o l l e r item to RAID Mode. See section "4.4.6 Onboard Devices Configuration" for details. 3. Save your changes and Exit Setup. Launching the Silicon Image Array Management Software Launch the Silicon Image Array Management software from Windows® XP by clicking the S t a r t button and selecting A l l P r o g r a m s > S i l i c o n I m a g e > Sam For details on the Silicon Image SATARaid™ RAID configuration, refer to the "Sil3132 SATA RAID User's Manual" in your motherboard support CD. ASUS P5N32-SLI Deluxe 5-35
-
 1
1 -
2
-
3
-
4
-
5
-
6
-
7
-
8
-
9
-
10
-
11
-
12
-
13
-
14
-
15
-
16
-
17
-
18
-
19
-
20
-
21
-
22
-
23
-
24
-
25
-
26
-
27
-
28
-
29
-
30
-
31
-
32
-
33
-
34
-
35
-
36
-
37
-
38
-
39
-
40
-
41
-
42
-
43
-
44
-
45
-
46
-
47
-
48
-
49
-
50
-
51
-
52
-
53
-
54
-
55
-
56
-
57
-
58
-
59
-
60
-
61
-
62
-
63
-
64
-
65
-
66
-
67
-
68
-
69
-
70
-
71
-
72
-
73
-
74
-
75
-
76
-
77
-
78
-
79
-
80
-
81
-
82
-
83
-
84
-
85
-
86
-
87
-
88
-
89
-
90
-
91
-
92
-
93
-
94
-
95
-
96
-
97
-
98
-
99
-
100
-
101
-
102
-
103
-
104
-
105
-
106
-
107
-
108
-
109
-
110
-
111
-
112
-
113
-
114
-
115
-
116
-
117
-
118
-
119
-
120
-
121
-
122
-
123
-
124
-
125
-
126
-
127
-
128
-
129
-
130
-
131
-
132
-
133
-
134
-
135
-
136
-
137
-
138
-
139
-
140
-
141
-
142
-
143
-
144
-
145
-
146
-
147
-
148
-
149
-
 150
150 -
 151
151 -
 152
152 -
 153
153 -
 154
154 -
 155
155 -
 156
156 -
 157
157 -
 158
158 -
 159
159 -
 160
160 -
161
-
162
-
163
-
164
-
165
-
166
-
167
-
168
-
169
-
170
-
171
-
172
-
173
-
174
-
175
-
176
-
177
-
178
 |
 |
