Asus P7P55D PREMIUM User Manual - Page 47
Connectors
 |
View all Asus P7P55D PREMIUM manuals
Add to My Manuals
Save this manual to your list of manuals |
Page 47 highlights
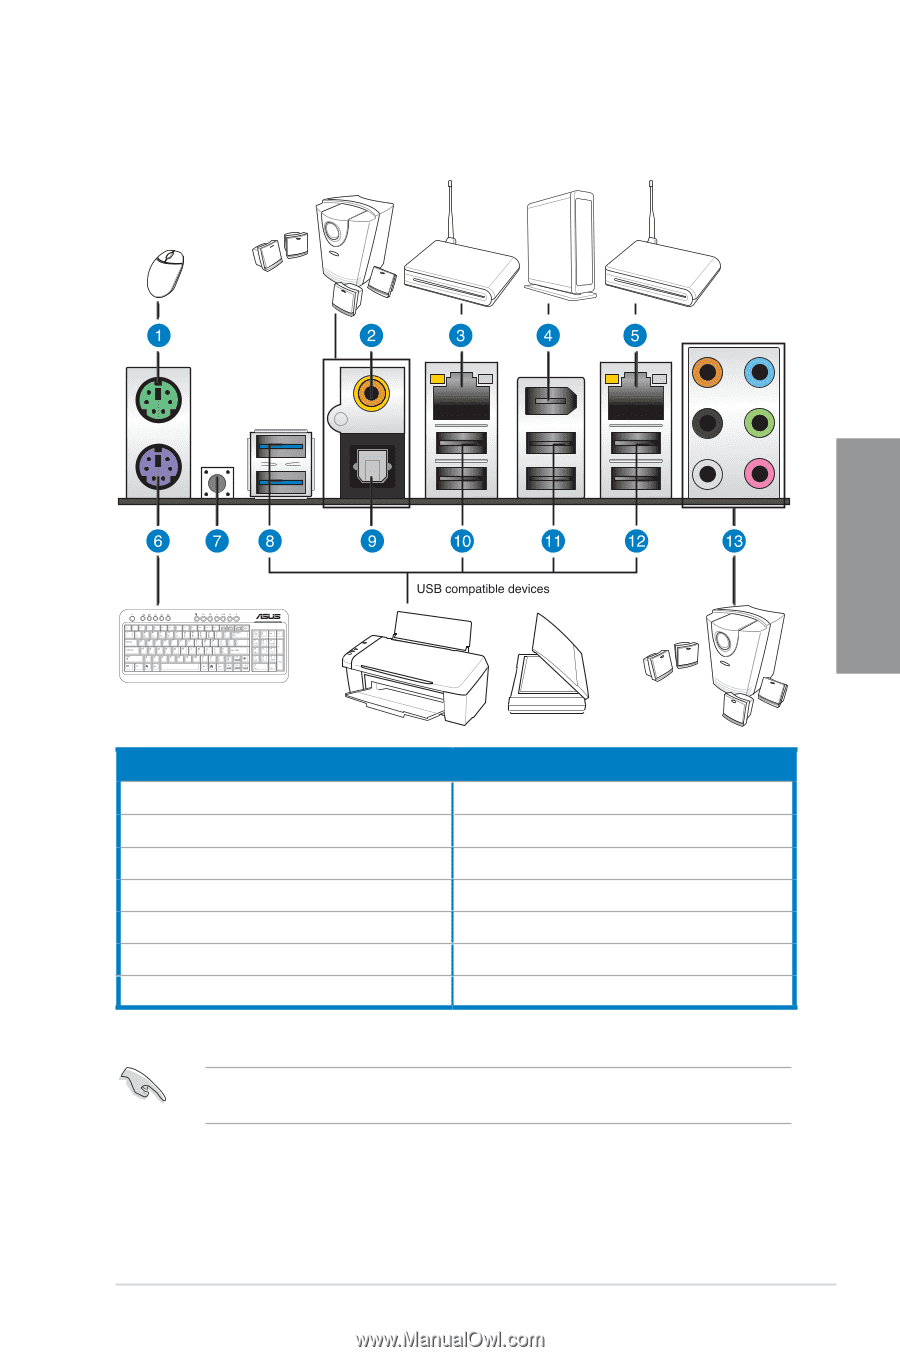
2.7 Connectors 2.7.1 Rear panel connectors Chapter 2 Rear panel connectors 1. PS/2 mouse port (green) 2. Coaxial S/PDIF Out port 3. LAN (RJ-45) port 2* 4. IEEE 1394a port 5. LAN (RJ-45) port 1* 6. PS/2 keyboard port (purple) 7. Clear CMOS switch 8. USB 2.0 ports 7 and 8 9. Optical S/PDIF Out port 10. USB 2.0 ports 5 and 6 11. USB 2.0 ports 3 and 4 12. USB 2.0 ports 1 and 2 13. Audio I/O ports** *and **: Refer to the tables on the next page for LAN port and audio port definitions. Press the Clear CMOS switch to clear BIOS setup information only when the system hangs due to overclocking. ASUS P7P55D Premium 2-27
-
 1
1 -
2
-
3
-
4
-
5
-
6
-
7
-
8
-
9
-
10
-
11
-
12
-
13
-
14
-
15
-
16
-
17
-
18
-
19
-
20
-
21
-
22
-
23
-
24
-
25
-
26
-
27
-
28
-
29
-
30
-
31
-
32
-
33
-
34
-
35
-
36
-
37
-
38
-
39
-
40
-
41
-
 42
42 -
 43
43 -
 44
44 -
 45
45 -
 46
46 -
 47
47 -
 48
48 -
 49
49 -
 50
50 -
 51
51 -
 52
52 -
53
-
54
-
55
-
56
-
57
-
58
-
59
-
60
-
61
-
62
-
63
-
64
-
65
-
66
-
67
-
68
-
69
-
70
-
71
-
72
-
73
-
74
-
75
-
76
-
77
-
78
-
79
-
80
-
81
-
82
-
83
-
84
-
85
-
86
-
87
-
88
-
89
-
90
-
91
-
92
-
93
-
94
-
95
-
96
-
97
-
98
-
99
-
100
-
101
-
102
-
103
-
104
-
105
-
106
-
107
-
108
-
109
-
110
-
111
-
112
-
113
-
114
-
115
-
116
-
117
-
118
-
119
-
120
-
121
-
122
-
123
-
124
-
125
-
126
-
127
-
128
 |
 |
ASUS P7P55D Premium
2-27
Chapter 2
2.7
Connectors
2.7.1
Rear panel connectors
Rear panel connectors
1.
PS/2 mouse port (green)
8.
USB 2.0 ports 7 and 8
2.
Coaxial S/PDIF Out port
9.
Optical S/PDIF Out port
3.
LAN (RJ-45) port 2*
10. USB 2.0 ports 5 and 6
4.
IEEE 1394a port
11. USB 2.0 ports 3 and 4
5.
LAN (RJ-45) port 1*
12. USB 2.0 ports 1 and 2
6.
PS/2 keyboard port (purple)
13. Audio I/O ports**
7.
Clear CMOS switch
*and **: Refer to the tables on the next page for LAN port and audio port definitions.
Press the Clear CMOS switch to clear BIOS setup information only when the system hangs
due to overclocking.