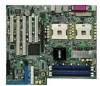
Asus PCH-DL User Manual - Page 27
CPU, having its angled side
 |
View all Asus PCH-DL manuals
Add to My Manuals
Save this manual to your list of manuals |
Page 27 highlights
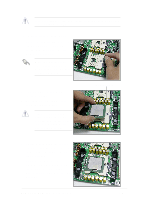
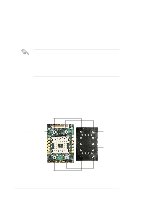
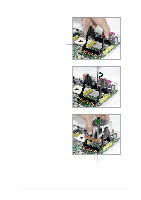
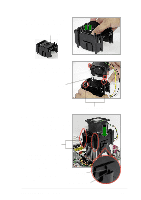
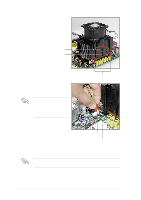
2. Place the heatsink retention mechanism over the CPU socket, matching its holes with the four holes on the motherboard and the standoffs on the thermal plate. Heatsink retention mechanism 3. Secure the retention mechanism with the thermal plate using four screws. 4. Position the heatsink on top of the CPU, having its angled side (with cut corners) facing the memory sockets. Make sure that the heatsink base fits completely on the retention mechanism. Heatsink angled side ASUS PCH-DL Deluxe motherboard 2-9
-
 1
1 -
2
-
3
-
4
-
5
-
6
-
7
-
8
-
9
-
10
-
11
-
12
-
13
-
14
-
15
-
16
-
17
-
18
-
19
-
20
-
21
-
 22
22 -
 23
23 -
 24
24 -
 25
25 -
 26
26 -
 27
27 -
 28
28 -
 29
29 -
 30
30 -
 31
31 -
 32
32 -
33
-
34
-
35
-
36
-
37
-
38
-
39
-
40
-
41
-
42
-
43
-
44
-
45
-
46
-
47
-
48
-
49
-
50
-
51
-
52
-
53
-
54
-
55
-
56
-
57
-
58
-
59
-
60
-
61
-
62
-
63
-
64
-
65
-
66
-
67
-
68
-
69
-
70
-
71
-
72
-
73
-
74
-
75
-
76
-
77
-
78
-
79
-
80
-
81
-
82
-
83
-
84
-
85
-
86
-
87
-
88
-
89
-
90
-
91
-
92
-
93
-
94
-
95
-
96
-
97
-
98
-
99
-
100
 |
 |

ASUS PCH-DL Deluxe motherboard
2-9
2.
Place the heatsink retention
mechanism over the CPU socket,
matching its holes with the four
holes on the motherboard and the
standoffs on the thermal plate.
3.
Secure the retention mechanism
with the thermal plate using four
screws.
4.
Position the heatsink on top of the
CPU, having its angled side (with
cut corners) facing the memory
sockets. Make sure that the
heatsink base fits completely on
the retention mechanism.
Heatsink angled side
Heatsink retention mechanism