Asus PRIME X470-PRO Users Manual English - Page 36
CPU heatsink and fan assembly installation, Type 1
 |
View all Asus PRIME X470-PRO manuals
Add to My Manuals
Save this manual to your list of manuals |
Page 36 highlights
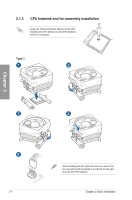
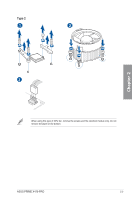
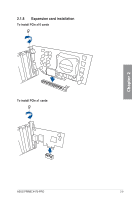
2.1.3 CPU heatsink and fan assembly installation Apply the Thermal Interface Material to the CPU heatsink and CPU before you install the heatsink and fan if necessary. Type 1 1 2 Chapter 2 3 5 2-4 4 When installing the fan, place the cam lever side of the fan opposite the M.2 heatsink to avoid that the fan gets stuck by the PCH heatsink. Chapter 2: Basic Installation
-
 1
1 -
2
-
3
-
4
-
5
-
6
-
7
-
8
-
9
-
10
-
11
-
12
-
13
-
14
-
15
-
16
-
17
-
18
-
19
-
20
-
21
-
22
-
23
-
24
-
25
-
26
-
27
-
28
-
29
-
30
-
 31
31 -
 32
32 -
 33
33 -
 34
34 -
 35
35 -
 36
36 -
 37
37 -
 38
38 -
 39
39 -
 40
40 -
 41
41 -
42
-
43
-
44
-
45
-
46
-
47
-
48
-
49
-
50
-
51
-
52
-
53
-
54
-
55
-
56
-
57
-
58
-
59
-
60
-
61
-
62
-
63
-
64
-
65
-
66
-
67
-
68
-
69
-
70
-
71
-
72
-
73
-
74
-
75
-
76
-
77
-
78
-
79
 |
 |

2-4
Chapter 2: Basic Installation
Chapter 2
Type 1
1
2
3
4
2.1.3
CPU heatsink and fan assembly installation
Apply the Thermal Interface Material to the CPU
heatsink and CPU before you install the heatsink
and fan if necessary.
5
When installing the fan, place the cam lever side of the
fan opposite the M.2 heatsink to avoid that the fan gets
stuck by the PCH heatsink.