Asus ProArt Display PA27AC PA27A Series User Guide - Page 16
Adjusting the monitor, Swivel, Height adjustment
 |
View all Asus ProArt Display PA27AC manuals
Add to My Manuals
Save this manual to your list of manuals |
Page 16 highlights
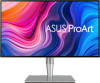
• The VESA wall mount kit (100 x 100 mm) is purchased separately. • Use only the UL Listed Wall Mount Bracket with minimum weight/load 22.7kg (Screw size: M4 x 10 mm). 2.3 Adjusting the monitor • For optimal viewing, we recommend that you look at the full face of the monitor, then adjust the monitor to the angle that is most comfortable for you. • Hold the stand to prevent the monitor from falling when you change its angle. • You can adjust the monitor's angle from +23˚ to -5˚, and it allows 60˚ swivel adjustment from either left or right. You can also adjust the monitor's height within +/- 120 mm. (Tilt) (Swivel) (Height adjustment) +23° ~ -5° 60° 60° 0° 120mm 2-2 Chapter 2: Setup
-
 1
1 -
2
-
3
-
4
-
5
-
6
-
7
-
8
-
9
-
10
-
 11
11 -
 12
12 -
 13
13 -
 14
14 -
 15
15 -
 16
16 -
 17
17 -
 18
18 -
 19
19 -
 20
20 -
 21
21 -
22
-
23
-
24
-
25
-
26
-
27
-
28
-
29
-
30
-
31
-
32
-
33
 |
 |

2-2
Chapter 2: Setup
•
The VESA wall mount kit (100 x 100 mm) is purchased separately.
•
Use only the UL Listed Wall Mount Bracket with minimum weight/load
22.7kg (Screw size: M4 x 10 mm).
2.3
Adjusting the monitor
•
For optimal viewing, we recommend that you look at the full face of the
monitor, then adjust the monitor to the angle that is most comfortable for you.
•
Hold the stand to prevent the monitor from falling when you change its angle.
•
You can adjust the monitor’s angle from +23˚ to -5˚, and it allows
60˚
swivel
adjustment from either left or right. You can also adjust the monitor’s height
within +/- 120 mm.
120mm
60°
0°
60°
+23° ~ -5°
(Tilt)
(Swivel)
(Height adjustment)