Asus ProArt PA27UCX-K PA27UCX Series User Guide - Page 10
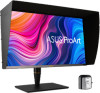
Monitor introduction, 1.3.1 Front view, Front view
 |
View all Asus ProArt PA27UCX-K manuals
Add to My Manuals
Save this manual to your list of manuals |
Page 10 highlights
1.3 Monitor introduction 1.3.1 Front view Menu Close Input Select QuickFit Brightness HDR 1 2 3 4 5 6 7 1. Menu (5-way) button: • Enter the OSD menu. • Enact the selected OSD menu items. • Increase/Decrease values or move your selection up/down/left/right. 2. Close button: • Exit the OSD menu. • Toggle the Key Lock function between on and off with a long press for 5 seconds. 3. Input select button: • Select an available input source. Press button (Input Select button) to display HDMI-1, HDMI-2, DisplayPort , USB 3.1 Type-C ( ) signals after you connect HDMI/DisplayPort/USB Type-C cable with the monitor. 4. QuickFit button: • This is a hotkey to activate the QuickFit function designed for alignment. • The QuickFit function contains 7 types of alignment patterns. (Please refer to 1.3.3 QuickFit Function). 1-2 Chapter 1: Product introduction
-
 1
1 -
2
-
3
-
4
-
 5
5 -
 6
6 -
 7
7 -
 8
8 -
 9
9 -
 10
10 -
 11
11 -
 12
12 -
 13
13 -
 14
14 -
 15
15 -
16
-
17
-
18
-
19
-
20
-
21
-
22
-
23
-
24
-
25
-
26
-
27
-
28
-
29
-
30
-
31
-
32
-
33
-
34
-
35
-
36
-
37
 |
 |
