Asus Pundit-R Pundit-R User Manual - Page 21
Installing a CPU - 478
 |
View all Asus Pundit-R manuals
Add to My Manuals
Save this manual to your list of manuals |
Page 21 highlights
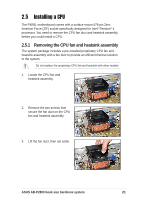
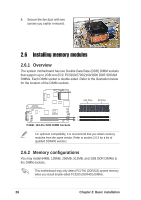
2.5 Installing a CPU The P4R8L motherboard comes with a surface mount 478-pin Zero Insertion Force (ZIF) socket specifically designed for Intel® Pentium® 4 processor. You need to remove the CPU fan duct and heatsink assembly before you could install a CPU. 2.5.1 Removing the CPU fan and heatsink assembly The system package includes a pre-installed proprietary CPU fan and heatsink assembly with a fan duct to provide an efficient thermal solution to the system. Do not replace the proprietary CPU fan and heatsink with other models. 1. Locate the CPU fan and heatsink assembly. 2. Remove the two screws that secure the fan duct on the CPU fan and heatsink assembly. 3. Lift the fan duct, then set aside. ASUS AB-P2800 book size barebone system 21
-
 1
1 -
2
-
3
-
4
-
5
-
6
-
7
-
8
-
9
-
10
-
11
-
12
-
13
-
14
-
15
-
 16
16 -
 17
17 -
 18
18 -
 19
19 -
 20
20 -
 21
21 -
 22
22 -
 23
23 -
 24
24 -
 25
25 -
 26
26 -
27
-
28
-
29
-
30
-
31
-
32
-
33
-
34
-
35
-
36
-
37
-
38
-
39
-
40
-
41
-
42
-
43
-
44
-
45
-
46
-
47
-
48
-
49
-
50
-
51
-
52
-
53
-
54
-
55
-
56
-
57
-
58
-
59
-
60
-
61
-
62
-
63
-
64
-
65
-
66
-
67
-
68
-
69
-
70
-
71
-
72
-
73
-
74
-
75
-
76
-
77
-
78
-
79
-
80
-
81
-
82
-
83
-
84
-
85
-
86
-
87
-
88
-
89
-
90
-
91
-
92
-
93
-
94
-
95
-
96
-
97
-
98
 |
 |

21
ASUS AB-P2800 book size barebone system
2.5
Installing a CPU
The P4R8L motherboard comes with a surface mount 478-pin Zero
Insertion Force (ZIF) socket specifically designed for Intel
®
Pentium
®
4
processor. You need to remove the CPU fan duct and heatsink assembly
before you could install a CPU.
2.5.1
Removing the CPU fan and heatsink assembly
The system package includes a pre-installed proprietary CPU fan and
heatsink assembly with a fan duct to provide an efficient thermal solution
to the system.
Do not replace the proprietary CPU fan and heatsink with other models.
1.
Locate the CPU fan and
heatsink assembly.
2.
Remove the two screws that
secure the fan duct on the CPU
fan and heatsink assembly.
3.
Lift the fan duct, then set aside.