Asus RS320Q-E7 RS12 User Guide - Page 23
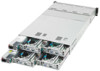
Removing the server node, ASUS RS320Q-E7/RS12, Hold the server node lever and press the node latch.
 |
View all Asus RS320Q-E7 RS12 manuals
Add to My Manuals
Save this manual to your list of manuals |
Page 23 highlights
Removing the server node 1. Remove the screw located on the node latch. 2. Hold the server node lever and press the node latch. 3. Firmly pull the server node out of the server chassis. When installing only two nodes, install the nodes to node slot number 1 and 3 or number 2 and 4. Refer to section 1.5 Rear panel features for details. ASUS RS320Q-E7/RS12 2-3
-
 1
1 -
2
-
3
-
4
-
5
-
6
-
7
-
8
-
9
-
10
-
11
-
12
-
13
-
14
-
15
-
16
-
17
-
 18
18 -
 19
19 -
 20
20 -
 21
21 -
 22
22 -
 23
23 -
 24
24 -
 25
25 -
 26
26 -
 27
27 -
 28
28 -
29
-
30
-
31
-
32
-
33
-
34
-
35
-
36
-
37
-
38
-
39
-
40
-
41
-
42
-
43
-
44
-
45
-
46
-
47
-
48
-
49
-
50
-
51
-
52
-
53
-
54
-
55
-
56
-
57
-
58
-
59
-
60
-
61
-
62
-
63
-
64
-
65
-
66
-
67
-
68
-
69
-
70
-
71
-
72
-
73
-
74
-
75
-
76
-
77
-
78
-
79
-
80
-
81
-
82
-
83
-
84
-
85
-
86
-
87
-
88
-
89
-
90
-
91
-
92
-
93
-
94
-
95
-
96
-
97
-
98
-
99
-
100
-
101
-
102
-
103
-
104
-
105
-
106
-
107
-
108
-
109
-
110
-
111
-
112
-
113
-
114
-
115
-
116
-
117
-
118
-
119
-
120
-
121
-
122
-
123
-
124
-
125
-
126
-
127
-
128
-
129
-
130
-
131
-
132
-
133
-
134
-
135
-
136
-
137
-
138
-
139
-
140
-
141
-
142
-
143
-
144
-
145
-
146
-
147
-
148
-
149
-
150
-
151
-
152
-
153
-
154
-
155
-
156
-
157
-
158
 |
 |

2-3
ASUS RS320Q-E7/RS12
Removing the server node
2.
Hold the server node lever and press the node latch.
3.
Firmly pull the server node out of the server chassis.
When installing only two nodes, install the nodes to node slot number 1 and 3 or number 2
and 4. Refer to section
1.5 Rear panel features
for details.
1.
Remove the screw located on the node latch.