Asus RS320Q-E7 RS12 User Guide - Page 40
Installing ASUS PIKE Riser Card (optional), Hardware setup
 |
View all Asus RS320Q-E7 RS12 manuals
Add to My Manuals
Save this manual to your list of manuals |
Page 40 highlights
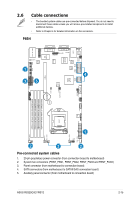
2.7.4 Installing ASUS PIKE Riser Card (optional) To install ASUS PIKE riser card: 1. Remove the three screws on the riser card bracket. 2. Firmly hold the riser card bracket, and pull it up to detach it from the PCI Express x16 slot on the motherboard. 3. Locate the two screws on the riser card bracket, then remove the screws from the bracket. 4. Locate the two screw holes on the PIKE riser card. 5. Secure the PIKE riser card to the riser card bracket with two screws. 2-20 Chapter 2: Hardware setup
-
 1
1 -
2
-
3
-
4
-
5
-
6
-
7
-
8
-
9
-
10
-
11
-
12
-
13
-
14
-
15
-
16
-
17
-
18
-
19
-
20
-
21
-
22
-
23
-
24
-
25
-
26
-
27
-
28
-
29
-
30
-
31
-
32
-
33
-
34
-
 35
35 -
 36
36 -
 37
37 -
 38
38 -
 39
39 -
 40
40 -
 41
41 -
 42
42 -
 43
43 -
 44
44 -
 45
45 -
46
-
47
-
48
-
49
-
50
-
51
-
52
-
53
-
54
-
55
-
56
-
57
-
58
-
59
-
60
-
61
-
62
-
63
-
64
-
65
-
66
-
67
-
68
-
69
-
70
-
71
-
72
-
73
-
74
-
75
-
76
-
77
-
78
-
79
-
80
-
81
-
82
-
83
-
84
-
85
-
86
-
87
-
88
-
89
-
90
-
91
-
92
-
93
-
94
-
95
-
96
-
97
-
98
-
99
-
100
-
101
-
102
-
103
-
104
-
105
-
106
-
107
-
108
-
109
-
110
-
111
-
112
-
113
-
114
-
115
-
116
-
117
-
118
-
119
-
120
-
121
-
122
-
123
-
124
-
125
-
126
-
127
-
128
-
129
-
130
-
131
-
132
-
133
-
134
-
135
-
136
-
137
-
138
-
139
-
140
-
141
-
142
-
143
-
144
-
145
-
146
-
147
-
148
-
149
-
150
-
151
-
152
-
153
-
154
-
155
-
156
-
157
-
158
 |
 |

Chapter 2:
Hardware setup
2-20
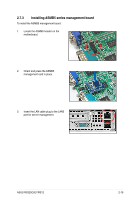
2.7.4
Installing ASUS PIKE Riser Card (optional)
To install ASUS PIKE riser card:
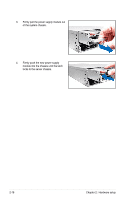
3.
Locate the two screws on the riser card
bracket, then remove the screws from
the bracket.
4.
Locate the two screw holes on the PIKE
riser card.
2.
Firmly hold the riser card bracket,
and pull it up to detach it from the PCI
Express x16 slot on the motherboard.
1.
Remove the three screws on the riser
card bracket.
5.
Secure the PIKE riser card to the riser
card bracket with two screws.