Asus RS500A-S6 PS4 User Guide - Page 42
Installing friction rail kit items
 |
View all Asus RS500A-S6 PS4 manuals
Add to My Manuals
Save this manual to your list of manuals |
Page 42 highlights
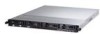
3.1 Installing friction rail kit items Your friction rail kit package contains: • Two pairs of rack rails (for the rack) • Nut-and-bolt type screws and one pair of server latches Nuts and screws Front rack rails Rear rack rails 3.1.1 Attaching the fixing latches to the server Refer to the image below for the locations to attach the two fixing latches to the two sides of the server with four screws. Fixing latch 3-2 Chapter 3: Installation options
-
 1
1 -
2
-
3
-
4
-
5
-
6
-
7
-
8
-
9
-
10
-
11
-
12
-
13
-
14
-
15
-
16
-
17
-
18
-
19
-
20
-
21
-
22
-
23
-
24
-
25
-
26
-
27
-
28
-
29
-
30
-
31
-
32
-
33
-
34
-
35
-
36
-
 37
37 -
 38
38 -
 39
39 -
 40
40 -
 41
41 -
 42
42 -
 43
43 -
 44
44 -
 45
45 -
 46
46 -
 47
47 -
48
-
49
-
50
-
51
-
52
-
53
-
54
-
55
-
56
-
57
-
58
-
59
-
60
-
61
-
62
-
63
-
64
-
65
-
66
-
67
-
68
-
69
-
70
-
71
-
72
-
73
-
74
-
75
-
76
-
77
-
78
-
79
-
80
-
81
-
82
-
83
-
84
-
85
-
86
-
87
-
88
-
89
-
90
-
91
-
92
-
93
-
94
-
95
-
96
-
97
-
98
-
99
-
100
-
101
-
102
-
103
-
104
-
105
-
106
-
107
-
108
-
109
-
110
-
111
-
112
-
113
-
114
-
115
-
116
-
117
-
118
-
119
-
120
-
121
-
122
-
123
-
124
-
125
-
126
-
127
-
128
-
129
-
130
-
131
-
132
-
133
-
134
-
135
-
136
-
137
-
138
-
139
-
140
-
141
-
142
 |
 |

Chapter 3:
Installation options
3-2
3.1
Installing friction rail kit items
Your friction rail kit package contains:
•
Two pairs of rack rails (for the rack)
•
Nut-and-bolt type screws and one pair of server latches
Nuts and screws
Front rack rails
Rear rack rails
3.1.1
Attaching the fixing latches to the server
Refer to the image below for the locations to attach the two fixing latches to the two
sides of the server with four screws.
Fixing latch