Asus TS500-E6/PS4 User Guide - Page 36
Removing and reinstalling the backplane, Remove all hot-swap HDD trays
 |
UPC - 610839689828
View all Asus TS500-E6/PS4 manuals
Add to My Manuals
Save this manual to your list of manuals |
Page 36 highlights
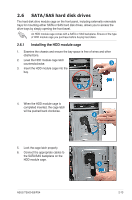
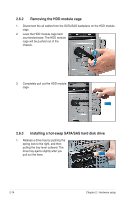
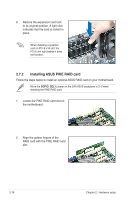
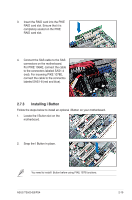
6. Push the tray lever until it clicks, and secures the drive tray in place. The drive tray is correctly placed when its front edge aligns with the bay edge. 7. Repeat steps 1 to 6 if you wish to install a second SATAII/SAS drive. 2.6.4 Removing and reinstalling the backplane DO NOT remove the backplane unless necessary! 1. Remove all hot-swap HDD trays from the chassis. 2. Disconnect all cables from the SATA/SAS backplane. 3. Loosen the four screws on the backplane. 4. Firmly hold the backplane, lift it up and remove it from the module. 5. Follow the previous instructions in reverse to reinstall the backplane. 2-16 Chapter 2: Hardware setup
-
 1
1 -
2
-
3
-
4
-
5
-
6
-
7
-
8
-
9
-
10
-
11
-
12
-
13
-
14
-
15
-
16
-
17
-
18
-
19
-
20
-
21
-
22
-
23
-
24
-
25
-
26
-
27
-
28
-
29
-
30
-
 31
31 -
 32
32 -
 33
33 -
 34
34 -
 35
35 -
 36
36 -
 37
37 -
 38
38 -
 39
39 -
 40
40 -
 41
41 -
42
-
43
-
44
-
45
-
46
-
47
-
48
-
49
-
50
-
51
-
52
-
53
-
54
-
55
-
56
-
57
-
58
-
59
-
60
-
61
-
62
-
63
-
64
-
65
-
66
-
67
-
68
-
69
-
70
-
71
-
72
-
73
-
74
-
75
-
76
-
77
-
78
-
79
-
80
-
81
-
82
-
83
-
84
-
85
-
86
-
87
-
88
-
89
-
90
-
91
-
92
-
93
-
94
-
95
-
96
-
97
-
98
-
99
-
100
-
101
-
102
-
103
-
104
-
105
-
106
-
107
-
108
-
109
-
110
-
111
-
112
-
113
-
114
-
115
-
116
-
117
-
118
-
119
-
120
-
121
-
122
-
123
-
124
-
125
-
126
-
127
-
128
-
129
-
130
-
131
-
132
-
133
-
134
-
135
-
136
-
137
-
138
-
139
-
140
-
141
-
142
-
143
-
144
-
145
-
146
-
147
-
148
-
149
-
150
-
151
-
152
-
153
-
154
-
155
-
156
-
157
-
158
-
159
-
160
-
161
-
162
 |
 |

Chapter 2:
Hardware setup
2-16
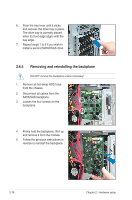
2.6.4
Removing and reinstalling the backplane
DO NOT remove the backplane unless necessary!
1.
Remove all hot-swap HDD trays
from the chassis.
2.
Disconnect all cables from the
SATA/SAS backplane.
3.
Loosen the four screws on the
backplane.
4.
Firmly hold the backplane, lift it up
and remove it from the module.
5.
Follow the previous instructions in
reverse to reinstall the backplane.
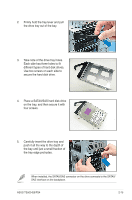
6.
Push the tray lever until it clicks,
and secures the drive tray in place.
The drive tray is correctly placed
when its front edge aligns with the
bay edge.
7.
Repeat steps 1 to 6 if you wish to
install a second SATAII/SAS drive.