Asus VENTO 3600 Vento3600 User''''s Manual for English Edition - Page 27
The Magic Mask
 |
View all Asus VENTO 3600 manuals
Add to My Manuals
Save this manual to your list of manuals |
Page 27 highlights
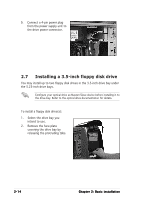
2. The Magic Mask® lifts to reveal the face plates of the drive bays. 3. Slide the drive bay lock to the left, towards the sign, to unlock the drive bay. 4. Carefully insert the optical drive into the bay, then push it inward until it is completely flushed to the chassis front panel. 5. Align the screw holes as shown. 6. Slide the drive bay lock to the right, towards the sign to lock the drive bay and to secure the drive in place. The drive bay lock has a screwless design that allows you to secure the optical drive without screws. However, we recommend that you still drive screws into the bay to ensure a firm fit. ASUS VENTO 3600 2-11
-
 1
1 -
2
-
3
-
4
-
5
-
6
-
7
-
8
-
9
-
10
-
11
-
12
-
13
-
14
-
15
-
16
-
17
-
18
-
19
-
20
-
21
-
 22
22 -
 23
23 -
 24
24 -
 25
25 -
 26
26 -
 27
27 -
 28
28 -
 29
29 -
 30
30 -
 31
31 -
 32
32 -
33
-
34
-
35
-
36
 |
 |

2-11
2-11
2-11
2-11
2-11
ASUS VENTO 3600
ASUS VENTO 3600
ASUS VENTO 3600
ASUS VENTO 3600
ASUS VENTO 3600
2.
The Magic Mask
®
lifts to
reveal the face plates of the
drive bays.
3.
Slide the drive bay lock to the
left, towards the
sign, to
unlock the drive bay.
4.
Carefully insert the optical
drive into the bay, then push
it inward until it is completely
flushed to the chassis front
panel.
5.
Align the screw holes as
shown.
6.
Slide the drive bay lock to the
right, towards the
sign to
lock the drive bay and to
secure the drive in place.
The drive bay lock has a screwless design that allows you to secure the
optical drive without screws. However, we recommend that you still
drive screws into the bay to ensure a firm fit.